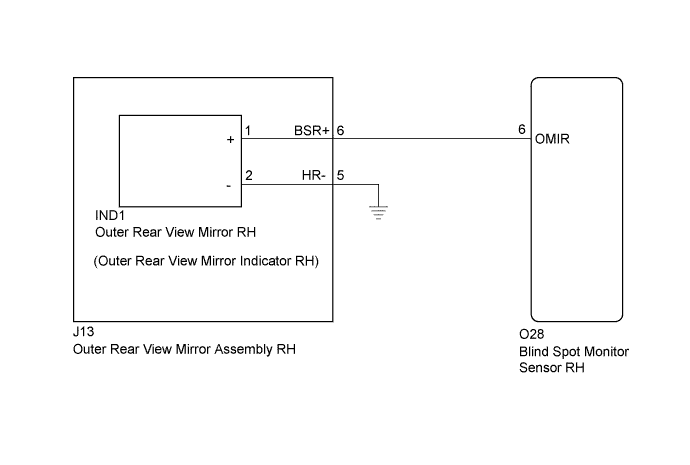
DTC C1AB4 Open in Outer Mirror Indicator(Master) |
| DTC No. | DTC Detection Condition | Trouble Area |
| C1AB4 | Both of the following conditions are met:
|
|
| 1.CHECK DTC |
Clear the DTCs (Click here).
Recheck for DTCs and check if the same DTC is output again.
|
| ||||
| OK | ||
 | ||
| ||
| 2.CHECK HARNESS AND CONNECTOR (BLIND SPOT MONITOR SENSOR RH - OUTER REAR VIEW MIRROR ASSEMBLY RH) |
Disconnect connector O28 from the blind spot monitor sensor RH.
Disconnect connector J13 from the outer rear view mirror assembly RH.
Measure the resistance according to the value(s) in the table below.
| Tester Connection | Condition | Specified Condition |
| O28-6 (OMIR) - J13-6 (BSR+) | Always | Below 1 Ω |
| J13-5 (HR-) - Body ground | Always | Below 1 Ω |
|
| ||||
| OK | |
 |
| 3.INSPECT OUTER REAR VIEW MIRROR RH (OUTER REAR VIEW MIRROR INDICATOR RH) |
Disconnect connector J13 from the outer rear view mirror assembly RH.
Check that the outer rear view mirror indicator turns on.
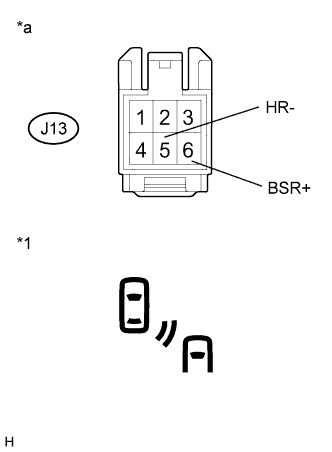 |
Apply battery voltage to the outer rear view mirror RH (outer rear view mirror indicator RH) and check that the outer rear view mirror indicator turns on.
| Connection | Specified Condition |
| Battery positive (+) → J13-6 (BSR+) Battery negative (-) → J13-5 (HR-) | Indicator turns on |
| *1 | Outer Rear View Mirror Indicator RH |
| *a | Component without harness connected (Outer Rear View Mirror Assembly RH) |
|
| ||||
| OK | ||
| ||
| ||
| 4.CHECK HARNESS AND CONNECTOR (OUTER REAR VIEW MIRROR RH - OUTER REAR VIEW MIRROR ASSEMBLY RH) |
Disconnect connector IND1 from the outer rear view mirror RH.
Measure the resistance according to the value(s) in the table below.
| Tester Connection | Condition | Specified Condition |
| J13-6 (BSR+) - IND1-1 (+) | Always | Below 1 Ω |
| J13-5 (HR-) - IND1-2 (-) | Always | Below 1 Ω |
|
| ||||
| OK | ||
| ||
| ||

