Home › Vehicle Interior › DOOR LOCK › DOOR CONTROL RECEIVER

DOOR CONTROL RECEIVER > INSTALLATION

for Preparation Click here


1. INSTALL DOOR CONTROL RECEIVER (w/o Tire Pressure Warning System)
  1. Install the door control receiver with the bolt.

  1. Connect the connector.


2. INSTALL DOOR CONTROL AND TIRE PRESSURE MONITORING SYSTEM RECEIVER ASSEMBLY (w/ Tire Pressure Warning System)
  1. Install the door control and tire pressure monitoring system receiver assembly with the bolt.

  1. Connect the connector.


3. INSTALL ROOF SIDE INNER GARNISH RH

HINT:
Use the same procedure for the RH side and LH side .


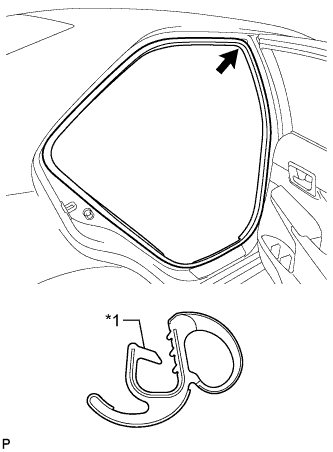
4. INSTALL REAR DOOR OPENING TRIM WEATHERSTRIP RH


    B278983E01
  1. Align the alignment mark (Blue) on the weatherstrip with the protruding portion on the body indicated by the arrow in the illustration, and install the rear door opening trim weatherstrip RH.
    Text in Illustration 
    *1
    Alignment Mark (Blue)

    NOTICE:
    After installation, check that the corners fit correctly.


5. INSTALL REAR SIDE SEATBACK ASSEMBLY RH
  1. Engage the hook.

  1. Install the rear side seatback assembly RH with the 2 bolts.

    Torque:
    18 N*m{ 184 kgf*cm , 13 ft.*lbf }

  1. Connect the connector.

  1. Connect the rear seat outer belt to the rear seat shoulder belt guide.


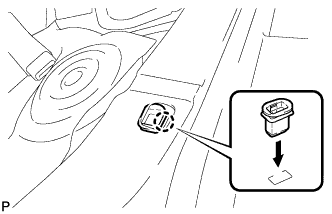
6. INSTALL REAR SEAT CUSHION LOCK HOOK


    B280246
  1. Engage the claw to install a new rear seat cushion lock hook.

    NOTICE:
    Rear seat cushion lock hooks must not be reused.

    HINT:
    Use the same procedure for the RH side and the LH side.


7. INSTALL REAR SEAT CUSHION ASSEMBLY
  1. Place the rear seat cushion assembly in the cabin.

    NOTICE:
    Be careful not to damage the vehicle body.


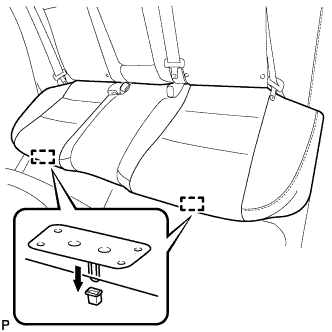
    B280250
  1. Engage the 2 hooks of the seat cushion to the vehicle body as shown in the illustration.

  1. Confirm that the seat cushion is firmly installed.

    NOTICE:
    When installing the seat cushion, make sure that the seat belt buckles are not under the seat cushion.


8. CONNECT CABLE TO NEGATIVE BATTERY TERMINAL

NOTICE:
When disconnecting the cable, some systems need to be initialized after the cable is reconnected (Click here).


9. REGISTER DOOR CONTROL TRANSMITTER MODULE SET SUB-ASSEMBLY ID (w/o Smart Key System)

HINT:
In case of door control receiver or door control and tire pressure monitoring system receiver assembly replacement (Click here).


10. REGISTER TRANSMITTER ID (w/ Tire Pressure Warning System)

HINT:
In case of door control and tire pressure monitoring system receiver assembly replacement (Click here).


11. INSPECT TIRE PRESSURE WARNING SYSTEM (w/ Tire Pressure Warning System)

HINT:
In case of door control and tire pressure monitoring system receiver assembly replacement (Click here).


12. PERFORM INITIALIZATION (w/ Tire Pressure Warning System)

HINT:
In case of door control and tire pressure monitoring system receiver assembly replacement (Click here).


13. INSPECT SRS WARNING LIGHT
  1. for Built-in Type Yaw Rate Sensor: (Click here)
  2. for Separate Type Yaw Rate Sensor: (Click here)