2GR-FE ENGINE MECHANICAL CYLINDER HEAD GASKET INSTALLATION
CAUTION / NOTICE / HINT
- HINT:
-
Perform "Inspection After Repair" after replacing the cylinder head RH or cylinder head LH.
-
Click hereEngine / Hybrid System>2GR-FE ENGINE CONTROL>SFI SYSTEM>INITIALIZATION
PROCEDURE

 11115
1.INSTALL CYLINDER HEAD GASKET RH
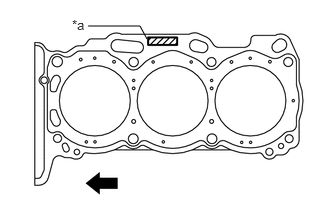
| *a | Lot No. |

|
Engine Front |
Place a new cylinder head gasket RH on the cylinder block surface with the Lot No. stamp facing upward.
- NOTICE:
-
Be careful of the installation direction.
11101
2.INSTALL CYLINDER HEAD SUB-ASSEMBLY RH
Place the cylinder head on the cylinder block.
- NOTICE:
- ·
Be careful not to allow oil to adhere to the bottom part of the cylinder head.
·Gently lower the cylinder head in order not to damage the gasket with the bottom part of the head.
- HINT:
-
The cylinder head bolts are tightened in 3 progressive steps.
Apply a light coat of engine oil to the threads and under the heads of the cylinder head bolts.
Step 1
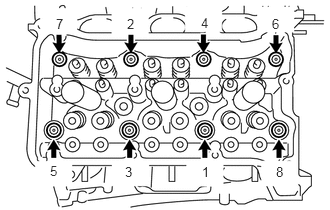
Using a 10 mm bi-hexagon wrench, install and uniformly tighten the 8 cylinder head bolts with the plate washers in several steps and in the sequence shown in the illustration.
- Torque:
- 36 N*m (367 kgf*cm, 27 ft.*lbf)
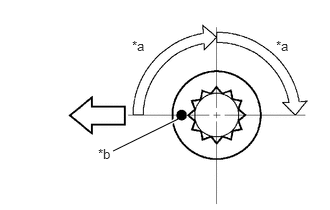
| *a | Turn 90° |
| *b | Painted Mark |

|
Engine Front |
Step 2
Mark each cylinder head bolt head with paint as shown in the illustration.
Tighten the cylinder head bolts 90° in the sequence shown in step 1.
Step 3
Tighten the cylinder head bolts an additional 90° in the sequence shown in step 1.
Check that the painted mark is now facing rearward.
- HINT:
-
Perform "Inspection After Repair" after replacing the cylinder head RH.
-
Click hereEngine / Hybrid System>2GR-FE ENGINE CONTROL>SFI SYSTEM>INITIALIZATION
11116
3.INSTALL CYLINDER HEAD GASKET LH
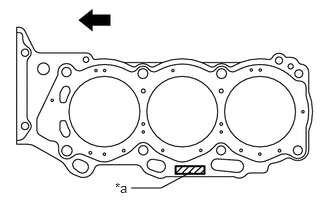
| *a | Lot No. |
|
|
Engine Front |
Place a new cylinder head gasket LH on the cylinder block surface with the Lot No. stamp facing upward.
- NOTICE:
-
Be careful of the installation direction.
11102
4.INSTALL CYLINDER HEAD SUB-ASSEMBLY LH
Place the cylinder head on the cylinder block.
- NOTICE:
- ·
Be careful not to allow oil to adhere to the bottom part of the cylinder head.
·Gently lower the cylinder head in order not to damage the gasket with the bottom part of the head.
- HINT:
-
The cylinder head bolts are tightened in 3 progressive steps.
Apply a light coat of engine oil to the threads and under the heads of the cylinder head bolts.
Step 1
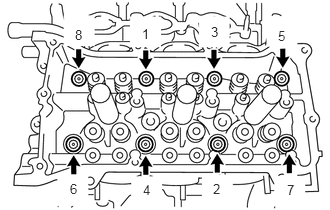
Using a 10 mm bi-hexagon wrench, install and uniformly tighten the 8 cylinder head bolts with the plate washers in several steps in the sequence shown in the illustration.
- Torque:
- 36 N*m (367 kgf*cm, 27 ft.*lbf)
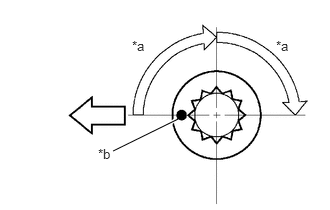
| *a | Turn 90° |
| *b | Painted Mark |
|
|
Engine Front |
Step 2
Mark each cylinder head bolt head with paint as shown in the illustration.
Tighten the cylinder head bolts 90° in the sequence shown in step 1.
Step 3
Tighten the cylinder head bolts an additional 90° in the sequence shown in step 1.
Check that the painted mark is now facing rearward.
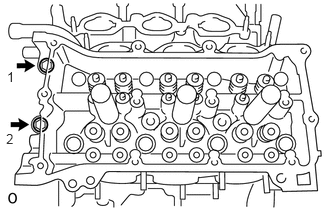
Tighten the 2 bolts in the order shown in the illustration.
- Torque:
- 30 N*m (306 kgf*cm, 22 ft.*lbf)
- HINT:
-
Perform "Inspection After Repair" after replacing the cylinder head LH.
-
Click hereEngine / Hybrid System>2GR-FE ENGINE CONTROL>SFI SYSTEM>INITIALIZATION
16331
5.INSTALL WATER OUTLET
13716
6.INSTALL VALVE STEM CAP
Install the 24 valve stem caps.
13750
7.INSTALL VALVE LASH ADJUSTER ASSEMBLY
- NOTICE:
- ·
Keep the lash adjuster free of dirt and foreign objects.
·Only use clean engine oil.
Place the lash adjuster into a container filled with engine oil.
Insert the tip of SST into the lash adjuster plunger and use the tip to press down on the check ball inside the plunger.
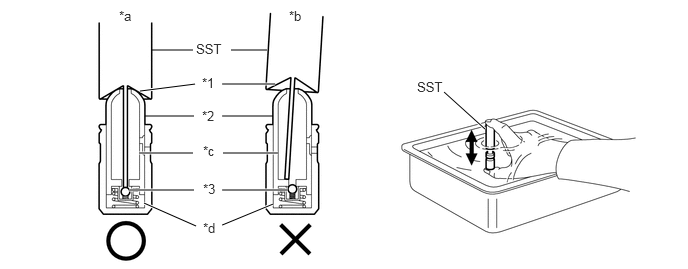
| *1 | Tapered Part | *2 | Plunger |
| *3 | Check Ball | - | - |
| *a | CORRECT | *b | INCORRECT |
| *c | Low Pressure Chamber | *d | High Pressure Chamber |
- SST
- 09276-75010
Squeeze SST and lash adjuster together to move the plunger up and down 5 to 6 times.
Check the movement of the plunger and bleed the air.
- OK:
Plunger moves up and down.
- NOTICE:
-
When bleeding air from the high-pressure chamber, make sure that the tip of SST is actually pressing the check ball as shown in the illustration. If the check ball is not pressed, air will not bleed.
After bleeding the air, remove SST. Then, try to press the plunger quickly and firmly by hand.
- OK:
Plunger is very difficult to move.
If the result is not as specified, replace the valve lash adjuster.
Install the valve lash adjusters.
- NOTICE:
-
Install each valve lash adjuster to the same place it was removed from.
13801
8.INSTALL NO. 1 VALVE ROCKER ARM SUB-ASSEMBLY
- HINT:
-
Type A and Type B can be distinguished by the shape of the compression spring.
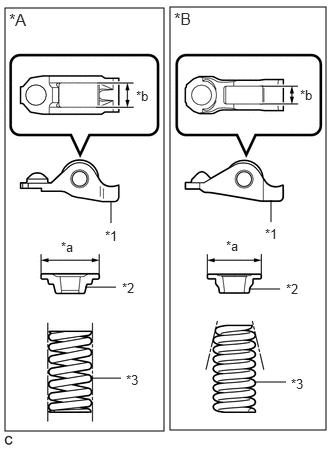
| *A | Type A |
| *B | Type B |
| *1 | No. 1 Valve Rocker Arm Sub-assembly |
| *2 | Valve Spring Retainer |
| *3 | Inner Compression Spring |
| *a | Valve Spring Retainer Diameter |
| *b | No. 1 Valve Rocker Arm Sub-assembly Roller Width |
| Type | No. 1 Valve Rocker Arm Sub-assembly Roller Width | Valve Spring Retainer Diameter | Inner Compression Spring Shape |
|---|---|---|---|
| A | 10.7 mm (0.421 in.) | 23.4 mm (0.921 in.) | Straight |
| B | 8.0 mm (0.315 in.) | 18.9 mm (0.744 in.) | Taper |
Apply engine oil to the lash adjuster tip and valve stem cap end.
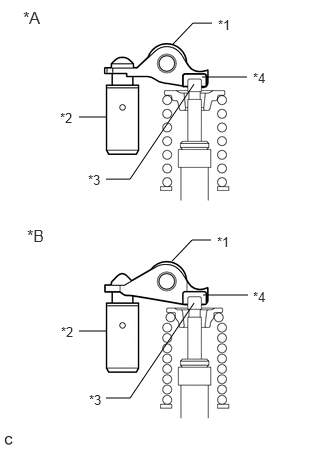
| *A | Type A |
| *B | Type B |
| *1 | No. 1 Valve Rocker Arm Sub-assembly |
| *2 | Valve Lash Adjuster Assembly |
| *3 | Valve Stem |
| *4 | Valve Stem Cap |
Install the valve rocker arms as shown in the illustration.
13053
9.INSTALL NO. 3 CAMSHAFT
13054
10.INSTALL NO. 4 CAMSHAFT
11.INSTALL CAMSHAFT BEARING CAP (for Bank 2)
11104A
12.INSTALL CAMSHAFT HOUSING SUB-ASSEMBLY LH
13511
13.INSTALL CAMSHAFT
13512
14.INSTALL NO. 2 CAMSHAFT
15.INSTALL CAMSHAFT BEARING CAP (for Bank 1)
11103C
16.INSTALL CAMSHAFT HOUSING SUB-ASSEMBLY RH