2GR-FE ENGINE MECHANICAL CYLINDER HEAD GASKET REMOVAL
PROCEDURE

 13511
1.REMOVE CAMSHAFT
13512
2.REMOVE NO. 2 CAMSHAFT
11103C
3.REMOVE CAMSHAFT HOUSING SUB-ASSEMBLY RH
4.REMOVE CAMSHAFT TIMING GEARS AND NO. 2 CHAIN (for Bank 2)
13560A
5.REMOVE NO. 3 CHAIN TENSIONER ASSEMBLY
6.REMOVE CAMSHAFT BEARING CAP (for Bank 2)
13053
7.REMOVE NO. 3 CAMSHAFT
13054
8.REMOVE NO. 4 CAMSHAFT
11104A
9.REMOVE CAMSHAFT HOUSING SUB-ASSEMBLY LH
13801
10.REMOVE NO. 1 VALVE ROCKER ARM SUB-ASSEMBLY
Remove the 24 valve rocker arms.
- HINT:
-
Arrange the removed parts in the correct order.
13750
11.REMOVE VALVE LASH ADJUSTER ASSEMBLY
Remove the 24 valve lash adjuster assemblies from the cylinder head.
- HINT:
-
Arrange the removed parts in the correct order.
13716
12.REMOVE VALVE STEM CAP
Remove the 24 valve stem caps.
16331
13.REMOVE WATER OUTLET
11101
14.REMOVE CYLINDER HEAD SUB-ASSEMBLY RH
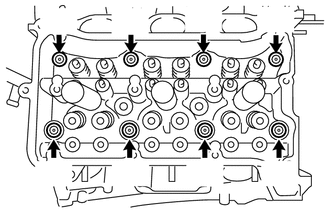
Using a 10 mm bi-hexagon wrench, uniformly loosen the 8 cylinder head bolts in the sequence shown in the illustration. Remove the 8 cylinder head bolts and plate washers.
- NOTICE:
- ·
Be careful not to drop washers into the cylinder head sub-assembly.
·Cylinder head warpage or cracking could result from removing bolts in the incorrect order.
- HINT:
-
Arrange the removed parts in the correct order.
Remove the cylinder head sub-assembly RH.
11115
15.REMOVE CYLINDER HEAD GASKET RH
Remove the cylinder head gasket RH.
11102
16.REMOVE CYLINDER HEAD SUB-ASSEMBLY LH
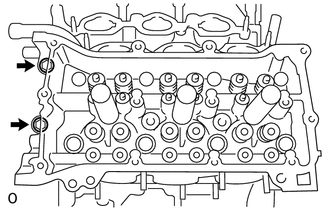
Uniformly loosen and remove the 2 cylinder head set bolts in several steps and in the sequence shown in the illustration.
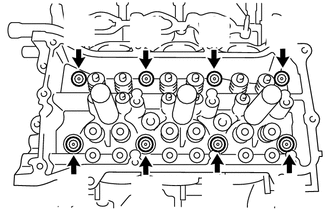
Using a 10 mm bi-hexagon wrench, uniformly loosen the 8 bolts in the sequence shown in the illustration. Remove the 8 cylinder head bolts and plate washers.
- NOTICE:
- ·
Be careful not to drop washers into the cylinder head sub-assembly.
·Cylinder head warpage or cracking could result from removing bolts in the incorrect order.
- HINT:
-
Be sure to keep separate the removed parts for each installation position.
Remove the cylinder head sub-assembly LH.
11116
17.REMOVE CYLINDER HEAD GASKET LH
Remove the cylinder head gasket LH.