INTERIOR PANELS / TRIM INSTRUMENT PANEL SAFETY PAD REMOVAL
PROCEDURE

 1. PRECAUTION
Click hereVehicle Interior>INTERIOR PANELS / TRIM>INSTRUMENT PANEL SAFETY PAD>PRECAUTION
- NOTICE:
-
After turning the power switch off, waiting time may be required before disconnecting the cable from the auxiliary battery negative (-) terminal. Therefore, make sure to read the disconnecting the cable from the auxiliary battery negative (-) terminal notices before proceeding with work.
-
Click hereGeneral>INTRODUCTION>REPAIR INSTRUCTION>PRECAUTION
64718C
2.REMOVE LUGGAGE TRIM SERVICE HOLE COVER
3.DISCONNECT CABLE FROM NEGATIVE AUXILIARY BATTERY TERMINAL
- CAUTION:
-
Wait at least 90 seconds after disconnecting the cable from the negative (-) auxiliary battery terminal to disable the SRS system.
- NOTICE:
-
When disconnecting the cable, some systems need to be initialized after the cable is reconnected.
-
Click hereGeneral>INTRODUCTION>REPAIR INSTRUCTION>INITIALIZATION
67913
4.REMOVE FRONT DOOR SCUFF PLATE RH
62111A
5.REMOVE COWL SIDE TRIM SUB-ASSEMBLY RH
62311B
6.DISCONNECT FRONT DOOR OPENING TRIM WEATHERSTRIP RH
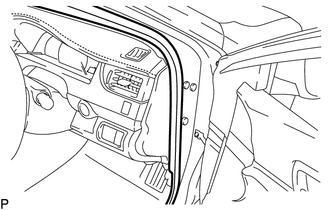
Disconnect the front door opening trim weatherstrip RH.
55317A
7.REMOVE INSTRUMENT SIDE PANEL RH
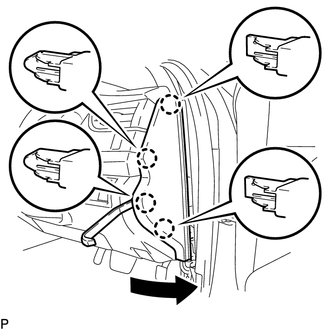
Using a moulding remover, disengage the 4 claws as shown in the illustration.
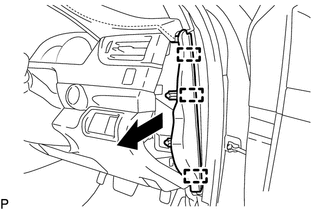
Disengage the 3 guides and remove the instrument side panel RH as shown in the illustration.
55431B
8.REMOVE UPPER INSTRUMENT PANEL FINISH PANEL
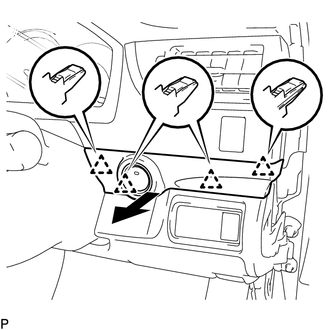
Disengage the 4 clips as shown in the illustration.
Disconnect the connector to remove the upper instrument panel finish panel.
55670
9.REMOVE NO. 3 INSTRUMENT PANEL REGISTER ASSEMBLY
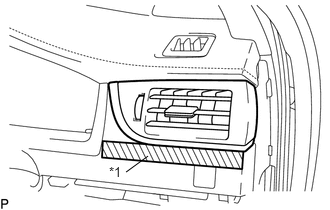
| *1 | Protective Tape |
Apply protective tape to the area shown in the illustration.
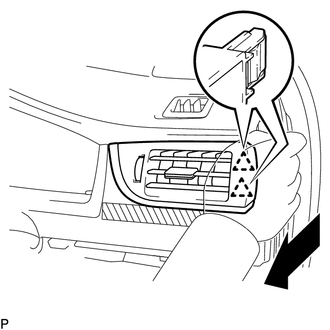
Disengage the 2 clips as shown in the illustration.
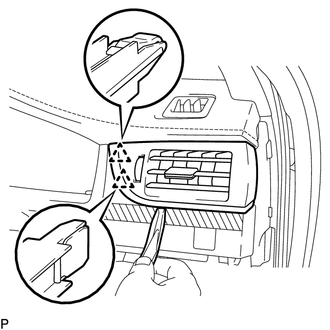
Using a moulding remover, disengage the 2 clips to remove the No. 3 instrument panel register assembly.
55410C
10.REMOVE INSTRUMENT CLUSTER FINISH PANEL ASSEMBLY
Operate the tilt and telescopic lever to fully extend and lower the steering column assembly.
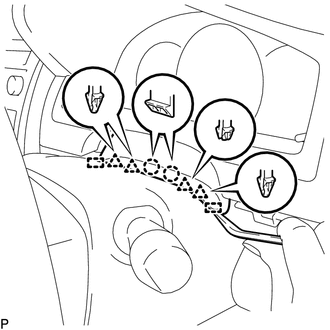
Using a moulding remover, disengage the 2 claws, 4 clips and 2 guides.
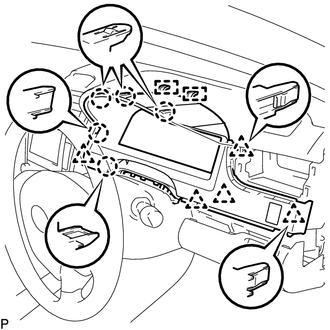
Disengage the 5 claws, 5 clips and 2 guides.
Disconnect each connector.
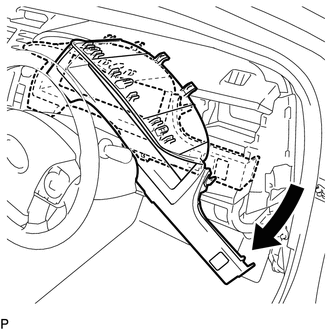
Remove the instrument cluster finish panel assembly as shown in the illustration.
83100
11.REMOVE COMBINATION METER ASSEMBLY
53921B
12.REMOVE FRONT PANEL GARNISH RH
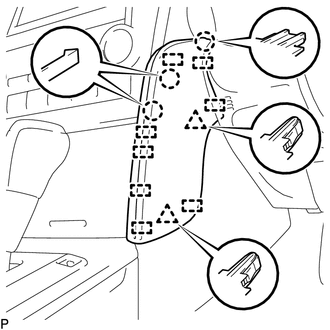
Disengage the 3 claws, 2 clips and 8 guides to remove the front panel garnish RH.
53601
13.DISCONNECT HOOD LOCK CONTROL LEVER SUB-ASSEMBLY
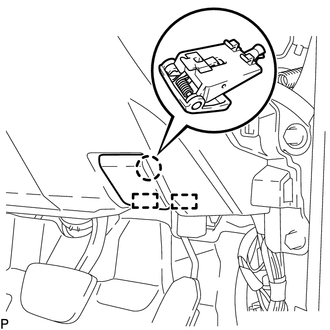
Disengage the claw and 2 guides to disconnect the hood lock control lever sub-assembly.
14.REMOVE LOWER NO. 1 INSTRUMENT PANEL FINISH PANEL ASSEMBLY
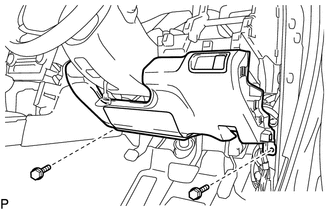
Remove the 2 bolts <B>.
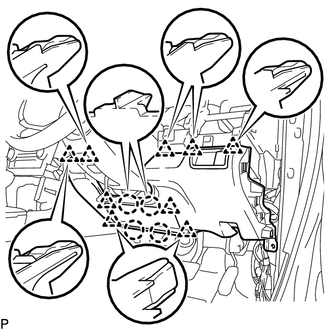
Disengage the 4 claws, 9 clips and 3 guides to remove the lower No. 1 instrument panel finish panel assembly.
53922B
15.REMOVE FRONT PANEL GARNISH LH
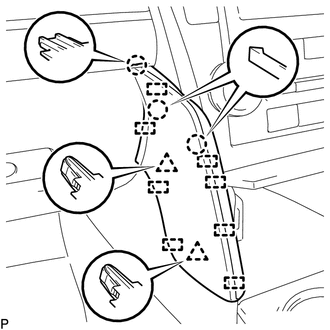
Disengage the 3 claws, 2 clips and 8 guides to remove the front panel garnish LH.
33504F
16.REMOVE SHIFT LEVER KNOB SUB-ASSEMBLY
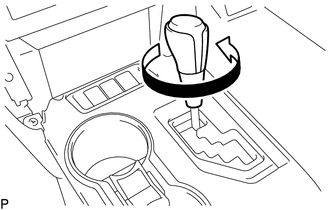
Turn the shift lever knob sub-assembly counterclockwise and remove the shift lever knob sub-assembly.
58805C
17.REMOVE REAR CONSOLE UPPER PANEL SUB-ASSEMBLY
Open the upper console panel sub-assembly door.
Move the shift lever to N.
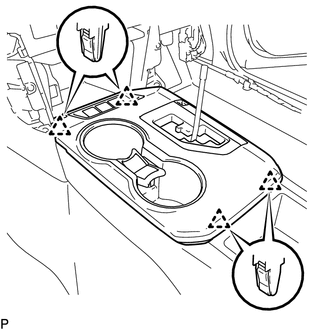
Disengage the 4 clips.
Disconnect each connector and remove the rear console upper panel sub-assembly.
58801E
18.REMOVE UPPER CONSOLE BOX SUB-ASSEMBLY
58864B
19.REMOVE NO. 4 CONSOLE BOX DUCT
58815A
20.REMOVE CONSOLE BOX CARPET
21.REMOVE REAR CONSOLE BOX ASSEMBLY
22.REMOVE CENTER INSTRUMENT CLUSTER FINISH PANEL ASSEMBLY
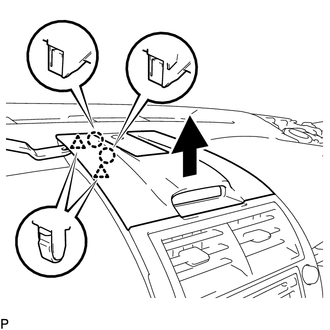
Using a moulding remover, disengage the 2 claws and 2 clips as shown in the illustration.
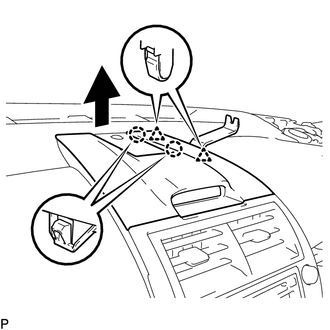
Using a moulding remover, disengage the 2 claws and 2 clips as shown in the illustration.
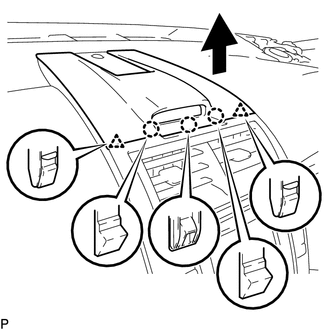
Disengage the 3 claws and 2 clips as shown in the illustration.
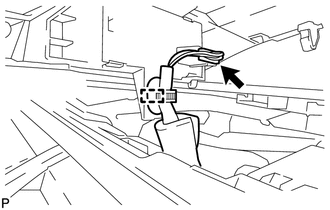
Disengage the clamp.
Disconnect the connector to remove the center instrument cluster finish panel assembly.
55660
23.REMOVE NO. 2 INSTRUMENT PANEL REGISTER ASSEMBLY
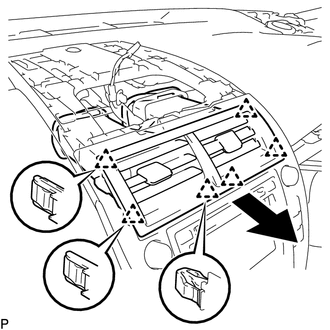
Pull the No. 2 instrument panel register assembly in the direction indicated by the arrow to disengage the 6 clips to remove the No. 2 instrument panel register assembly.
58916
24.REMOVE BOX BOTTOM MAT
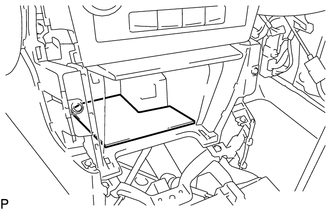
Remove the box bottom mat.
58804A
25.REMOVE UPPER CONSOLE PANEL SUB-ASSEMBLY
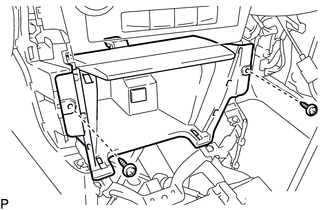
Remove the 2 screws <C> or <D>.
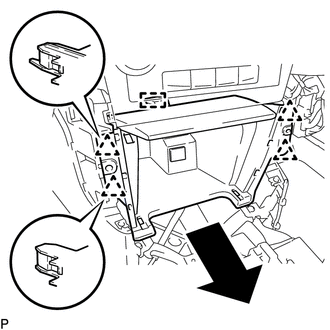
Disengage the 4 clips and guide as shown in the illustration.
Disconnect each connector to remove the upper console panel sub-assembly.
26.REMOVE RADIO RECEIVER ASSEMBLY WITH AIR CONDITIONING CONTROL ASSEMBLY (w/o Navigation System)
27.REMOVE NAVIGATION RECEIVER ASSEMBLY WITH AIR CONDITIONING CONTROL ASSEMBLY (w/ Navigation System)
55510F
28.REMOVE NO. 1 SPEAKER OPENING COVER ASSEMBLY
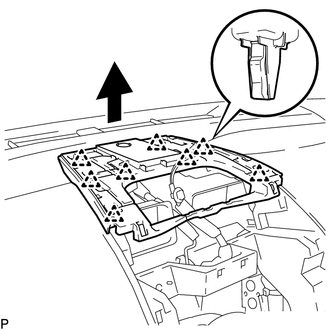
Disengage the 8 clips as shown in the illustration.
Disconnect the connector to remove the No. 1 speaker opening cover assembly.
86160J
29.REMOVE FRONT NO. 3 SPEAKER ASSEMBLY (for 10 Speakers)
67914
30.REMOVE FRONT DOOR SCUFF PLATE LH
- HINT:
-
Use the same procedure as for the RH side.
-
Click hereVehicle Interior>INTERIOR PANELS / TRIM>ROOF HEADLINING>REMOVAL
62112A
31.REMOVE COWL SIDE TRIM SUB-ASSEMBLY LH
- HINT:
-
Use the same procedure as for the RH side.
-
Click hereVehicle Interior>INTERIOR PANELS / TRIM>ROOF HEADLINING>REMOVAL
62312B
32.DISCONNECT FRONT DOOR OPENING TRIM WEATHERSTRIP LH
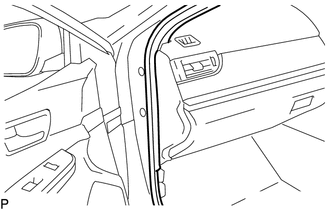
Disconnect the front door opening trim weatherstrip LH.
55318C
33.REMOVE INSTRUMENT SIDE PANEL LH
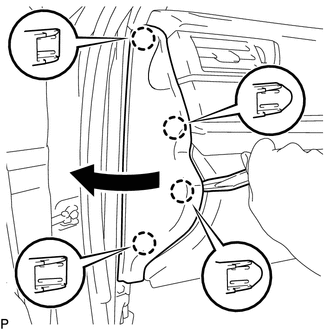
Using a moulding remover, disengage the 4 claws as shown in the illustration.
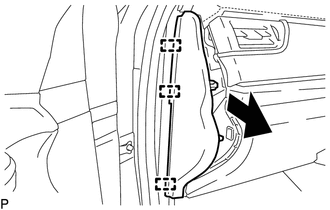
Disengage the 3 guides to remove the instrument side panel RH as shown in the illustration.
55607
34.REMOVE NO. 2 INSTRUMENT PANEL UNDER COVER SUB-ASSEMBLY
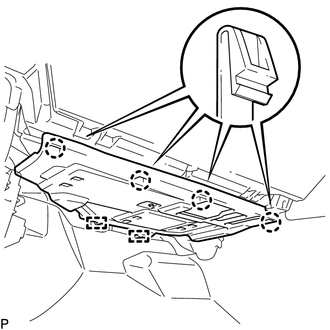
Disengage the 4 claws and 2 guides.
Disconnect the connector and remove the No. 2 instrument panel under cover sub-assembly.
55303B
35.REMOVE LOWER INSTRUMENT PANEL SUB-ASSEMBLY
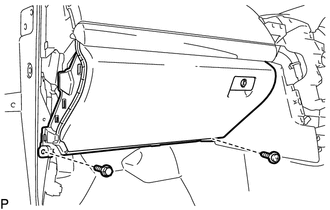
Remove the bolt <B> and screw <C> or <D>.
Open the lower instrument panel door.
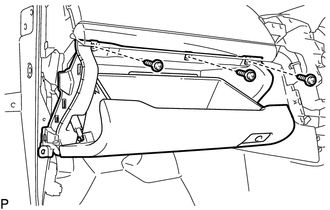
Remove the 3 screws <C> or <D>.
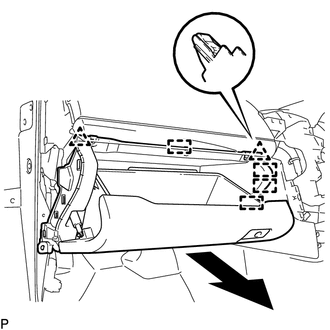
Disengage the 2 clips and 4 guides and remove the lower instrument panel sub-assembly.
55475A
36.REMOVE NO. 2 INSTRUMENT CLUSTER FINISH PANEL GARNISH
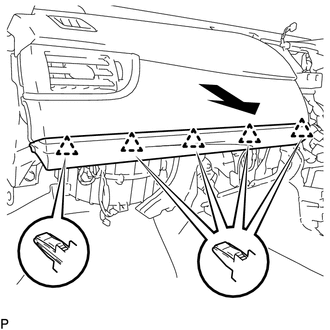
Disengage the 5 clips to remove the No. 2 instrument cluster finish panel garnish as shown in the illustration.
55650
37.REMOVE NO. 1 INSTRUMENT PANEL REGISTER ASSEMBLY
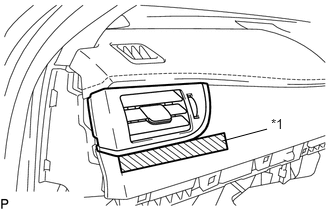
| *1 | Protective Tape |
Apply protective tape to the area shown in the illustration.
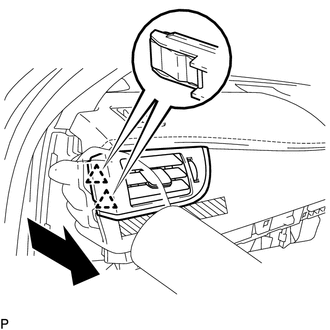
Disengage the 2 clips as shown in the illustration.
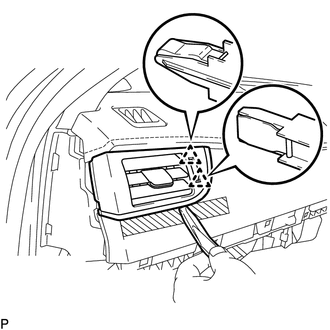
Using a moulding remover, disengage the 2 clips to remove the No. 1 instrument panel register assembly.
62211
38.REMOVE FRONT PILLAR GARNISH RH
55409F
39.REMOVE NO. 2 INSTRUMENT PANEL SPEAKER PANEL SUB-ASSEMBLY
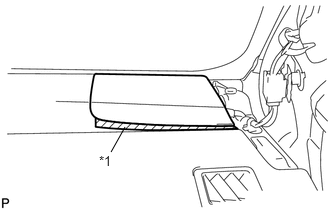
| *1 | Protective Tape |
Apply protective tape to the area shown in the illustration.
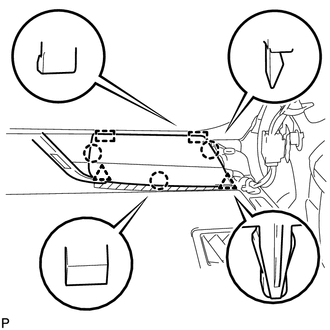
Using a moulding remover, disengage the 2 clips and 3 claws.
Disengage the 2 guides to remove the No. 2 instrument panel speaker panel sub-assembly.
86160P
40.REMOVE FRONT NO. 2 SPEAKER ASSEMBLY (for RH Side)
62212
41.REMOVE FRONT PILLAR GARNISH LH
- HINT:
-
Use the same procedure as for the RH side.
-
Click hereVehicle Interior>INTERIOR PANELS / TRIM>ROOF HEADLINING>REMOVAL
55408F
42.REMOVE NO. 1 INSTRUMENT PANEL SPEAKER PANEL SUB-ASSEMBLY
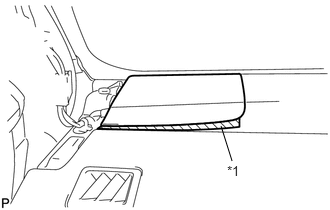
| *1 | Protective Tape |
Apply protective tape to the area shown in the illustration.
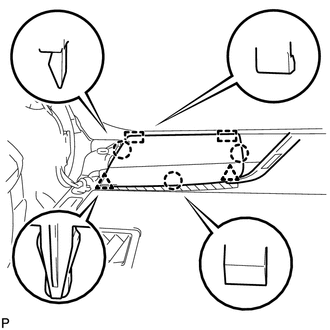
Using a moulding remover, disengage the 2 clips and 3 claws.
Disengage the 2 guides to remove the No. 1 instrument panel speaker panel sub-assembly.
86160P
43.REMOVE FRONT NO. 2 SPEAKER ASSEMBLY (for LH Side)
- HINT:
-
Use the same procedure as for the RH side.
-
Click hereAudio / Visual / Telematics>AUDIO / VIDEO>INSTRUMENT PANEL SPEAKER>REMOVAL
55480D
44.REMOVE LOWER INSTRUMENT PANEL FINISH PANEL ASSEMBLY
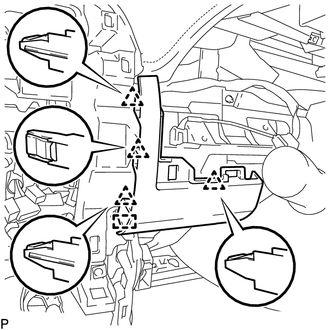
Disengage the 4 clips and guide and remove the lower instrument panel finish panel assembly.
58816B
45.REMOVE CONSOLE BOX INSERT
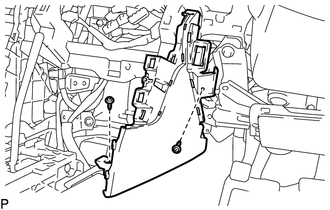
Remove the 2 screws <C> or <D>.
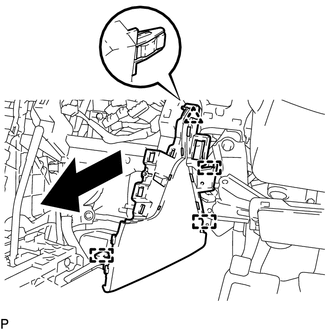
Disengage the clip and 3 guides to remove the console box insert as shown in the illustration.
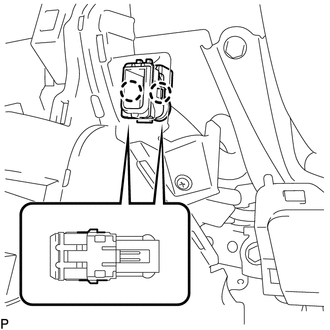
Disengage the 2 claws to disconnect the room temperature sensor from the console box insert.
58817A
46.REMOVE FRONT NO. 2 CONSOLE BOX INSERT
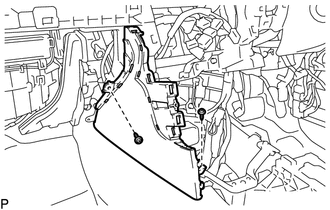
Remove the 2 screws <C> or <D>.
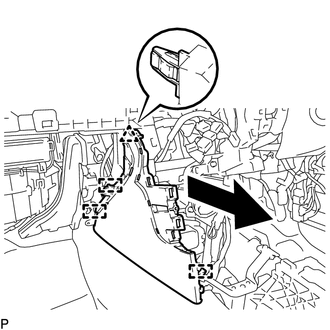
Disengage the clip and 3 guides to remove the front No. 2 console box insert as shown in the illustration.
55011A
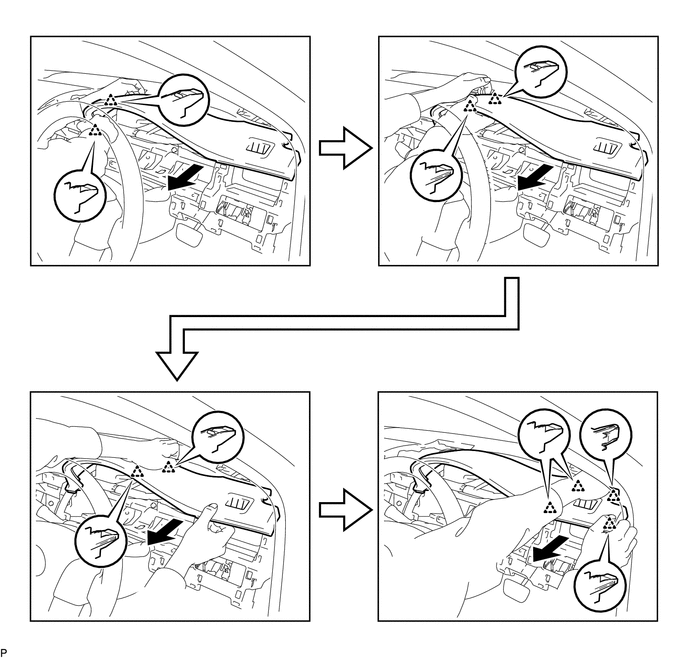
47.REMOVE NO. 1 INSTRUMENT PANEL GARNISH SUB-ASSEMBLY
Disengage the 10 clips to remove the No. 1 instrument panel garnish sub-assembly as shown in the illustration.
82142A
48.DISCONNECT NO. 2 INSTRUMENT PANEL WIRE
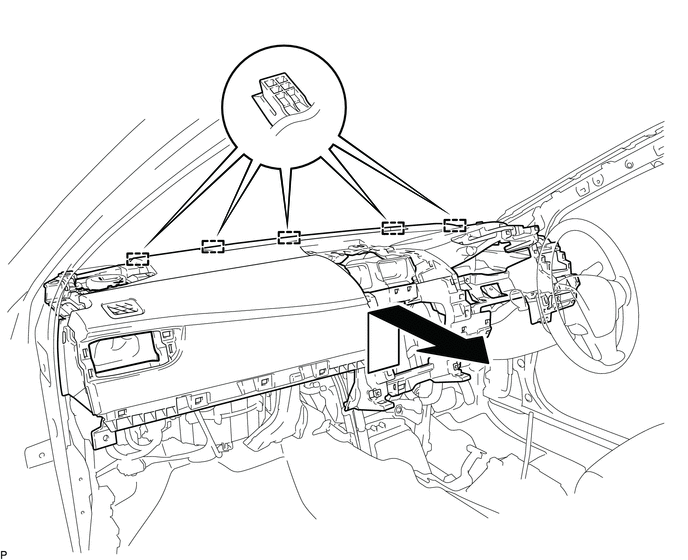
49.REMOVE INSTRUMENT PANEL SAFETY PAD ASSEMBLY
Disconnect each connector.
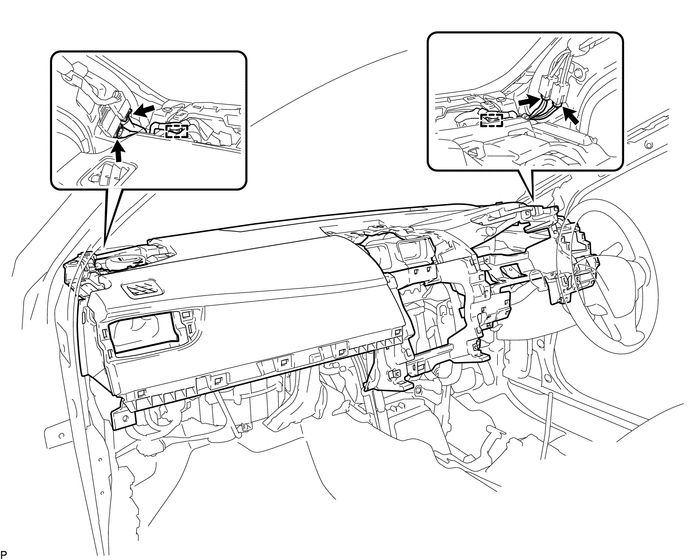
Disengage each clamp.
Remove the 2 passenger airbag bolts <A>.
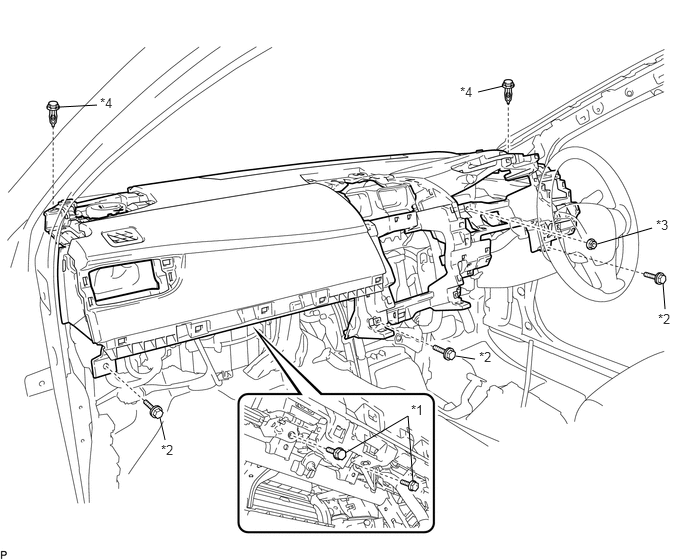
| *1 | Passenger Airbag Bolt <A> | *2 | Bolt <B> |
| *3 | Nut <E> | *4 | Clip |
Remove the 3 bolts <B> and nut <E>.
Remove the 2 clips.
Disengage the 5 guides and remove the instrument panel safety pad assembly as shown in the illustration.
- NOTICE:
- ·
Do not damage the instrument panel safety pad assembly.
·Do not allow the wire harnesses to interfere with the surrounding parts.