Home › Audio / Visual / Telematics › AUDIO / VIDEO › AUDIO AND VISUAL SYSTEM › 2012.02–2015.04
RM2040EQ _56 Audio / Visual / Telematics _014716 AUDIO / VIDEO _0076806 AUDIO AND VISUAL SYSTEM J

AUDIO / VIDEO  AUDIO AND VISUAL SYSTEM  Reverse Signal Circuit  


DESCRIPTION

The radio and display receiver assembly receives a reverse signal from the power management control ECU via the engine room junction block assembly.

WIRING DIAGRAM
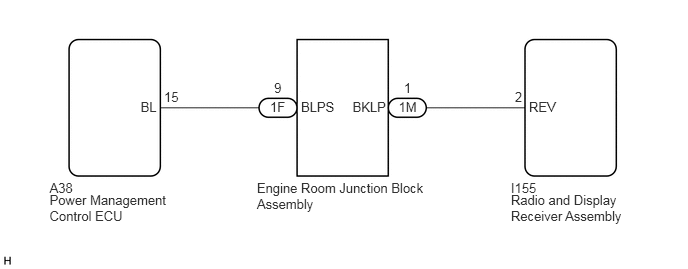
E235272E01
0.516,2.002 1.814,2.335 1.298,0.333 10 Power Management Control ECU 2.676,1.874 4.483,2.207 1.806,0.333 10 Engine Room Junction Block Assembly 0.516,1.874 0.849,2.018 0.333,0.144 10 A38 5.322,2.002 6.62,2.335 1.298,0.333 10 Radio and Display Receiver Assembly 5.322,1.874 5.655,2.018 0.333,0.144 10 I155 1.464,1.031 1.797,1.175 0.333,0.144 10 BL 3.135,1.031 3.515,1.175 0.38,0.144 10 BLPS 3.672,1.031 4.052,1.175 0.38,0.144 10 BKLP 2.813,1.031 3.145,1.175 0.333,0.144 10 1F 2.855,0.836 3.187,0.981 0.333,0.144 10 9 4.152,1.031 4.485,1.175 0.333,0.144 10 1M 4.208,0.836 4.541,0.981 0.333,0.144 10 1 1.709,0.926 2.042,1.07 0.333,0.144 10 15 5.51,1.031 5.843,1.175 0.333,0.144 10 REV 5.363,0.926 5.696,1.07 0.333,0.144 10 2

PROCEDURE

1.INSPECT RADIO AND DISPLAY RECEIVER ASSEMBLY
a.

Disconnect the radio and display receiver assembly connector.


b.

Measure the voltage according to the value(s) in the table below.

Standard Voltage:
Tester Connection Condition Specified Condition
I155-2 (REV) - Body ground Power switch on (IG)
Shift lever in R
11 to 14 V
I155-2 (REV) - Body ground Power switch on (IG)
Shift lever in any position other than R
Below 1 V


Result:
Proceed to
OK
NG


OK

PROCEED TO NEXT SUSPECTED AREA SHOWN IN PROBLEM SYMPTOMS TABLE

NG

2.CHECK HARNESS AND CONNECTOR (RADIO AND DISPLAY RECEIVER ASSEMBLY - ENGINE ROOM JUNCTION BLOCK ASSEMBLY)
a.

Disconnect the radio and display receiver assembly connector.


b.

Disconnect the engine room junction block assembly connector.


c.

Measure the resistance according to the value(s) in the table below.

Standard Resistance:
Tester Connection Condition Specified Condition
I155-2 (REV) - 1M-1 (BKLP) Always Below 1 Ω
I155-2 (REV) - Body ground Always 10 kΩ or higher


Result:
Proceed to
OK
NG


OK

3.CHECK HARNESS AND CONNECTOR (ENGINE ROOM JUNCTION BLOCK ASSEMBLY - POWER MANAGEMENT CONTROL ECU)

NG

REPAIR OR REPLACE HARNESS OR CONNECTOR

3.CHECK HARNESS AND CONNECTOR (ENGINE ROOM JUNCTION BLOCK ASSEMBLY - POWER MANAGEMENT CONTROL ECU)
a.

Disconnect the engine room junction block assembly connector.


b.

Disconnect the power management control ECU connector.


c.

Measure the resistance according to the value(s) in the table below.

Standard Resistance:
Tester Connection Condition Specified Condition
1F-9 (BLPS) - A38-15 (BL) Always Below 1 Ω
1F-9 (BLPS) - Body ground Always 10 kΩ or higher


Result:
Proceed to
OK
NG


OK

4.REPLACE ENGINE ROOM JUNCTION BLOCK ASSEMBLY

NG

REPAIR OR REPLACE HARNESS OR CONNECTOR

4.REPLACE ENGINE ROOM JUNCTION BLOCK ASSEMBLY
a.

Replace the engine room junction block assembly with a new or known good one.

Click herePower Source / Network>POWER DISTRIBUTION>INTEGRATION RELAY>REMOVAL


b.

Check that the malfunction disappears.

OK:

Malfunction disappears.


Result:
Proceed to
OK
NG


OK

END (ENGINE ROOM JUNCTION BLOCK ASSEMBLY WAS DEFECTIVE)

NG