Home › Brake › BRAKE CONTROL / DYNAMIC CONTROL SYSTEMS › ELECTRONICALLY CONTROLLED BRAKE SYSTEM

ELECTRONICALLY CONTROLLED BRAKE SYSTEM > TS and CG Terminal Circuit

for Preparation Click here


DESCRIPTION

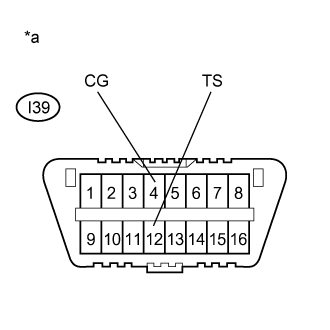
Connecting terminals TS and CG of the DLC3 causes the ECU to display Test Mode DTCs by blinking the ABS warning, brake warning / yellow (minor malfunction) and slip indicator lights.
In Test Mode (signal check), a malfunction in a speed sensor that cannot be detected when the vehicle is stopped can be detected while driving.
Sensor check mode can be entered by connecting terminals TS and CG of the DLC3 and turning the power switch from off to on (IG).

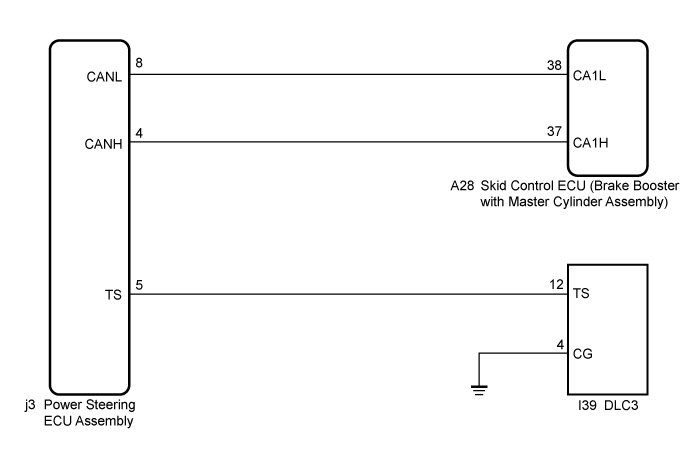
WIRING DIAGRAM


C243629E09


INSPECTION PROCEDURE

NOTICE:
When replacing the skid control ECU (brake booster with master cylinder assembly), perform initialization and calibration of the linear solenoid valve (Click here).

1.CHECK CAN COMMUNICATION SYSTEM
  1. Check if CAN communication system DTCs are output (Click here).

    Result:

    Result
    Proceed to
    DTC is not output.
    A
    DTC is output.
    B


B
INSPECT CAN COMMUNICATION SYSTEM (Click here)
A


2.INSPECT DLC3


    C207407E28
  1. Turn the power switch on (IG).

  1. Measure the voltage according to the value(s) in the table below.

    Standard Voltage:
    Tester Connection
    Condition
    Specified Condition
    I39-12 (TS) - I39-4 (CG)
    Power switch on (IG)
    11 to 14 V

    Text in Illustration 
    *a
    Front view of DLC3


NG
Go to step 4
OK


3.CHECK POWER STEERING ECU ASSEMBLY (TS of DLC3 INPUT)


    C207407E28
  1. Turn the power switch off.

  1. Using SST, connect terminals TS and CG of the DLC3.

SST
09843-18040  
  1. Check that the P/S warning light is blinking.

    OK:
    The P/S warning light is blinking.

    Text in Illustration 
    *a
    Front view of DLC3

    Result:

    Result
    Proceed to
    OK (for LHD)
    A
    OK (for RHD)
    B
    NG
    C

    HINT:
    If troubleshooting has been carried out according to Problem Symptoms Table, refer back to the table and proceed to the next step before replacing the parts (Click here).


B
REPLACE BRAKE BOOSTER WITH MASTER CYLINDER ASSEMBLY (Click here)

C
REPAIR OR REPLACE WIRE HARNESS OR POWER STEERING ECU ASSEMBLY
A

REPLACE BRAKE BOOSTER WITH MASTER CYLINDER ASSEMBLY (Click here)  

4.CHECK HARNESS AND CONNECTOR (TS of DLC3 - POWER STEERING ECU ASSEMBLY)
  1. Turn the power switch off.

  1. Disconnect the power steering ECU assembly connector.

  1. Measure the resistance according to the value(s) in the table below.

    Standard Resistance:
    Tester Connection
    Condition
    Specified Condition
    I39-12 (TS) - j3-5 (TS)
    Always
    Below 1 Ω
    I39-12 (TS) - Body ground
    Always
    10 kΩ or higher


NG
REPAIR OR REPLACE HARNESS OR CONNECTOR
OK


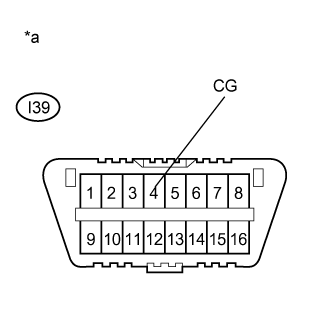
5.CHECK HARNESS AND CONNECTOR (CG of DLC3 - BODY GROUND)


    C207407E18
  1. Measure the resistance according to the value(s) in the table below.

    Standard Resistance:
    Tester Connection
    Condition
    Specified Condition
    I39-4 (CG) - Body ground
    Always
    Below 1 Ω

    Text in Illustration 
    *a
    Front view of DLC3


NG
REPAIR OR REPLACE HARNESS OR CONNECTOR
OK


6.CHECK POWER STEERING ECU ASSEMBLY (TS of DLC3 INPUT)


    C207407E28
  1. Reconnect the power steering ECU assembly connector.

  1. Using SST, connect terminals TS and CG of the DLC3.

SST
09843-18040  
  1. Check that the P/S warning light is blinking.

    OK:
    The P/S warning light is blinking.

    Text in Illustration 
    *a
    Front view of DLC3

    Result:

    Result
    Proceed to
    OK (for LHD)
    A
    OK (for RHD)
    B
    NG
    C

    HINT:
    If troubleshooting has been carried out according to Problem Symptoms Table, refer back to the table and proceed to the next step before replacing the parts (Click here).


B
REPLACE BRAKE BOOSTER WITH MASTER CYLINDER ASSEMBLY (Click here)

C
REPAIR OR REPLACE WIRE HARNESS OR POWER STEERING ECU ASSEMBLY
A

REPLACE BRAKE BOOSTER WITH MASTER CYLINDER ASSEMBLY (Click here)