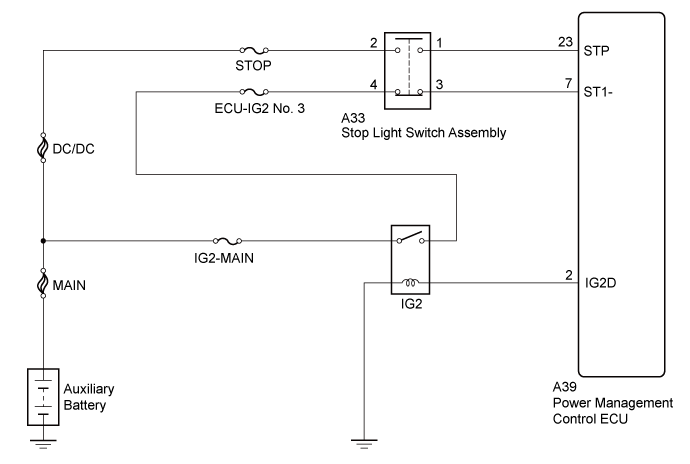
DTC P0571 Brake Switch "A" Circuit |
| DTC No. | DTC Detection Condition | Trouble Area |
| P0571 | Voltage of STP signal and that of ST1- terminal of power management control ECU are less than 1 V for 0.5 seconds or more |
|
| 1.INSPECT STOP LIGHT SWITCH ASSEMBLY (POWER SOURCE) |
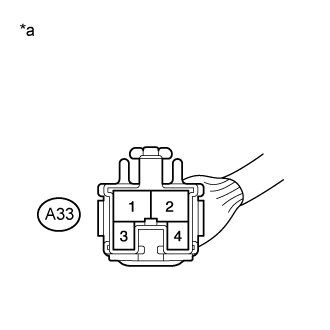 |
Disconnect the stop light switch assembly connector.
Measure the voltage according to the value(s) in the table below.
| Tester Connection | Condition | Specified Condition |
| A33-2 - Body ground | Always | 11 to 14 V |
| *a | Front view of wire harness connector (to Stop Light Switch Assembly) |
|
| ||||
| OK | |
 |
| 2.INSPECT STOP LIGHT SWITCH ASSEMBLY (POWER SOURCE) |
|
Turn the power switch on (IG).
Measure the voltage according to the value(s) in the table below.
| Tester Connection | Condition | Specified Condition |
| A33-4 - Body ground | Power switch on (IG) | 11 to 14 V |
| *a | Front view of wire harness connector (to Stop Light Switch Assembly) |
|
| ||||
| OK | |
|
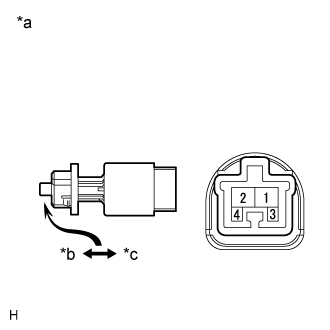
| 3.INSPECT STOP LIGHT SWITCH ASSEMBLY |
 |
Remove the stop light switch assembly (Click here).
Measure the resistance according to the value(s) in the table below.
| Tester Connection | Switch Condition | Specified Condition |
| 1 - 2 | Switch pin not pushed | Below 0.1 Ω |
| 3 - 4 | Switch pin not pushed | 10 kΩ or higher |
| 1 - 2 | Switch pin pushed | 10 kΩ or higher |
| 3 - 4 | Switch pin pushed | Below 200 Ω |
| *a | Component without harness connected (Stop Light Switch Assembly) |
| *b | Not pushed |
| *c | Pushed |
|
| ||||
| OK | |
|
| 4.CHECK HARNESS AND CONNECTOR (STOP LIGHT SWITCH ASSEMBLY - POWER MANAGEMENT CONTROL ECU) |
Disconnect the power management control ECU connector.
Measure the resistance according to the value(s) in the table below.
| Tester Connection | Condition | Specified Condition |
| A39-23 (STP) - A33-1 | Always | Below 1 Ω |
| A39-7 (ST1-) - A33-3 | Always | Below 1 Ω |
| Tester Connection | Condition | Specified Condition |
| A39-23 (STP) or A33-1 - Body ground | Always | 10 kΩ or higher |
| A39-7 (ST1-) or A33-3 - Body ground | Always | 10 kΩ or higher |
|
| ||||
| OK | ||
 | ||
| ||
