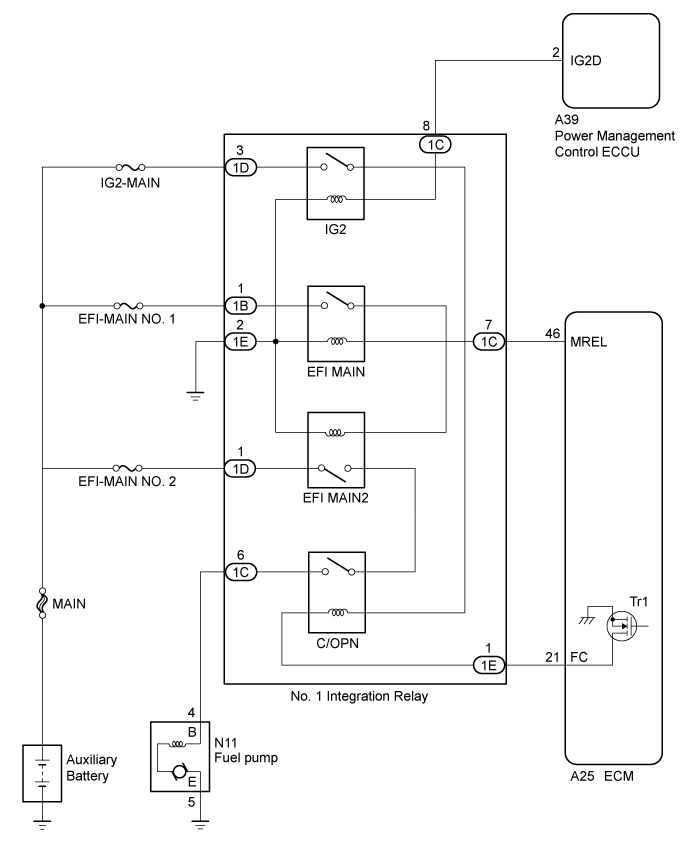
SFI SYSTEM (w/o EGR System) > Fuel Pump Control Circuit |
| 1.PERFORM ACTIVE TEST USING INTELLIGENT TESTER (CONTROL THE FUEL PUMP / SPEED) |
Connect the intelligent tester to the DLC3.
Turn the power switch on (IG).
Turn the tester on.
Enter the following menus: Powertrain / Engine and ECT / Active Test / Control the Fuel Pump / Speed.
Check whether the fuel pump operating sound occurs when performing the Active Test on the tester.
| Result | Proceed to |
| Fuel pump operating sound does not occur | A |
| Fuel pump operating sound occurs | B |
|
| ||||
| A | |
 |
| 2.CHECK HARNESS AND CONNECTOR (NO. 1 INTEGRATION RELAY - ECM) |
Remove the No. 1 integration relay from the engine room relay block and junction block assembly.
Disconnect the ECM connector.
Measure the resistance according to the value(s) in the table below.
| Tester Connection | Condition | Specified Condition |
| 1E-1 - A25-21 (FC) | Always | Below 1 Ω |
| 1E-1 or A25-21 (FC) - Body ground | Always | 10 kΩ or higher |
|
| ||||
| OK | |
|
| 3.CHECK HARNESS AND CONNECTOR (NO. 1 INTEGRATION RELAY - FUEL PUMP) |
Remove the No. 1 integration relay from the engine room relay block and junction block assembly.
Disconnect the fuel pump connector.
Measure the resistance according to the value(s) in the table below.
| Tester Connection | Condition | Specified Condition |
| 1C-6 - N11-4 (B) | Always | Below 1 Ω |
| 1C-6 or N11-4 (B) - Body ground | Always | 10 kΩ or higher |
|
| ||||
| OK | |
|
| 4.CHECK HARNESS AND CONNECTOR (FUEL PUMP - BODY GROUND) |
Disconnect the fuel pump connector.
Measure the resistance according to the value(s) in the table below.
| Tester Connection | Condition | Specified Condition |
| N11-5 (E) - Body ground | Always | Below 1 Ω |
|
| ||||
| OK | |
|
| 5.INSPECT FUEL PUMP |
Inspect the fuel pump (Click here).
|
| ||||
| OK | |
|
| 6.CHECK TERMINAL VOLTAGE (POWER SOURCE OF NO. 1 INTEGRATION RELAY) |
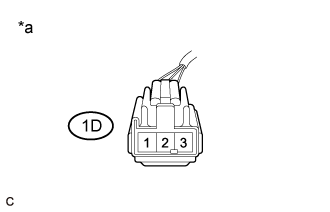 |
Remove the No. 1 integration relay from the engine room relay block and junction block assembly.
Measure the voltage according to the value(s) in the table below.
| Tester Connection | Condition | Specified Condition |
| 1D-1 - Body ground | Always | 11 to 14 V |
| *a | Front view of wire harness connector (to No. 1 Integration Relay) |
|
| ||||
| OK | ||
 | ||
| ||
| 7.READ VALUE USING INTELLIGENT TESTER (STARTER SIGNAL) |
Connect the intelligent tester to the DLC3.
Turn the power switch on (IG).
Turn the tester on.
Put the engine in inspection mode (maintenance mode) (Click here).
Enter the following menus: Powertrain / Engine and ECT / Data List / All Data / Starter Signal.
Check the result when the power switch on (IG) and the engine starts.
| Condition | Starter Signal |
| Power switch on (IG) | Close (OFF) |
| Engine started | Open (ON) |
|
| ||||
| OK | |
|
| 8.READ VALUE USING INTELLIGENT TESTER (ENGINE SPEED) |
Connect the intelligent tester to the DLC3.
Turn the power switch on (IG).
Turn the tester on.
Put the engine in inspection mode (maintenance mode) (Click here).
Enter the following menus: Powertrain / Engine and ECT / Data List / All Data / Engine Speed.
Read the values displayed on the tester while cranking.
|
| ||||
| OK | ||
| ||
| ||

