 |
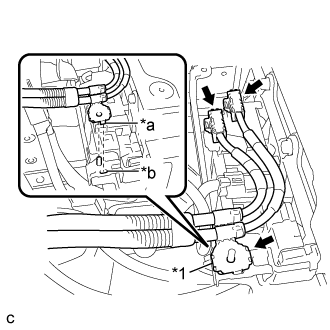
Connect the 2 connectors.
| *1 | Shielded Wire Ground |
| *a | Claw |
| *b | Hole |
HV RELAY ASSEMBLY > INSTALLATION |
| 1. INSTALL HYBRID BATTERY JUNCTION BLOCK ASSEMBLY |
Install the hybrid battery junction block assembly with the 3 bolts.
Connect the connector to the hybrid battery junction block assembly.
Using an insulated tool, install the 2 bolts.
Connect the terminal cover.
| 2. INSTALL NO. 1 HYBRID BATTERY SHIELD SUB-ASSEMBLY |
Install the No. 1 hybrid battery shield sub-assembly with the bolt and 3 nuts.
Connect the connector.
| 3. CONNECT NO. 4 FLOOR WIRE |
|
Connect the 2 connectors.
| *1 | Shielded Wire Ground |
| *a | Claw |
| *b | Hole |
Connect the shielded wire ground.
| 4. INSTALL NO. 4 HYBRID BATTERY SHIELD PANEL |
Install the No. 4 hybrid battery shield panel with the bolt and 2 nuts.
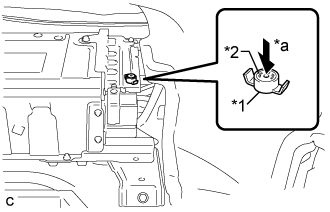 |
Install the battery cover lock striker, then push the button to lock it.
| *1 | Battery Cover Lock Striker |
| *a | Push |
| 5. INSTALL ROOM PARTITION BOARD LH |
Engage the 5 claws and clip to install the room partition board LH.
Install the clip.
| 6. INSTALL REAR SIDE SEATBACK ASSEMBLY RH |
Place the rear side seatback assembly RH in the cabin.
Engage the hook to install the rear side seatback assembly RH with the bolt.
Connect the rear seat outer belt to the rear seat shoulder belt guide RH.
| 7. INSTALL REAR SEATBACK ASSEMBLY RH |
Lift the rear seatback assembly RH.
| 8. INSTALL REAR SEAT CUSHION LOCK HOOK |
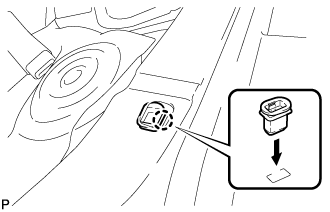 |
Engage the claw to install a new rear seat cushion lock hook.
| 9. INSTALL REAR SEAT CUSHION ASSEMBLY |
Place the rear seat cushion assembly in the cabin.
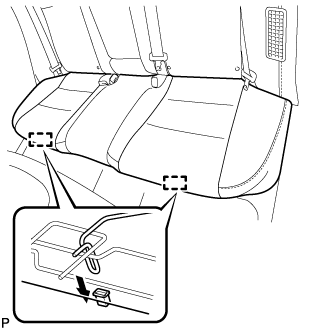 |
Engage the 2 hooks of the rear seat cushion assembly to the vehicle body as shown in the illustration.
Confirm that the rear seat cushion assembly is firmly installed.
| 10. INSTALL SERVICE PLUG GRIP |