Home › Engine / Hybrid System › HYBRID / BATTERY CONTROL › HV RELAY ASSEMBLY

HV RELAY ASSEMBLY > INSTALLATION

for Preparation Click here


1. INSTALL HYBRID BATTERY JUNCTION BLOCK ASSEMBLY

CAUTION:
Wear insulated gloves.


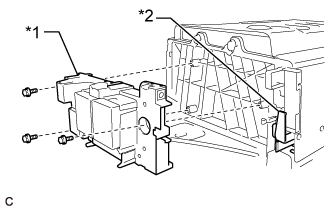
    A337168E01
  1. Install the hybrid battery junction block assembly and hybrid vehicle battery clamp to the HV battery with the 3 bolts as shown in the illustration.
    Text in Illustration 
    *1
    Hybrid Battery Junction Block Assembly
    *2
    Hybrid Vehicle Battery Clamp

    Torque:
    7.5 N*m{ 76 kgf*cm , 66 in.*lbf }


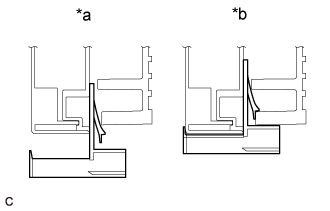
    HINT:
    A337169E01
    The claw of the hybrid vehicle battery clamp will be engaged after the terminal cover is closed. Do not engage the claw at this time.
    Text in Illustration 
    *a
    OK
    *b
    NG

  1. Connect the hybrid battery junction block assembly connector.

    NOTICE:
    Make sure that the connector is connected securely.

  1. Using an insulated tool, install the 2 bolts.

    Torque:
    5.4 N*m{ 55 kgf*cm , 48 in.*lbf }

    NOTICE:
    Be sure to use a torque wrench to tighten the bolts.

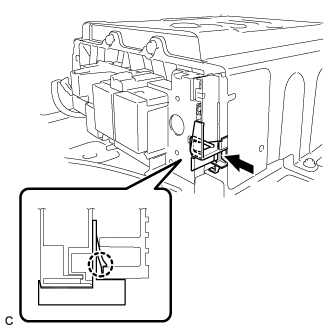
  1. Engage the claw to close the terminal cover.

    NOTICE:
    Make sure that the terminal cover is closed securely.


    A337171E01
  1. Push the hybrid vehicle battery clamp to engage the claw.
    Text in Illustration 
    V100135
    Push

    NOTICE:
    1. Make sure that the claw is engaged securely.

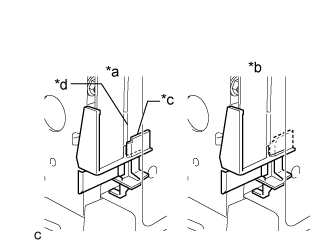
    2. A337170E01
      Make sure the part (A) of the hybrid vehicle battery clamp is not behind the terminal cover.
      Text in Illustration 
      *a
      OK
      *b
      NG
      *c
      Part (A)
      *d
      Terminal Cover


2. INSTALL NO. 1 HYBRID BATTERY SHIELD SUB-ASSEMBLY

CAUTION:
Wear insulated gloves.

  1. Install the No. 1 hybrid battery shield sub-assembly to the HV battery with the bolt and 3 nuts.

    Torque:
    7.5 N*m{ 76 kgf*cm , 66 in.*lbf }

  1. Engage the wire harness clamp.

  1. Connect the hybrid battery junction block assembly connector.

    NOTICE:
    Make sure that the connector is connected securely.


3. CONNECT NO. 4 FLOOR WIRE

CAUTION:
Wear insulated gloves.


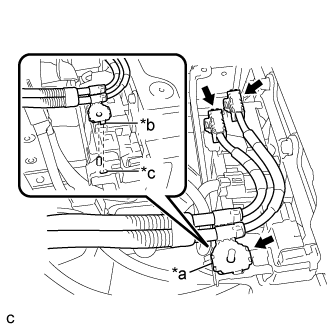
    A255166E02
  1. Connect the 2 No. 4 floor wire connectors and engage the shielded wire ground.
    Text in Illustration 
    *a
    Shielded Wire Ground
    *b
    Claw
    *c
    Hole

    NOTICE:
    1. Make sure that the ends of the No. 4 floor wire do not cross over each other.
    2. Make sure that the connector is connected securely.
    3. Be sure to align the claw of the shielded wire ground with the hole.
    4. Be sure to install the shielded wire ground in the correct direction.


4. INSTALL NO. 4 HYBRID BATTERY SHIELD PANEL

CAUTION:
Wear insulated gloves.

  1. Install the No. 4 hybrid battery shield panel to the HV battery with the bolt and 2 nuts.

    Torque:
    7.5 N*m{ 76 kgf*cm , 66 in.*lbf }


    A259417E02
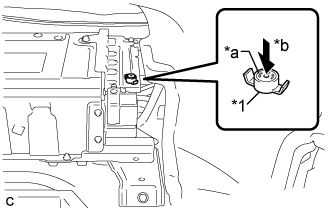
  1. Install the battery cover lock striker, then push the button to lock it.
    Text in Illustration 
    *1
    Battery Cover Lock Striker
    *a
    Button
    *b
    Push


5. INSTALL ROOM PARTITION BOARD LH
  1. Engage the 5 claws and clip to install the room partition board LH.

  1. Install the clip.


6. INSTALL REAR SIDE SEATBACK ASSEMBLY RH
  1. Place the rear side seatback assembly RH in the cabin.

    NOTICE:
    Be careful not to damage the vehicle body.

  1. Engage the hook to install the rear side seatback assembly RH with the bolt.

    Torque:
    18 N*m{ 184 kgf*cm , 13 ft.*lbf }

  1. Connect the rear seat outer belt to the rear seat shoulder belt guide RH.


7. INSTALL REAR SEATBACK ASSEMBLY RH
  1. Lift the rear seatback assembly RH.


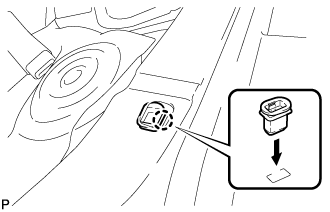
8. INSTALL REAR SEAT CUSHION LOCK HOOK


    B280246
  1. Engage the claw to install a new rear seat cushion lock hook.

    NOTICE:
    Rear seat cushion lock hooks must not be reused.

    HINT:
    Use the same procedure as for the LH side.


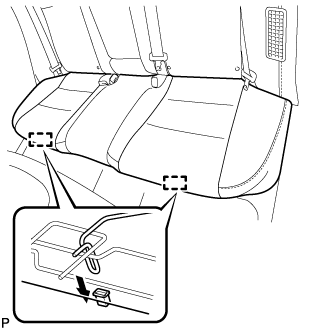
9. INSTALL REAR SEAT CUSHION ASSEMBLY
  1. Place the rear seat cushion assembly in the cabin.

    NOTICE:
    Be careful not to damage the vehicle body.


    B298857
  1. Engage the 2 hooks of the rear seat cushion assembly to the vehicle body as shown in the illustration.

  1. Confirm that the rear seat cushion assembly is firmly installed.

    NOTICE:
    When installing the rear seat cushion assembly, make sure that the seat belt buckles are not under the rear seat cushion assembly.


10. INSTALL SERVICE PLUG GRIP
(Click here)