Home › Engine / Hybrid System › HYBRID / BATTERY CONTROL › INVERTER WITH CONVERTER

INVERTER WITH CONVERTER > INSTALLATION

for Preparation Click here


NOTICE:
If the inverter with converter assembly has been replaced with a new one, make sure to lock the No. 1 inverter cooling hose retainer.

A256822E01
Text in Illustration 
*1
Retainer


1. INSTALL NO. 3 ENGINE ROOM WIRE


    A260013
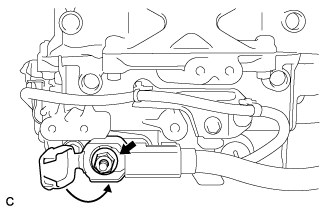
  1. Temporarily install the No. 3 engine room wire with the nut.

  1. Tighten the nut.

    Torque:
    18 N*m{ 184 kgf*cm , 13 ft.*lbf }

  1. Close the cover.


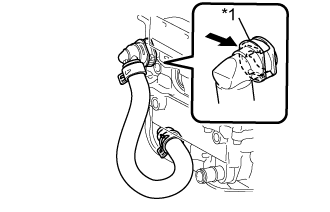
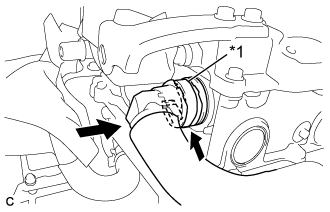
2. INSTALL NO. 1 INVERTER COOLING HOSE


    A256794E01
  1. Connect the No. 1 inverter cooling hose to the inverter with converter assembly and lock the hose with the retainer.
    Text in Illustration 
    *1
    Retainer

    NOTICE:
    1. Insert the retainer until a click sound is heard.
    2. Pull on the hose to confirm that the hose is securely connected.
    3. If there is foreign matter on the union or the O-ring, clean it with water and finger scouring.
    4. To prevent foreign matter from entering the cooling system, do not remove the pieces of cloth or plastic bags from the pipes and disconnected hoses until installation.

  1. Install the No. 1 inverter hose to the inverter with hose clamp.


3. INSTALL NO. 2 MOTOR CABLE BRACKET
  1. Install the No. 2 motor cable bracket with the 2 bolts.

    Torque:
    10 N*m{ 102 kgf*cm , 7 ft.*lbf }


4. INSTALL NO. 1 MOTOR CABLE BRACKET
  1. Install the No. 1 motor cable bracket with the 2 bolts.

    Torque:
    10 N*m{ 102 kgf*cm , 7 ft.*lbf }


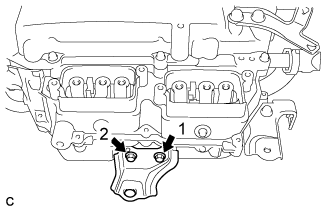
5. INSTALL NO. 3 INVERTER BRACKET
  1. Temporarily install the No. 3 inverter bracket with the 2 bolts.


    A258766E01
  1. Tighten the 2 bolts in the order shown in the illustration.

    Torque:
    8.5 N*m{ 87 kgf*cm , 75 in.*lbf }


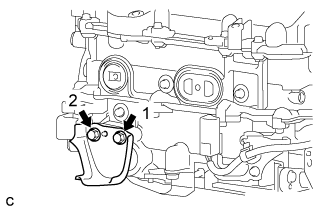
6. INSTALL NO. 2 INVERTER BRACKET
  1. Temporarily install the No. 2 inverter bracket with the 2 bolts.


    A258763E01
  1. Tighten the 2 bolts in the order shown in the illustration.

    Torque:
    8.5 N*m{ 87 kgf*cm , 75 in.*lbf }


7. INSTALL NO. 1 INVERTER BRACKET
  1. Temporarily install the No. 1 inverter bracket with the 2 bolts.
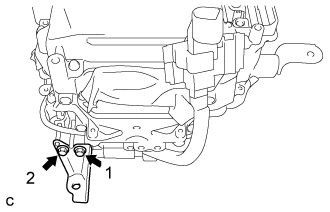


    A258764E01
  1. Tighten the 2 bolts in the order shown in the illustration.

    Torque:
    8.5 N*m{ 87 kgf*cm , 75 in.*lbf }


8. INSTALL AIR CLEANER BRACKET
  1. Install the air cleaner bracket with the bolt.

    Torque:
    5.0 N*m{ 51 kgf*cm , 44 in.*lbf }


9. INSTALL AIR CLEANER BRACKET
  1. Install the air cleaner bracket with the bolt.

    Torque:
    5.0 N*m{ 51 kgf*cm , 44 in.*lbf }


10. INSTALL HIGH VOLTAGE FUSE

CAUTION:
Wear insulated gloves.

HINT:
Perform this procedure only when replacement of the high voltage fuse is necessary.

  1. Remove the bolt and connector cover assembly.

    NOTICE:
    1. Make sure to pull the connector cover assembly straight up, as a connector is connected to the bottom of the cover.
    2. Do not allow any foreign objects or water to enter the inverter with converter assembly.

  1. Install the high voltage fuse with 2 new nuts.

    Torque:
    4.0 N*m{ 41 kgf*cm , 35 in.*lbf }

    NOTICE:
    Be sure to use a torque wrench to tighten the nuts.

  1. Temporarily install the connector cover assembly with the bolt to prevent any foreign objects or water from entering the inverter with converter assembly.


11. INSTALL INVERTER WITH CONVERTER ASSEMBLY

CAUTION:
Wear insulated gloves.


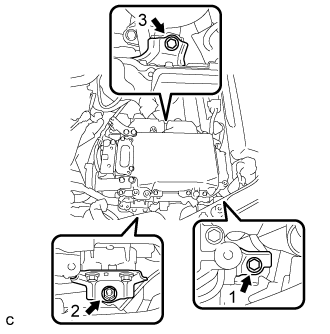
    A258760E01
  1. Temporarily install the inverter with converter assembly with the 2 bolts and nut.

    NOTICE:
    1. Since the inverter with converter assembly is very heavy, 2 people are needed to install the inverter with converter assembly. When installing the inverter with converter assembly, do not damage the parts around it.
    2. To prevent damage, do not hold the inverter with converter assembly by the connectors.
    3. To prevent damage due to static electricity, do not touch the terminals of the disconnected connectors.

  1. Fully tighten the 2 bolts and nut in the order shown in the illustration.

    Torque:
    21 N*m{ 214 kgf*cm , 15 ft.*lbf }


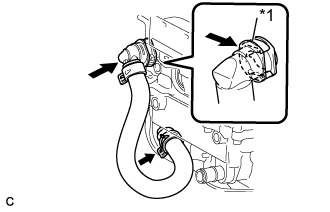
12. CONNECT NO. 1 INVERTER COOLING HOSE ASSEMBLY


    A260014E01
  1. Connect the No. 1 inverter cooling hose assembly to the inverter with converter assembly and lock the hose with the retainer.
    Text in Illustration 
    *1
    Retainer

    NOTICE:
    1. Insert the retainer until a click sound is heard.
    2. Pull on the hose to confirm that the hose is securely connected.
    3. If there is foreign matter on the union or the O-ring, clean it with water and finger scouring.
    4. To prevent foreign matter from entering the cooling system, do not remove the pieces of cloth or plastic bags from the pipes and disconnected hoses until installation.


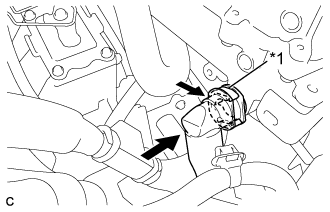
13. CONNECT NO. 4 INVERTER COOLING HOSE


    A260015E01
  1. Connect the No. 4 inverter cooling hose assembly to the inverter with converter assembly and lock the hose with the retainer.
    Text in Illustration 
    *1
    Retainer

    NOTICE:
    1. Insert the retainer until a click sound is heard.
    2. Pull on the hose to confirm that the hose is securely connected.
    3. If there is foreign matter on the union or the O-ring, clean it with water and finger scouring.
    4. To prevent foreign matter from entering the cooling system, do not remove the pieces of cloth or plastic bags from the pipes and disconnected hoses until installation.


14. CONNECT NO. 3 ENGINE ROOM WIRE
  1. Connect the clamp.

  1. Install the No. 3 engine room wire with the nut.

    Torque:
    8.0 N*m{ 82 kgf*cm , 71 in.*lbf }

  1. Install the relay block cover.


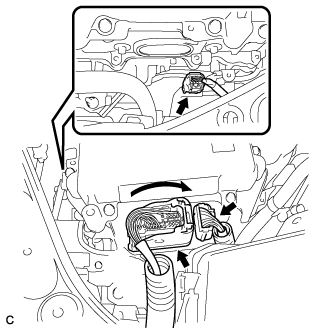
15. CONNECT LOW VOLTAGE CONNECTOR


    A255156
  1. Connect the 3 low voltage connectors and lock the connector with the lock lever.

    NOTICE:
    1. Do not allow any foreign objects or water to enter the inverter with converter assembly.
    2. Make sure that the connectors are fully engaged.


16. REMOVE CONNECTOR COVER ASSEMBLY
  1. Remove the bolt and connector cover assembly.

    NOTICE:
    1. Make sure to pull the connector cover assembly straight up, as a connector is connected to the bottom of the cover.
    2. Do not allow any foreign objects or water to enter the inverter with converter assembly.


17. CONNECT NO. 4 FLOOR WIRE

CAUTION:
Wear insulated gloves.

NOTICE:
  1. Do not damage the terminals, connector housings or inverter with converter assembly when connecting them.
  2. Do not touch the connector waterproofing rubber or terminals.
  3. Do not allow any foreign objects or water to enter the inverter with converter assembly.
  4. Make sure that the connectors are fully engaged.
  5. Make sure that the connector does not come out when its body is pulled.

  1. Connect the No. 4 floor wire and wire harness clamp to the inverter with converter assembly.

  1. Secure the No. 4 floor wire to the inverter with converter assembly with the bolt.

    Torque:
    8.0 N*m{ 82 kgf*cm , 71 in.*lbf }


18. CONNECT NO. 4 ENGINE WIRE

CAUTION:
Wear insulated gloves.

NOTICE:
  1. Do not damage the terminals, connector housings or inverter with converter assembly when connecting them.
  2. Do not touch the connector waterproofing rubber or terminals.
  3. Do not allow any foreign objects or water to enter the inverter with converter assembly.
  4. Make sure that the connectors are fully engaged.
  5. Make sure that the connector does not come out when its body is pulled.

  1. Connect the No. 4 engine wire to the inverter with converter assembly.

  1. Connect the wire harness clamp.


19. INSTALL CONNECTOR COVER ASSEMBLY

CAUTION:
Wear insulated gloves.

NOTICE:
  1. Make sure that the interlock is fully engaged.
  2. Do not allow any foreign objects or water to enter the inverter with converter assembly.

  1. Install the connector cover assembly with the 2 bolts.

    Torque:
    8.0 N*m{ 82 kgf*cm , 71 in.*lbf }


20. INSTALL NO. 3 MOTOR CABLE BRACKET
  1. Install the No. 3 motor cable bracket with the 2 bolts.

    Torque:
    10 N*m{ 102 kgf*cm , 7 ft.*lbf }

  1. Connect the hose clamp.


21. CONNECT MOTOR CABLE

CAUTION:
Wear insulated gloves.

NOTICE:
  1. Do not damage the terminals, connector housings or inverter with converter assembly when connecting them.
  2. Do not touch the connector waterproofing rubber or terminals.
  3. Do not allow any foreign objects or water to enter the inverter with converter assembly.

  1. Connect the motor cable to the inverter with converter assembly.

  1. Connect the 3 wire harness clamps.

  1. Using an insulated tool, install the 3 bolts and motor cable to the inverter with converter assembly.

    Torque:
    8.0 N*m{ 82 kgf*cm , 71 in.*lbf }

    NOTICE:
    1. The connector should be connected securely.
    2. The bolts should be tightened securely.


22. INSTALL UPPER INVERTER COVER

CAUTION:
Wear insulated gloves.

  1. Install the upper inverter cover (motor cable side) with the 2 bolts.

    Torque:
    8.0 N*m{ 82 kgf*cm , 71 in.*lbf }

    NOTICE:
    1. Do not touch the upper inverter cover waterproofing rubber.
    2. Visually confirm that the upper inverter cover waterproofing rubber is securely installed before installing the upper inverter cover.
    3. Make sure that the interlock is fully engaged.


23. CONNECT GENERATOR CABLE

CAUTION:
Wear insulated gloves.

NOTICE:
  1. Do not damage the terminals, connector housings or inverter with converter assembly when connecting them.
  2. Do not touch the connector waterproofing rubber or terminals.
  3. Do not allow any foreign objects or water to enter the inverter with converter assembly.

  1. Connect the generator cable to the inverter with converter assembly.

  1. Connect the 2 wire harness clamps.

  1. Using an insulated tool, install the 3 bolts and generator cable to the inverter with converter assembly.

    Torque:
    8.0 N*m{ 82 kgf*cm , 71 in.*lbf }

    NOTICE:
    1. The connector should be connected securely.
    2. The bolts should be tightened securely.


24. INSTALL UPPER INVERTER COVER

CAUTION:
Wear insulated gloves.

  1. Install the upper inverter cover (generator cable side) with the 2 bolts.

    Torque:
    8.0 N*m{ 82 kgf*cm , 71 in.*lbf }

    NOTICE:
    1. Do not touch the upper inverter cover waterproofing rubber.
    2. Visually confirm that the upper inverter cover waterproofing rubber is securely installed before installing the upper inverter cover.
    3. Make sure that the interlock is fully engaged.


25. INSTALL NO. 4 INVERTER BRACKET
  1. Temporarily install the No. 4 inverter bracket with the 3 bolts.
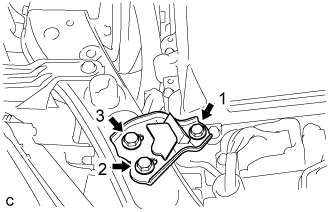


    A258738E01
  1. Tighten the 3 bolts in the order shown in the illustration.

    Torque:
    10 N*m{ 102 kgf*cm , 7 ft.*lbf }


26. INSTALL NO. 5 INVERTER BRACKET
  1. Temporarily install the No. 5 inverter bracket with the 2 bolts.
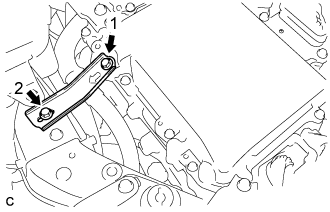


    A258737E01
  1. Tighten the 2 bolts in the order shown in the illustration.

    Torque:
    10 N*m{ 102 kgf*cm , 7 ft.*lbf }


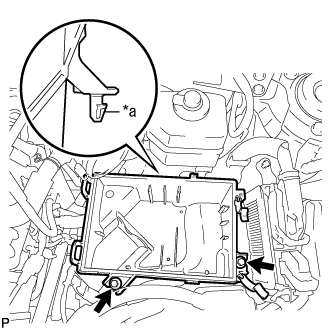
27. INSTALL AIR CLEANER CASE SUB-ASSEMBLY


    A259768E03
  1. Insert the projection of the air cleaner case sub-assembly to the hole of the No. 2 air cleaner bracket as shown in the illustration.
    Text in Illustration 
    *a
    Projection

  1. Tighten the 2 bolts.

    Torque:
    5.0 N*m{ 51 kgf*cm , 44 in.*lbf }


28. INSTALL AIR CLEANER FILTER ELEMENT SUB-ASSEMBLY


29. INSTALL AIR CLEANER CAP SUB-ASSEMBLY
  1. Install the air cleaner hose with the hose clamp.
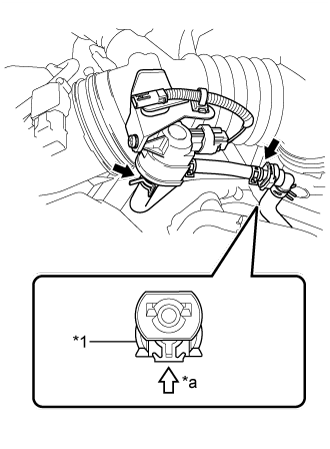


    A259685E01
  1. Connect the 2 fuel vapor feed hoses.
    Text in Illustration 
    *1
    Retainer
    *a
    Push

    NOTICE:
    1. Check that there are no scratches or foreign matter around the connected part of the fuel tube connector and pipe before performing this work.
    2. Connect the quick connector and push the retainer in until the retainer makes a "click" sound to lock the claws of the retainer.
    3. After connecting the fuel vapor feed hose to the fuel tube connector, check that the fuel vapor feed hose is securely connected by pulling on the fuel tube connector and the fuel vapor feed hose.

  1. Install the air cleaner cap sub-assembly with the 2 clamps.

  1. Connect the connector.

  1. Connect the ventilation hose to the cylinder head cover.

  1. Connect the mass air flow meter connector and wire harness clamp to the air cleaner cap sub-assembly.


30. INSTALL INLET AIR CLEANER ASSEMBLY
  1. Install the inlet air cleaner with the 2 bolts.

    Torque:
    8.0 N*m{ 82 kgf*cm , 71 in.*lbf }


31. INSTALL COOL AIR INTAKE DUCT SEAL
  1. Install the cool air intake duct seal with the 9 clips.


32. INSTALL SERVICE PLUG GRIP
(Click here)


33. ADD COOLANT (for Inverter)

NOTICE:
  1. Do not reuse the drained coolant because it may contain foreign objects.
  2. If the vehicle is driven with air in the inverter cooling system, damage may occur and the following DTCs may be set.

    DTC Code
    Detection Item
    P0A01-725
    Motor Electronics Coolant Temperature Sensor Circuit Range / Performance
    P0A01-726
    Motor Electronics Coolant Temperature Sensor Circuit Intermittent
    P0A08-264
    DC / DC Converter Status Circuit
    P0A78-284
    Drive Motor "A" Inverter Performance
    P0A78-286
    Drive Motor "A" Inverter Performance
    P0A7A-322
    Generator Inverter Performance
    P0A7A-324
    Generator Inverter Performance
    P0A93-346
    Inverter Cooling System Performance
    P0A94-553
    DC / DC Converter Performance
    P0A94-557
    DC / DC Converter Performance
    P0AEE-276
    Drive Motor Inverter Temperature Sensor "A" Circuit Intermittent / Erratic
    P0AEE-277
    Motor Inverter Temperature Sensor "A" Circuit Range / Performance
    P0BD0-314
    Generator Inverter Temperature Sensor Circuit Range / Erratic
    P0BCD-315
    Generator Inverter Temperature Sensor Circuit Range / Performance
    P0C3C-625
    DC / DC Converter Temperature Sensor "A" Intermittent / Erratic
    P0C39-626
    DC / DC Converter Temperature Sensor "A" Range / Performance
    P0C41-627
    DC / DC Converter Temperature Sensor "B" Intermittent / Erratic
    P0C3E-628
    DC / DC Converter Temperature Sensor "B" Range / Performance
    P0C73-776
    Motor Electronics Coolant Pump "A" Control Performance


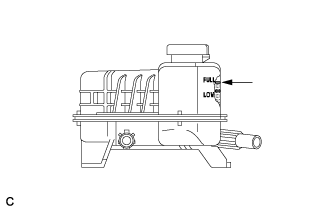
    A258733
  1. Slowly pour coolant into the reserve tank until it reaches the FULL line.

    Coolant quantity:
    3.2 liters (3.4 US qts, 2.8 Imp. qts.)

    NOTICE:
    To prevent foreign matter such as dust or dirt from entering the cooling system, make sure to confirm that the container used to add coolant is clean and free of foreign matter such as dust or dirt.

  1. When using the intelligent tester:

    1. Connect the intelligent tester to the DLC3.

    2. Turn the power switch on (IG).

    3. Enter the following menus: Powertrain / Hybrid Control / Active Test / Activate the Water Pump.

    4. Keep the coolant at the FULL line in the reserve tank to compensate for the drop in coolant level when the air bleeds.

      Standard:
      Air bleeding from the inverter cooling system is completed when the noise made by the inverter water pump assembly becomes smaller and the circulation of coolant in the reserve tank improves.

      HINT:
      1. If free spinning of the inverter water pump is detected for approximately 5 seconds, failsafe control will be activated to suspend the operation of the pump for approximately 15 seconds and resume operation for approximately 4 seconds repeatedly. Operation of the inverter water pump will return to normal if coolant is added.
      2. Loud noise made by the inverter water pump assembly and poor circulation of coolant in the reserve tank indicates that there is air in the cooling system.

      HINT:
      Loud noise made by the water pump and poor circulation of coolant in the reserve tank indicates that there is air in the cooling system.

  1. When not using the intelligent tester:

    1. Turn the power switch on (READY).[*1]

    2. Turn the power switch off and add coolant to the FULL line because the coolant level drops as the air bleeds.[*2]

      NOTICE:
      1. Be sure to turn the power switch off before adding SLLC.
      2. Do not work on the components in the engine compartment while the vehicle is in the READY-on state because the engine is in intermittent operation.

    3. Repeat steps [*1] and [*2] until air bleeding from the cooling system is completed.

      Standard:
      Air bleeding from the inverter cooling system is completed when the noise made by the inverter water pump assembly becomes smaller and the circulation of coolant in the reserve tank improves.

      HINT:
      Loud noise made by the water pump and poor circulation of coolant in the reserve tank indicates that there is air in the cooling system.

  1. After the air is completely bled from the cooling system, tighten the reserve tank cap.


    A258733
  1. Add coolant to the FULL line of the reserve tank.


34. INSPECT FOR COOLANT LEAK (for Inverter)
  1. Remove the reserve tank cap.

    CAUTION:
    To avoid the danger of being burned, do not remove the reserve tank cap while the coolant for the inverter is still hot.


    A258731
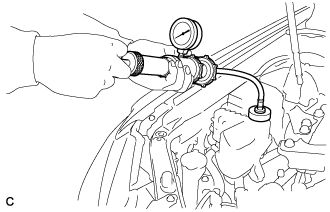
  1. Install the radiator cap tester.

  1. Pump the radiator cap tester to 122 kPa (1.2 kgf/ cm2, 17 psi), and then check that the pressure does not drop.

    HINT:
    If the pressure drops, check the hoses, radiator, water pump, inverter with converter, and hybrid vehicle transaxle assembly for leaks.

  1. Reinstall the reserve tank cap.