 |
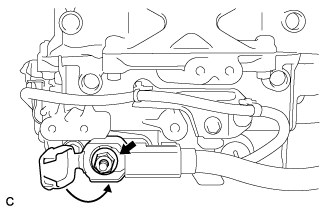
Temporarily install the No. 3 engine room wire with the nut.
INVERTER WITH CONVERTER > INSTALLATION |
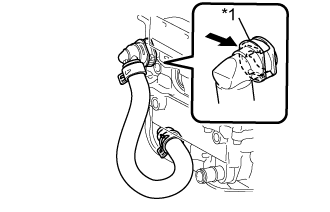
| *1 | Retainer |
| 1. INSTALL NO. 3 ENGINE ROOM WIRE |
|
Temporarily install the No. 3 engine room wire with the nut.
Tighten the nut.
Close the cover.
| 2. INSTALL NO. 1 INVERTER COOLING HOSE |
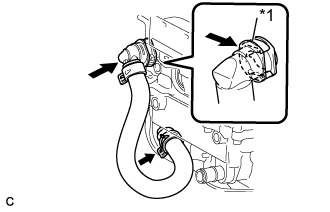 |
Connect the No. 1 inverter cooling hose to the inverter with converter assembly and lock the hose with the retainer.
| *1 | Retainer |
Install the No. 1 inverter hose to the inverter with hose clamp.
| 3. INSTALL NO. 2 MOTOR CABLE BRACKET |
Install the No. 2 motor cable bracket with the 2 bolts.
| 4. INSTALL NO. 1 MOTOR CABLE BRACKET |
Install the No. 1 motor cable bracket with the 2 bolts.
| 5. INSTALL NO. 3 INVERTER BRACKET |
Temporarily install the No. 3 inverter bracket with the 2 bolts.
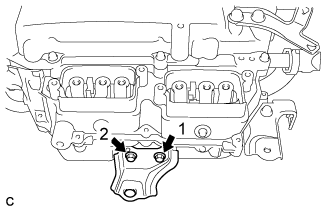 |
Tighten the 2 bolts in the order shown in the illustration.
| 6. INSTALL NO. 2 INVERTER BRACKET |
Temporarily install the No. 2 inverter bracket with the 2 bolts.
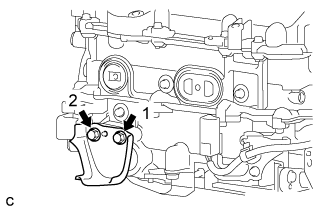 |
Tighten the 2 bolts in the order shown in the illustration.
| 7. INSTALL NO. 1 INVERTER BRACKET |
Temporarily install the No. 1 inverter bracket with the 2 bolts.
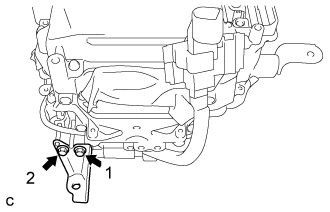 |
Tighten the 2 bolts in the order shown in the illustration.
| 8. INSTALL AIR CLEANER BRACKET |
Install the air cleaner bracket with the bolt.
| 9. INSTALL AIR CLEANER BRACKET |
Install the air cleaner bracket with the bolt.
| 10. INSTALL HIGH VOLTAGE FUSE |
Remove the bolt and connector cover assembly.
Install the high voltage fuse with 2 new nuts.
Temporarily install the connector cover assembly with the bolt to prevent any foreign objects or water from entering the inverter with converter assembly.
| 11. INSTALL INVERTER WITH CONVERTER ASSEMBLY |
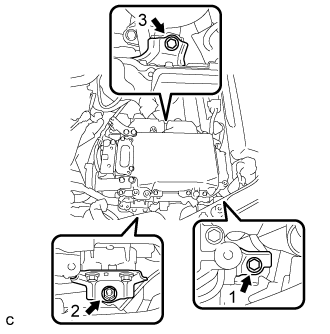 |
Temporarily install the inverter with converter assembly with the 2 bolts and nut.
Fully tighten the 2 bolts and nut in the order shown in the illustration.
| 12. CONNECT NO. 1 INVERTER COOLING HOSE ASSEMBLY |
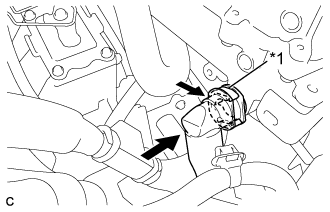 |
Connect the No. 1 inverter cooling hose assembly to the inverter with converter assembly and lock the hose with the retainer.
| *1 | Retainer |
| 13. CONNECT NO. 4 INVERTER COOLING HOSE |
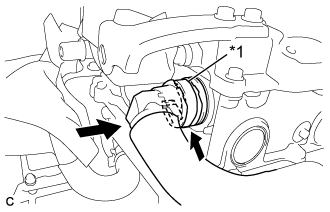 |
Connect the No. 4 inverter cooling hose assembly to the inverter with converter assembly and lock the hose with the retainer.
| *1 | Retainer |
| 14. CONNECT NO. 3 ENGINE ROOM WIRE |
Connect the clamp.
Install the No. 3 engine room wire with the nut.
Install the relay block cover.
| 15. CONNECT LOW VOLTAGE CONNECTOR |
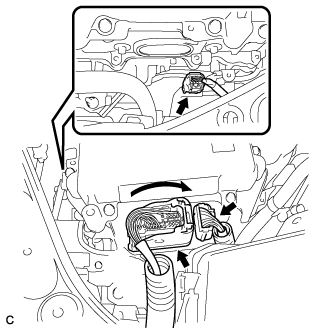 |
Connect the 3 low voltage connectors and lock the connector with the lock lever.
| 16. REMOVE CONNECTOR COVER ASSEMBLY |
Remove the bolt and connector cover assembly.
| 17. CONNECT NO. 4 FLOOR WIRE |
Connect the No. 4 floor wire and wire harness clamp to the inverter with converter assembly.
Secure the No. 4 floor wire to the inverter with converter assembly with the bolt.
| 18. CONNECT NO. 4 ENGINE WIRE |
Connect the No. 4 engine wire to the inverter with converter assembly.
Connect the wire harness clamp.
| 19. INSTALL CONNECTOR COVER ASSEMBLY |
Install the connector cover assembly with the 2 bolts.
| 20. INSTALL NO. 3 MOTOR CABLE BRACKET |
Install the No. 3 motor cable bracket with the 2 bolts.
Connect the hose clamp.
| 21. CONNECT MOTOR CABLE |
Connect the motor cable to the inverter with converter assembly.
Connect the 3 wire harness clamps.
Using an insulated tool, install the 3 bolts and motor cable to the inverter with converter assembly.
| 22. INSTALL UPPER INVERTER COVER |
Install the upper inverter cover (motor cable side) with the 2 bolts.
| 23. CONNECT GENERATOR CABLE |
Connect the generator cable to the inverter with converter assembly.
Connect the 2 wire harness clamps.
Using an insulated tool, install the 3 bolts and generator cable to the inverter with converter assembly.
| 24. INSTALL UPPER INVERTER COVER |
Install the upper inverter cover (generator cable side) with the 2 bolts.
| 25. INSTALL NO. 4 INVERTER BRACKET |
Temporarily install the No. 4 inverter bracket with the 3 bolts.
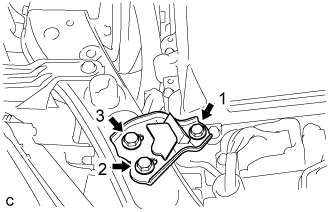 |
Tighten the 3 bolts in the order shown in the illustration.
| 26. INSTALL NO. 5 INVERTER BRACKET |
Temporarily install the No. 5 inverter bracket with the 2 bolts.
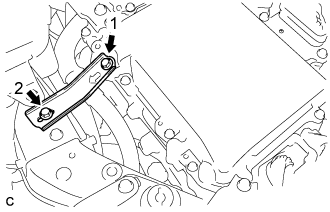 |
Tighten the 2 bolts in the order shown in the illustration.
| 27. INSTALL AIR CLEANER CASE SUB-ASSEMBLY |
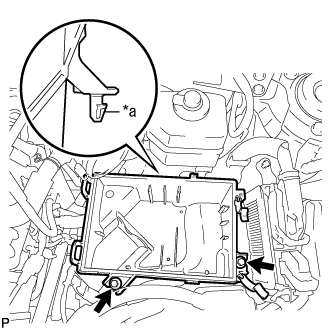 |
Insert the projection of the air cleaner case sub-assembly to the hole of the No. 2 air cleaner bracket as shown in the illustration.
| *a | Projection |
Tighten the 2 bolts.
| 28. INSTALL AIR CLEANER FILTER ELEMENT SUB-ASSEMBLY |
| 29. INSTALL AIR CLEANER CAP SUB-ASSEMBLY |
Install the air cleaner hose with the hose clamp.
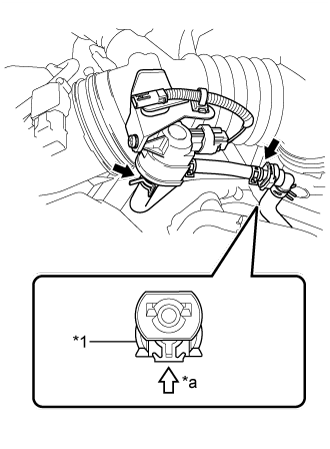 |
Connect the 2 fuel vapor feed hoses.
| *1 | Retainer |
| *a | Push |
Install the air cleaner cap sub-assembly with the 2 clamps.
Connect the connector.
Connect the ventilation hose to the cylinder head cover.
Connect the mass air flow meter connector and wire harness clamp to the air cleaner cap sub-assembly.
| 30. INSTALL INLET AIR CLEANER ASSEMBLY |
Install the inlet air cleaner with the 2 bolts.
| 31. INSTALL COOL AIR INTAKE DUCT SEAL |
Install the cool air intake duct seal with the 9 clips.
| 32. INSTALL SERVICE PLUG GRIP |
| 33. ADD COOLANT (for Inverter) |
| DTC Code | Detection Item |
| P0A01-725 | Motor Electronics Coolant Temperature Sensor Circuit Range / Performance |
| P0A01-726 | Motor Electronics Coolant Temperature Sensor Circuit Intermittent |
| P0A08-264 | DC / DC Converter Status Circuit |
| P0A78-284 | Drive Motor "A" Inverter Performance |
| P0A78-286 | Drive Motor "A" Inverter Performance |
| P0A7A-322 | Generator Inverter Performance |
| P0A7A-324 | Generator Inverter Performance |
| P0A93-346 | Inverter Cooling System Performance |
| P0A94-553 | DC / DC Converter Performance |
| P0A94-557 | DC / DC Converter Performance |
| P0AEE-276 | Drive Motor Inverter Temperature Sensor "A" Circuit Intermittent / Erratic |
| P0AEE-277 | Motor Inverter Temperature Sensor "A" Circuit Range / Performance |
| P0BD0-314 | Generator Inverter Temperature Sensor Circuit Range / Erratic |
| P0BCD-315 | Generator Inverter Temperature Sensor Circuit Range / Performance |
| P0C3C-625 | DC / DC Converter Temperature Sensor "A" Intermittent / Erratic |
| P0C39-626 | DC / DC Converter Temperature Sensor "A" Range / Performance |
| P0C41-627 | DC / DC Converter Temperature Sensor "B" Intermittent / Erratic |
| P0C3E-628 | DC / DC Converter Temperature Sensor "B" Range / Performance |
| P0C73-776 | Motor Electronics Coolant Pump "A" Control Performance |
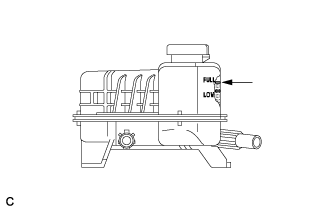 |
Slowly pour coolant into the reserve tank until it reaches the FULL line.
When using the intelligent tester:
Connect the intelligent tester to the DLC3.
Turn the power switch on (IG).
Enter the following menus: Powertrain / Hybrid Control / Active Test / Activate the Water Pump.
Keep the coolant at the FULL line in the reserve tank to compensate for the drop in coolant level when the air bleeds.
When not using the intelligent tester:
Turn the power switch on (READY).[*1]
Turn the power switch off and add coolant to the FULL line because the coolant level drops as the air bleeds.[*2]
Repeat steps [*1] and [*2] until air bleeding from the cooling system is completed.
After the air is completely bled from the cooling system, tighten the reserve tank cap.
|
Add coolant to the FULL line of the reserve tank.
| 34. INSPECT FOR COOLANT LEAK (for Inverter) |
Remove the reserve tank cap.
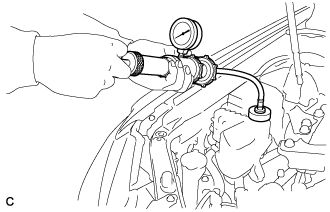 |
Install the radiator cap tester.
Pump the radiator cap tester to 122 kPa (1.2 kgf/ cm2, 17 psi), and then check that the pressure does not drop.
Reinstall the reserve tank cap.