 |
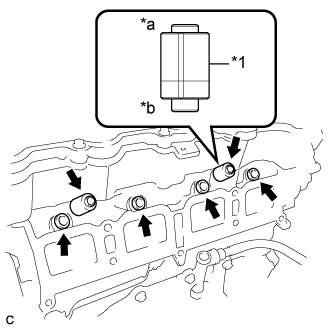
Install 4 new injector vibration insulators to the cylinder head.
| *1 | Fuel Delivery Spacer |
| *a | Fuel Delivery Pipe Side |
| *b | Cylinder Head Side |
ENGINE UNIT > INSTALLATION |
| 1. INSTALL IGNITION COIL ASSEMBLY |
Install the 4 ignition coil assemblies with the 4 bolts.
Connect the 4 ignition coil assembly connectors.
| 2. INSTALL SENSOR WIRE |
Install the sensor wire with the bolt.
Connect the knock control sensor connector.
| 3. INSTALL FUEL DELIVERY PIPE SUB-ASSEMBLY |
|
Install 4 new injector vibration insulators to the cylinder head.
| *1 | Fuel Delivery Spacer |
| *a | Fuel Delivery Pipe Side |
| *b | Cylinder Head Side |
Install the 2 fuel delivery spacers onto the cylinder head.
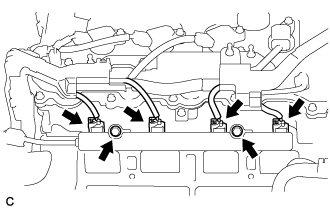 |
Install the fuel delivery pipe sub-assembly with the 4 fuel injector assemblies and install the 2 bolts.
Connect the 4 fuel injector connectors.
| 4. INSTALL INTAKE MANIFOLD |
Temporarily install the intake manifold with the 6 bolts.
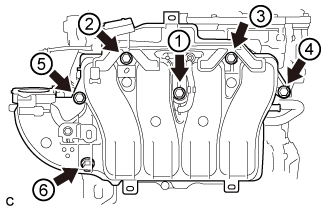 |
Tighten the 6 bolts in the order shown in the illustration.
Connect the 6 wire harness clamps.
Connect the heated oxygen sensor connector.
Connect the No. 2 ventilation hose.
| 5. INSTALL NO. 1 COMPRESSOR MOUNTING BRACKET |
Install the No. 1 compressor mounting bracket with the 4 bolts.
| 6. INSTALL WATER INLET HOUSING |
Using an E5 "TORX" socket, install the stud bolt to the water inlet housing.
Using an E8 "TORX" socket, install the stud bolt to the cylinder block.
Install a new gasket.
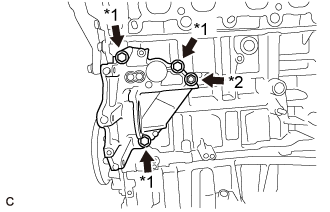 |
Install the water inlet housing with the 3 bolts and nut.
| *1 | Bolt |
| *2 | Nut |
Install the harness clamp bracket to the water inlet housing with the bolt.
Install the harness clamp bracket to the cylinder block with the bolt.
| 7. INSTALL WATER INLET SUB-ASSEMBLY |
Install a new gasket and the water inlet sub-assembly with the 2 bolts.
| 8. INSTALL ENGINE WATER PUMP ASSEMBLY |
Install a new gasket and the engine water pump assembly with the 5 bolts.
Connect the connector to the engine water pump assembly.
Connect the clamp.
| 9. INSTALL COMPRESSOR WITH MOTOR ASSEMBLY |
Using an E8 "TORX" socket, temporarily install the 2 stud bolts.
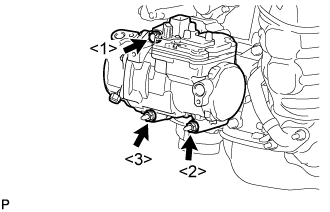 |
Install the compressor with motor assembly with the bolt and 2 nuts.
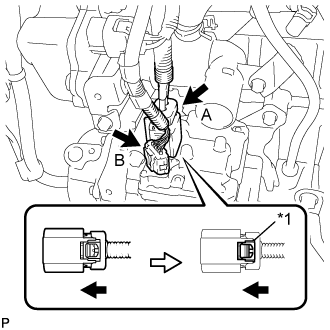 |
Connect connector A and lock the green-colored lock as shown in the illustration.
| *1 | Green-colored Lock |
Connect connector B.
| 10. INSTALL NO. 1 WATER BY-PASS PIPE |
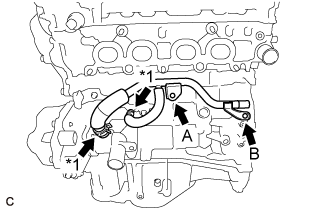 |
Install the No. 1 water by-pass pipe with the 2 bolts.
| *1 | Clamp |
Connect the 2 clamps.
| 11. INSTALL NO. 3 WATER BY-PASS PIPE |
Install the No. 3 water by-pass pipe with the 2 bolts.
Connect the No. 5 water by-pass hose with the clamp.
| 12. INSTALL EXHAUST MANIFOLD CONVERTER SUB-ASSEMBLY |
Set a new gasket to the cylinder head sub-assembly.
Temporarily install the exhaust manifold converter sub-assembly with the 5 nuts.
Temporarily install the No. 2 manifold stay and manifold stay with the 2 bolts and 2 nuts.
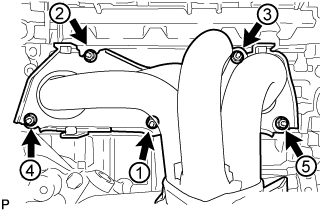 |
Tighten the 5 nuts in the order shown in the illustration.
| 13. INSTALL MANIFOLD STAY |
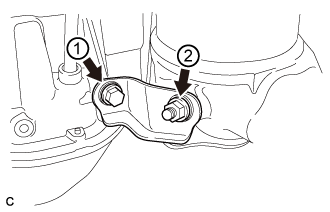 |
Tighten the bolt and nut in the order shown in the illustration.
| 14. INSTALL NO. 2 MANIFOLD STAY |
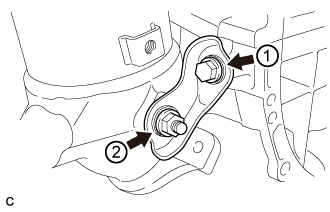 |
Tighten the bolt and nut in the order shown in the illustration.
| 15. INSTALL NO. 1 EXHAUST MANIFOLD HEAT INSULATOR |
Install the No. 1 exhaust manifold heat insulator with the 4 bolts.
| 16. INSTALL NO. 1 WATER BY-PASS HOSE |
Connect the No. 1 water by-pass hose with the clamp.
| 17. INSTALL THROTTLE WITH MOTOR BODY ASSEMBLY |
Install a new gasket to the intake manifold.
Install the throttle with motor body assembly with the 4 bolts.
Connect the throttle body connector.
Connect the 2 water by-pass hoses to the throttle with motor body assembly.
Connect the 2 hoses.
| 18. INSTALL ENGINE OIL LEVEL DIPSTICK GUIDE |
Apply a light coat of engine oil to a new O-ring.
Install the O-ring to the engine oil level dipstick guide.
Install the engine oil level dipstick guide with the bolt.
Install the engine oil level dipstick.
| 19. INSTALL ENGINE HANGERS |
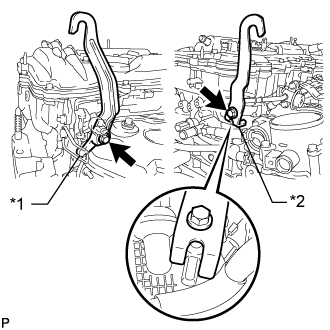 |
Install the 2 engine hangers with the 4 bolts as shown in the illustration.
| Item | Part No. |
| No. 1 Engine Hanger | 12281-36020 |
| No. 2 Engine Hanger | 12282-36021 |
| Bolt | 91552-81040 or 91552-81025 |
Attach an engine sling device and hang the engine with a chain block.