WINDSHIELD GLASS (for TMMK Made) > INSTALLATION |
| 1. INSTALL NO. 2 WINDSHIELD GLASS STOPPER (for 2-piece Type) |
Using a brush or sponge, coat the installation area of 2 new No. 2 windshield glass stoppers with primer G.
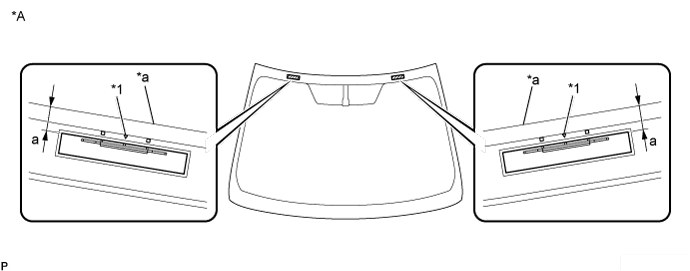
Install the 2 new No. 2 windshield glass stoppers to the windshield glass as shown in the illustration.

| *A | Back Side | - | - |
| *1 | Ceramic Notch | - | - |
| *a | Windshield Glass Edge | - | - |
| Area | Dimension |
| a | 13.7 to 14.7 mm (0.539 to 0.578 in.) |
| 2. INSTALL NO. 1 WINDSHIELD GLASS STOPPER (for 2-piece Type) |
![]() |
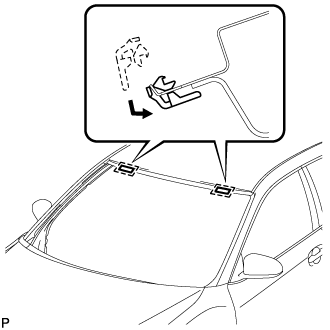
Install 2 new No. 1 windshield glass stoppers to the vehicle body as shown in the illustration.
| 3. INSTALL WINDSHIELD GLASS RETAINER |
Using a brush or sponge, coat the installation area of 2 new windshield glass retainers with primer G.
![]() |
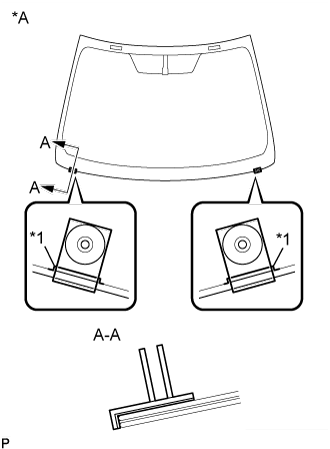
Install the 2 new windshield glass retainers to the windshield glass as shown in the illustration.
| *A | Back Side |
| *1 | Ceramic Notch |
| 4. INSTALL WINDSHIELD OUTSIDE MOULDING |
Using a brush or sponge, coat the installation area of a new windshield outside moulding with primer G.
![]() |
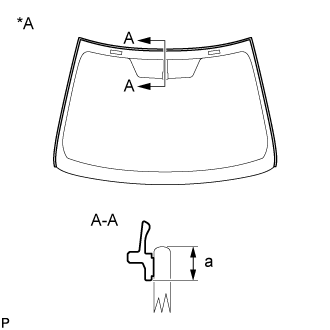
Install the new windshield outside moulding to the windshield glass as shown in the illustration.
| *A | Back Side |
| Area | Dimension |
| a | 6.9 mm (0.272 in.) |
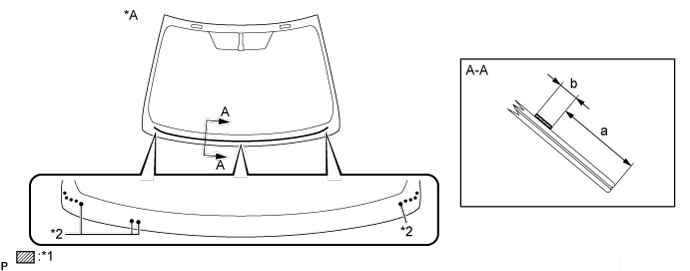
| 5. INSTALL WINDSHIELD GLASS ADHESIVE DAM |
Using a brush or sponge, coat the installation area of a new windshield glass adhesive dam with primer G.

| *A | Back Side | - | - |
| *1 | Primer G | *2 | Ceramic Notch |
| Area | Dimension |
| a | 32.5 mm (1.28 in.) |
| b | 10.0 mm (0.394 in.) |
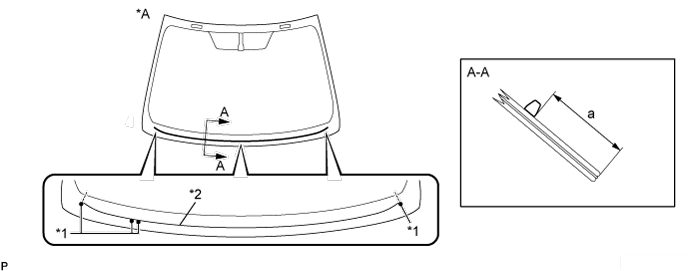
Install the windshield glass adhesive dam to the windshield glass as shown in the illustration.

| *A | Back Side | - | - |
| *1 | Ceramic Notch | *2 | Windshield Glass Adhesive Dam |
| Area | Dimension |
| a | 35.0 mm (1.38 in.) |
| 6. INSTALL WINDSHIELD GLASS SUB-ASSEMBLY |
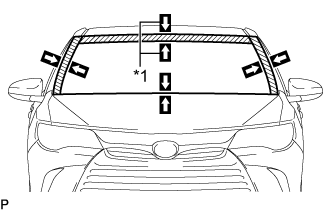
![]() |
Position the windshield glass sub-assembly.
| *1 | Matchmark |
Using suction cups, place the windshield glass sub-assembly in the correct position.
Check that the whole contact surface of the windshield glass sub-assembly is perfectly even.
Align the matchmarks on the windshield glass sub-assembly and vehicle body.
Remove the windshield glass sub-assembly.
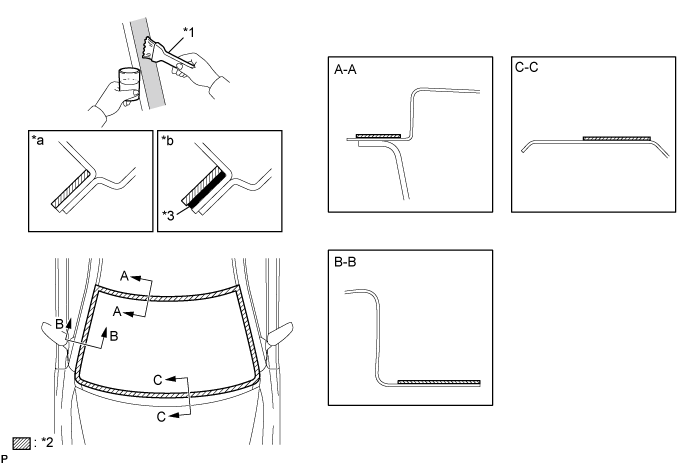
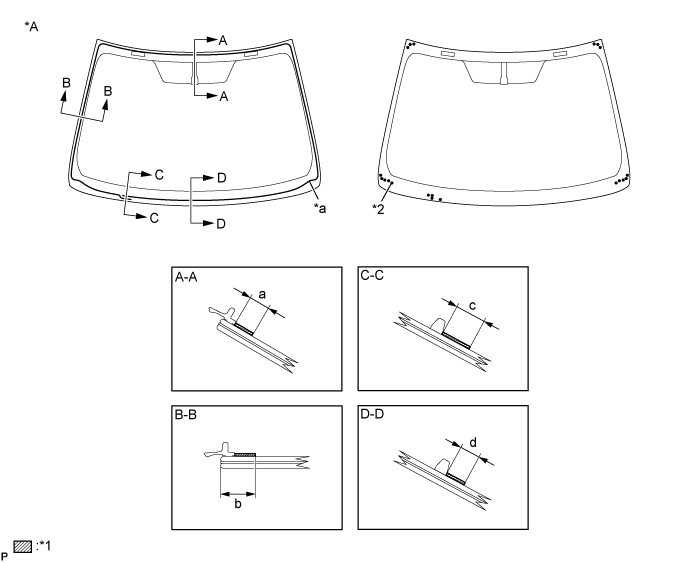
Using a brush, coat the installation surface on the vehicle body with primer M.

| *1 | Brush | *2 | Primer M |
| *3 | Adhesive | - | - |
| *a | Correct | *b | Incorrect |
Using a brush or sponge, coat the adhesive application area with primer G.

| *A | Back Side | - | - |
| *1 | Primer G | *2 | Ceramic Notch |
| *a | Adhesive Center Line | - | - |
| Area | Dimension |
| a | 9.6 mm (0.378 in.) or more |
| b | 16.5 mm (0.650 in.) or more |
| c | 18.5 mm (0.728 in.) or more |
| d | 11.0 mm (0.433 in.) or more |
Apply adhesive to the windshield glass sub-assembly.
![]() |
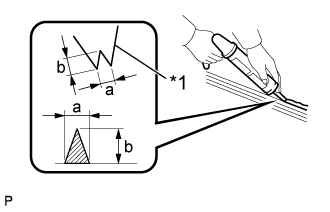
Cut off the tip of the cartridge nozzle as shown in the illustration.
| *1 | Nozzle |
| Area | Dimension |
| a | 8.0 mm (0.315 in.) or more |
| b | 12.0 mm (0.472 in.) or more |
Load the sealer gun with the cartridge.
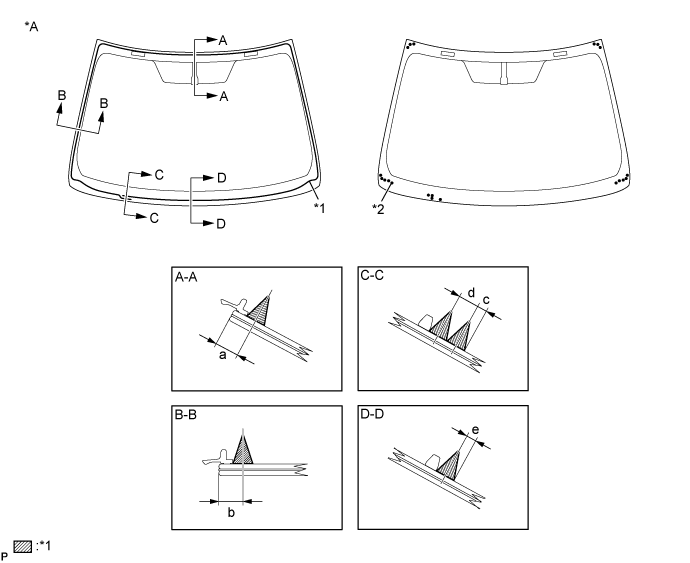
Apply adhesive to the windshield glass sub-assembly as shown in the illustration.

| *A | Back Side | - | - |
| *1 | Adhesive | *2 | Ceramic Notch |
| Area | Dimension |
| a | 9.5 mm (0.374 in.) |
| b | 9.5 mm (0.374 in.) |
| c | 4.0 mm (0.157 in.) |
| d | 8.0 mm (0.315 in.) |
| e | 4.0 mm (0.157 in.) |
![]() |
Install the windshield glass sub-assembly.
| *1 | Matchmark |
Using suction cups, position the windshield glass sub-assembly so that the matchmarks are aligned, and press it in gently along the rim.
Lightly press the front surface of the windshield glass sub-assembly to ensure that the windshield glass sub-assembly is securely fit to the vehicle body.
Using a scraper, remove any excess or protruding adhesive.
Hold the windshield glass sub-assembly using protective tape until the applied adhesive becomes hard.
| Temperature | Minimum Time Prior to Driving Vehicle |
| 35°C (95°F) | 1 hour and 30 minutes |
| 20°C (68°F) | 5 hours |
| 5°C (41°F) | 24 hours |
| 7. INSPECT FOR LEAK |
After the adhesive has hardened, apply water from the outside of the vehicle. Check that no water leaks into the cabin.
If water leaks into the cabin, allow the water to dry and add adhesive.
Remove the protective tape.
| 8. INSTALL ROOF HEADLINING ASSEMBLY |
Return the front section of its roof headlining assembly to it original position.
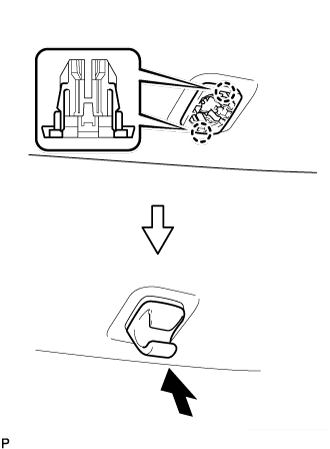
| 9. INSTALL VISOR HOLDER |
![]() |
Engage the 2 claws.
Push in the visor holder as shown in the illustration.
| 10. INSTALL VISOR ASSEMBLY LH |
Install the visor assembly LH with the 2 screws.
| 11. INSTALL VISOR BRACKET COVER (for LH Side) |
![]() |
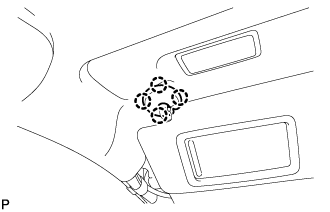
Engage the 4 claws to install the visor bracket cover.
| 12. INSTALL VISOR ASSEMBLY RH |
| 13. INSTALL VISOR BRACKET COVER (for RH Side) |
| 14. INSTALL SLIDING ROOF OPENING TRIM MOULDING (w/ Sliding Roof) |
![]() |
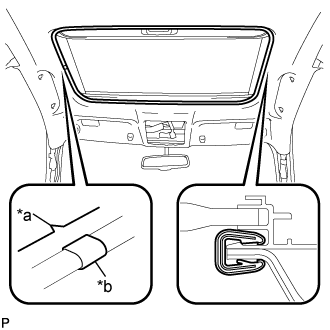
Align the alignment mark on the moulding with the notch of the roof headlining to install the sliding roof opening trim moulding.
| *a | Notch |
| *b | Alignment Mark |
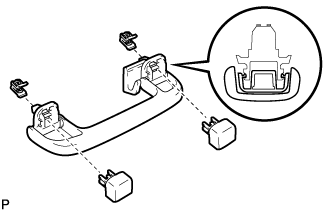
| 15. INSTALL ASSIST GRIP SUB-ASSEMBLY |
![]() |
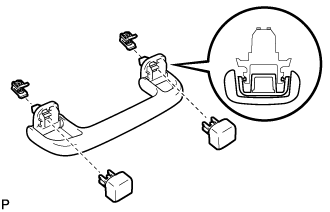
Put the assist grip sub-assembly together as shown in the illustration.
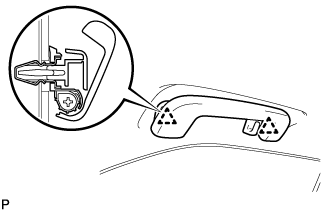
![]() |
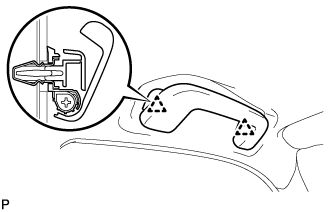
Engage the 2 clips to install the assist grip sub-assembly.
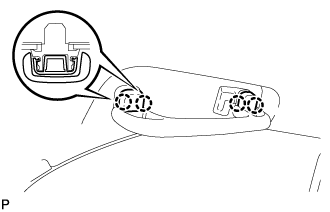
![]() |
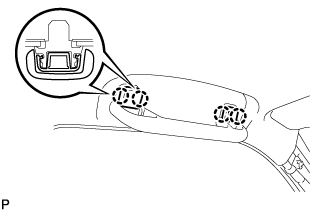
Engage the 4 claws to install the 2 assist grip covers.
| 16. INSTALL REAR ASSIST GRIP ASSEMBLY LH |
![]() |
Put the rear assist grip assembly LH together as shown in the illustration.
![]() |
Engage the 2 clips to install the rear assist grip assembly LH.
![]() |
Engage the 4 claws to install the 2 assist grip covers.
| 17. INSTALL REAR ASSIST GRIP ASSEMBLY RH |
| 18. INSTALL NO. 1 ROOM LIGHT ASSEMBLY (w/o Sliding Roof) |
![]() |
Align the switch parts shown in the illustration and engage the 4 claws to install the room light switch base to the No. 1 room light housing.
| *a | Switch Part of Room Light Switch Base |
| *b | Switch Part of No. 1 Room Light Housing |
![]() |
Engage the 4 claws to install the No. 1 room light housing.
| *a | Front |
![]() |
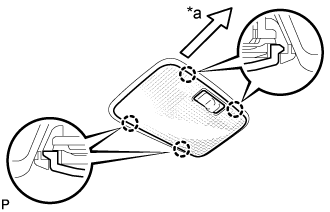
Engage the 4 claws to install the No. 1 room light lens.
| *a | Front |
| 19. INSTALL SPOT LIGHT ASSEMBLY (w/ Sliding Roof) |
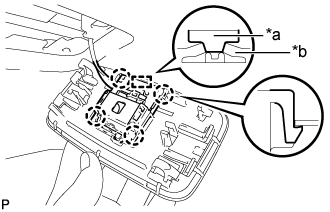
![]() |
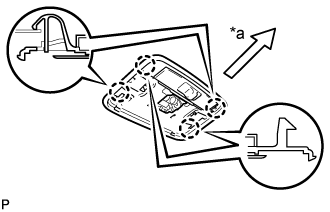
Engage the 8 claws to install the map light sub-assembly to the spot light housing as shown in the illustration.
| *a | Front |
![]() |
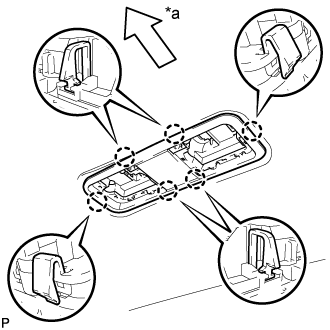
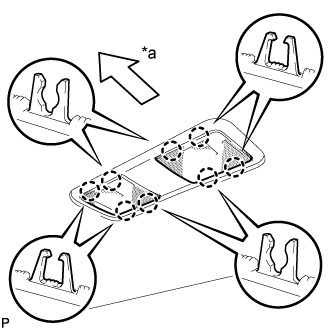
Engage the 6 claws to install the spot light housing.
| *a | Front |
![]() |
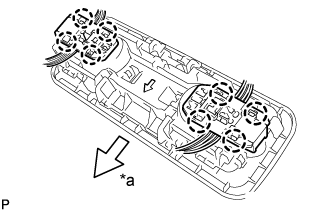
Engage the 8 claws to install the 2 spot light lenses.
| *a | Front |
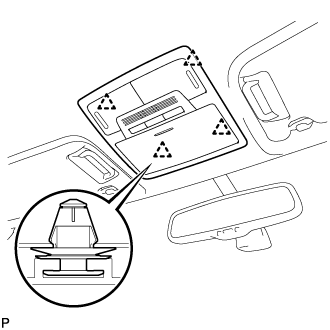
| 20. INSTALL ROOF CONSOLE BOX ASSEMBLY (w/o Sliding Roof) |
Connect the connector.
![]() |
Engage the 4 clips to install the roof console box assembly.
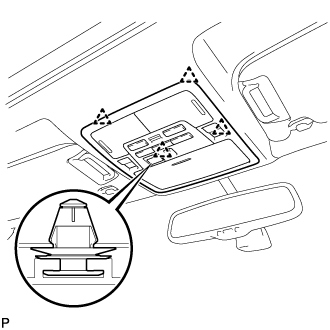
| 21. INSTALL ROOF CONSOLE BOX ASSEMBLY (w/ Sliding Roof) |
Connect the connector.
![]() |
Engage the 4 clips to install the roof console box assembly.
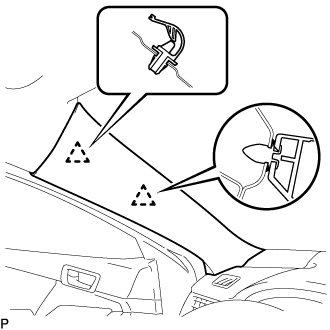
| 22. INSTALL FRONT PILLAR GARNISH LH |
Remove the protective cover.
Install a new clips to the front pillar garnish LH.
![]() |
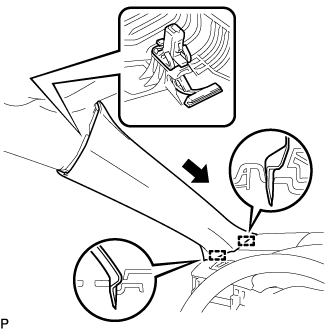
Install a new front pillar garnish clip to front pillar garnish LH.
Engage the 2 guides as shown in the illustration.
![]() |
Engage the front pillar garnish clip and clip to install the front pillar garnish LH.
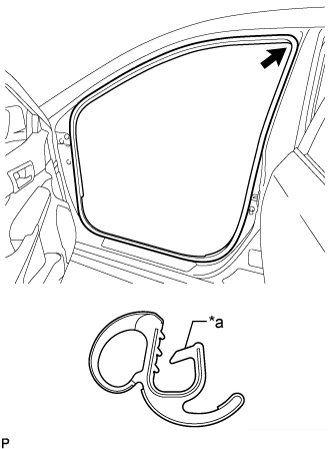
| 23. INSTALL FRONT DOOR OPENING TRIM WEATHERSTRIP LH |
![]() |
Align the alignment mark (Yellow) on the weatherstrip with the protruding portion on the vehicle body indicated by the arrow in the illustration, and install the front door opening trim weatherstrip LH.
| *a | Alignment Mark (Yellow) |
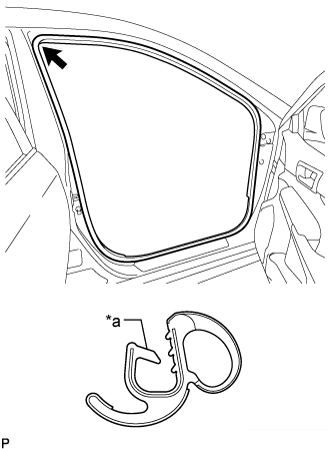
| 24. INSTALL FRONT PILLAR GARNISH RH |
| 25. INSTALL FRONT DOOR OPENING TRIM WEATHERSTRIP RH |
![]() |
Align the alignment mark (White) on the weatherstrip with the protruding portion on the vehicle body indicated by the arrow in the illustration, and install the front door opening trim weatherstrip RH.
| *a | Alignment Mark (White) |
| 26. INSTALL INNER REAR VIEW MIRROR ASSEMBLY |
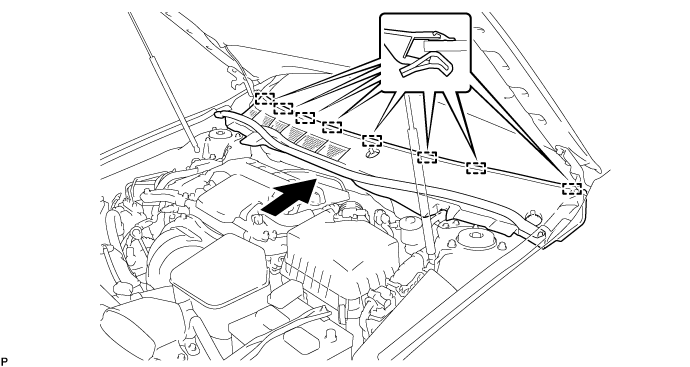
| 27. INSTALL COWL TOP VENTILATOR LOUVER SUB-ASSEMBLY |
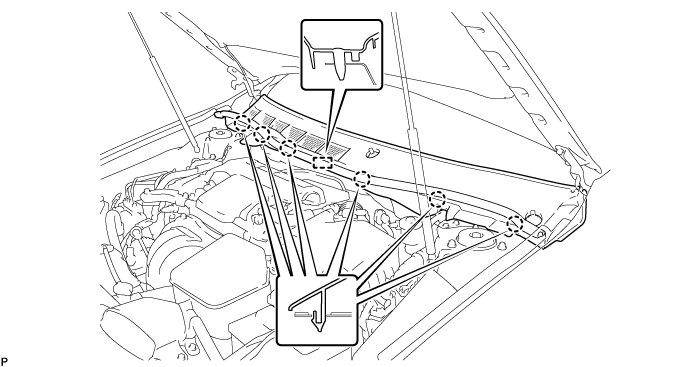
Engage the 8 guides as shown in the illustration.

Engage the 6 claws and guide to install the cowl top ventilator louver sub-assembly.

| 28. INSTALL FRONT FENDER TO COWL SIDE SEAL LH |
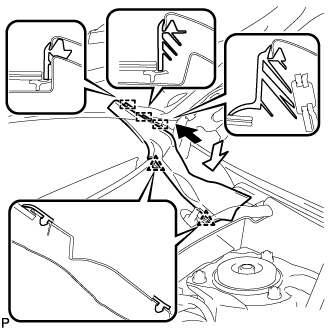
for TMC,TMMR Made:
![]() |
Engage the 3 guides and 2 clips to install the front fender to cowl side seal LH as shown in the illustration.
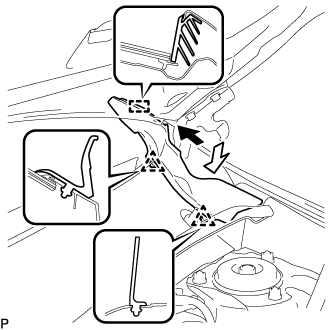
for TMMK Made:
![]() |
Engage the guide and 2 clips to install the front fender to cowl side seal LH as shown in the illustration.
| 29. INSTALL FRONT FENDER TO COWL SIDE SEAL RH |
| 30. INSTALL FRONT WIPER ARM AND BLADE ASSEMBLY LH |
![]() |
When reusing the front wiper arm and blade assembly LH:
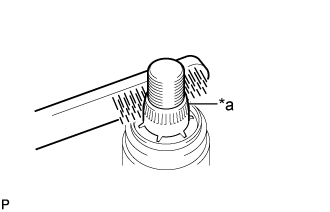
Clean the wiper arm serrations.
| *a | Wiper Arm Serration |
![]() |
When reusing the windshield wiper link assembly:
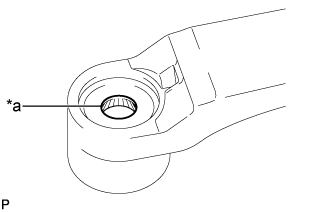
Clean the wiper pivot serrations with a wire brush.
| *a | Wiper Pivot Serration |
![]() |
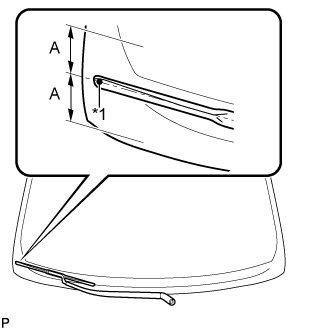
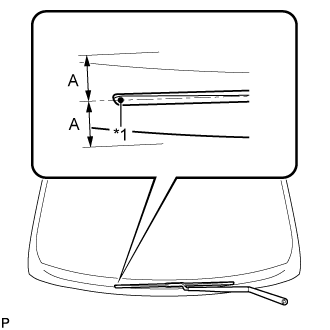
Set the front wiper arm and blade assembly LH in the range shown in the illustration and then install the front wiper arm and blade assembly LH with the nut.
| Area | Measurement |
| A | 7.5mm (0.295 in.) |
| *1 | Ceramic Dot |
| 31. INSTALL FRONT WIPER ARM AND BLADE ASSEMBLY RH |
![]() |
When reusing the front wiper arm and blade assembly RH:
Clean the wiper arm serrations.
| *a | Wiper Arm Serration |
![]() |
When reusing the windshield wiper link assembly:
Clean the wiper pivot serrations with a wire brush.
| *a | Wiper Pivot Serration |
![]() |
Set the front wiper arm and blade assembly RH in the range shown in the illustration and then install the front wiper arm and blade assembly RH with the nut.
| Area | Measurement |
| A | 7.5mm (0.295 in.) |
| *1 | Ceramic Dot |
Turn the ignition switch to ON.
Operate the front wiper while spraying washer fluid onto the windshield glass. Make sure that the front wiper functions properly and the wiper does not come into contact with the vehicle body.
Lift each wiper arm twice after the wipers stop and check the wiper set position.
Turn the ignition switch off.