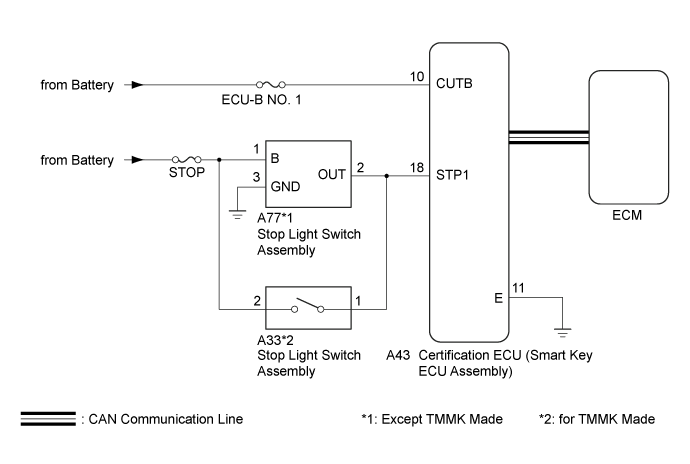
DTC B2284 Brake Signal Malfunction |
| DTC Code | DTC Detection Condition | Trouble Area | DTC Output Confirmation Operation |
| B2284 | The brake signal sent via direct line and the brake signal sent via CAN communication (1-trip detection logic*) do not match. |
| Connect the cable to the negative (-) battery terminal, release the brake pedal and wait 20 seconds or more. Then depress the brake pedal for 20 seconds or more. |
| Vehicle Condition when Malfunction Detected | Fail-safe Function when Malfunction Detected |
With the electrical key transmitter sub-assembly in the cabin, even if an engine start operation is performed, the engine does not start (the indicator in the combination meter is not illuminated in green). However, the engine can be started by turning the engine switch on (ACC) and then pressing and holding it.
| - |
| DTC | Data List Item | Active Test Item |
| B2284 | Power Source Control
ABS/VSC/TRC
| - |
| 1.READ VALUE USING INTELLIGENT TESTER (STOP LIGHT SWITCH ASSEMBLY) |
Connect the intelligent tester to the DLC3.
Turn the engine switch on (IG).
Turn the intelligent tester on.
Enter the following menus: Body / Power Source Control / Data List.
Read the Data List according to the display on the intelligent tester.
| Tester Display | Measurement Item/Range | Normal Condition | Specified Condition |
| Stop Light Switch1 | Stop light switch1/ON or OFF | ON: Brake pedal depressed OFF: Brake pedal released | - |
| Result | Proceed to |
| OK | A |
| NG (for 2AR-FE) | B |
| NG (for 2GR-FE) | C |
| NG (for 6AR-FSE) | D |
|
| ||||
|
| ||||
|
| ||||
| A | |
 |
| 2.CHECK HARNESS AND CONNECTOR (POWER SOURCE) |
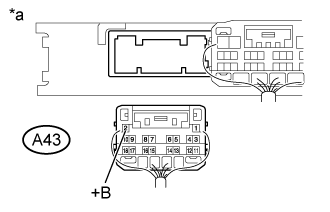 |
Disconnect the A43 connector from the certification ECU (smart key ECU assembly).
Measure the voltage according to the value(s) in the table below.
| Tester Connection | Condition | Specified Condition |
| A43-2 (+B) - Body ground | Always | 11 to 14 V |
| *a | Rear view of wire harness connector (to Certification ECU (smart key ECU assembly)) |
|
| ||||
| OK | |
|
| 3.CHECK HARNESS AND CONNECTOR (GROUND) |
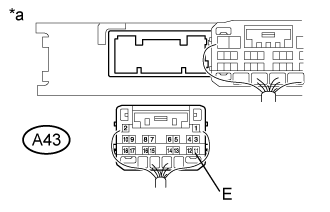 |
Measure the resistance according to the value(s) in the table below.
| Tester Connection | Condition | Specified Condition |
| A43-11 (E) - Body ground | Always | Below 1 Ω |
| *a | Rear view of wire harness connector (to Certification ECU (Smart Key ECU Assembly)) |
| Result | Proceed to |
| OK (Except TMMK Made) | A |
| OK (for TMMK Made) | B |
| NG | C |
|
| ||||
|
| ||||
| A | |
|
| 4.CHECK HARNESS AND CONNECTOR (CERTIFICATION ECU (SMART KEY ECU ASSEMBLY) - STOP LIGHT SWITCH ASSEMBLY) |
Disconnect the A43 certification ECU (smart key ECU assembly) connector.
Disconnect the A77 stop light switch assembly connector.
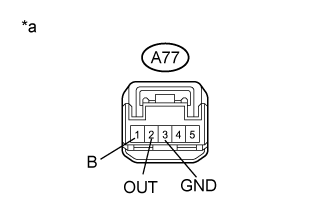 |
Measure the voltage according to the value(s) in the table below.
| Tester Connection | Condition | Specified Condition |
| A77-1 (B) - Body ground | Always | 11 to 14 V |
Measure the resistance according to the value(s) in the table below.
| Tester Connection | Condition | Specified Condition |
| A43-18 (STP1) - A77-2 (OUT) | Always | Below 1 Ω |
| A43-18 (STP1) or A77-2 (OUT) - Body ground | Always | 10 kΩ or higher |
| A77-3 (GND) - Body ground | Always | Below 1 Ω |
| *a | Front view of wire harness connector (to Stop Light Switch Assembly) |
|
| ||||
| OK | |
|
| 5.CHECK CERTIFICATION ECU (SMART KEY ECU ASSEMBLY) |
Reconnect the A43 certification ECU (smart key ECU assembly) connector.
Reconnect the A77 stop light switch assembly connector.
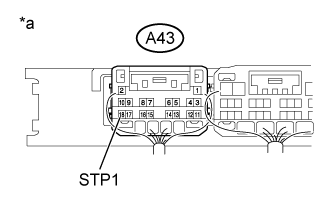 |
Measure the voltage according to the value(s) in the table below.
| Tester Connection | Condition | Specified Condition |
| A43-18 (STP1) - Body ground | Brake pedal released → depressed | 1 V or less → 9 V or higher |
| *a | Component with harness connected (Certification ECU (Smart Key ECU Assembly)) |
|
| ||||
| OK | ||
 | ||
| ||
| 6.CHECK HARNESS AND CONNECTOR (CERTIFICATION ECU (SMART KEY ECU ASSEMBLY) - STOP LIGHT SWITCH ASSEMBLY) |
Disconnect the A33 connector from the stop light switch assembly.
Measure the resistance according to the value(s) in the table below.
| Tester Connection | Condition | Specified Condition |
| A43-18 (STP1) - A33-1 | Always | Below 1 Ω |
| A43-18 (STP1) or A33-1 - Body ground | Always | 10 kΩ or higher |
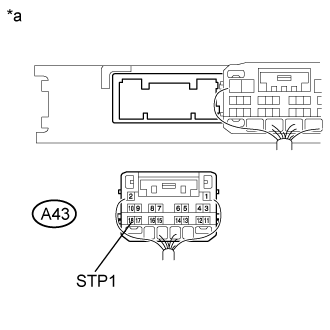 |
Reconnect the A43 stop light switch assembly connector.
Measure the voltage according to the value(s) in the table below.
| Tester Connection | Condition | Specified Condition |
| A43-18 (STP1) - Body ground | Brake pedal released | 1 V or less |
| Brake pedal depressed | 9 V or higher |
| *a | Rear view of wire harness connector (Certification ECU (Smart Key ECU Assembly)) |
|
| ||||
| OK | ||
| ||
| ||

