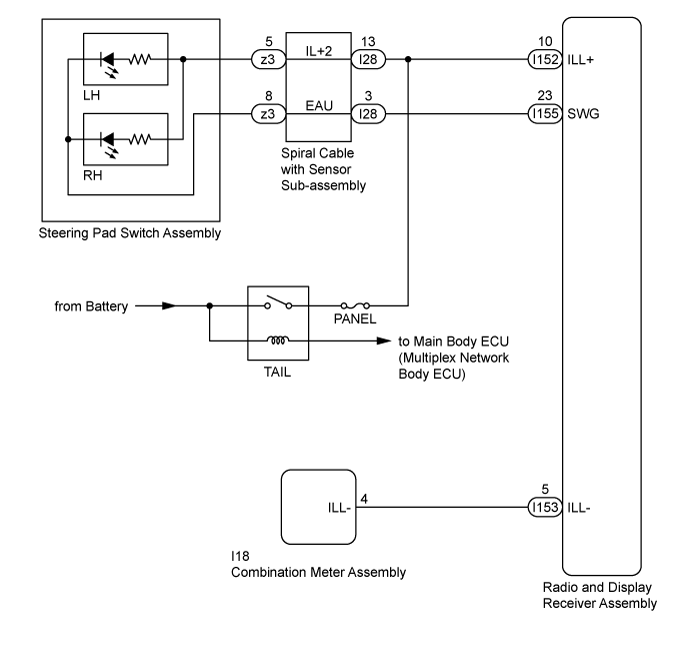
AUDIO AND VISUAL SYSTEM (for Radio and Display Type) > Illumination Circuit |
| 1.CHECK ILLUMINATION |
Check if the illumination for the radio and display receiver assembly, steering pad switch assembly, heater control switch or others (hazard switch, transmission control switch, etc.) comes on when the light control switch is turned to the head or tail position.
| Result | Proceed to |
| Illumination comes on for all components except steering pad switch assembly. | A |
| Illumination comes on for all components except radio and display receiver assembly. | B |
| Illumination comes on only for steering pad switch assembly. | C |
| No illumination comes on (radio and display receiver assembly, hazard switch, heater control switch, etc.). | D |
|
| ||||
|
| ||||
|
| ||||
| A | |
 |
| 2.CHECK HARNESS AND CONNECTOR (ILLUMINATION SIGNAL) |
Disconnect the I28 spiral cable with sensor sub-assembly connector.
Measure the voltage according to the value(s) in the table below.
| Tester Connection | Condition | Specified Condition |
| I28-13 (IL+2) - Body ground | Light control switch in the tail or head position | 11 to 14 V |
|
| ||||
| OK | |
|
| 3.INSPECT STEERING PAD SWITCH ASSEMBLY |
Remove the steering pad switch assembly (Click here).
Connect a positive (+) lead from the battery to terminal 5 (IL+2) and a negative (-) lead to terminal 8 (EAU) of the steering pad switch assembly connector.
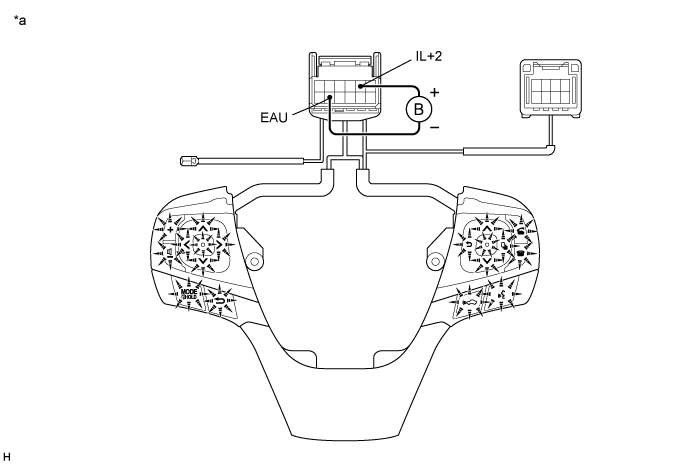
| *a | Component without harness connected (Steering Pad Switch Assembly) | - | - |
Check if the illumination for the steering pad switch assembly comes on.
|
| ||||
| OK | |
|
| 4.INSPECT SPIRAL CABLE WITH SENSOR SUB-ASSEMBLY |
Remove the spiral cable with sensor sub-assembly (Click here).
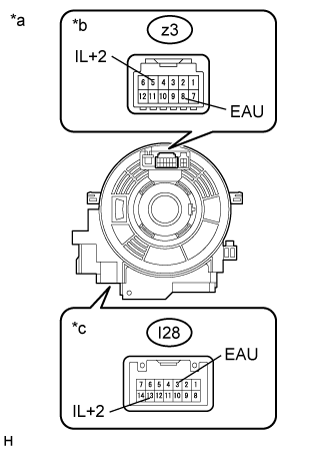 |
Measure the resistance according to the value(s) in the table below.
| Tester Connection | Condition | Specified Condition |
| z3-5 (IL+2) - I28-13 (IL+2) | Center | 3 Ω or less |
| 2.5 rotations to the left | ||
| 2.5 rotations to the right | ||
| z3-8 (EAU) - I28-3 (EAU) | Center | 3 Ω or less |
| 2.5 rotations to the left | ||
| 2.5 rotations to the right |
After setting the spiral cable with sensor sub-assembly to the center position, rotate the spiral cable with sensor sub-assembly 2.5 times clockwise. Then while rotating the spiral cable with sensor sub-assembly 5 times counterclockwise, measure the resistance according to the value(s) the table below.
| Tester Connection | Condition | Specified Condition |
| z3-5 (IL+2) - I28-13 (IL+2) | Always | 3 Ω or less |
| z3-8 (EAU) - I28-3 (EAU) | Always | 3 Ω or less |
| *a | Component without harness connected (Spiral Cable with Sensor Sub-assembly) |
| *b | Steering Pad Switch Assembly Side |
| *c | Vehicle Side |
|
| ||||
| OK | ||
 | ||
| ||
| 5.CHECK HARNESS AND CONNECTOR (ILLUMINATION SIGNAL) |
Disconnect the I152 radio and display receiver assembly connector.
Measure the voltage according to the value(s) in the table below.
| Tester Connection | Condition | Specified Condition |
| I152-10 (ILL+) - Body ground | Light control switch in the tail or head position | 11 to 14 V |
|
| ||||
| OK | |
|
| 6.CHECK HARNESS AND CONNECTOR (RADIO AND DISPLAY RECEIVER ASSEMBLY - COMBINATION METER ASSEMBLY) |
Disconnect the I153 radio and display receiver assembly connector.
Disconnect the I18 combination meter assembly connector.
Measure the resistance according to the value(s) in the table below.
| Tester Connection | Condition | Specified Condition |
| I153-5 (ILL-) - I18-4 (ILL-) | Always | Below 1 Ω |
| I153-5 (ILL-) - Body ground | Always | 10 kΩ or higher |
|
| ||||
| OK | ||
| ||
| ||

