AUTOMATIC TRANSAXLE ASSEMBLY > INSTALLATION |
| 1. INSPECT TORQUE CONVERTER ASSEMBLY |
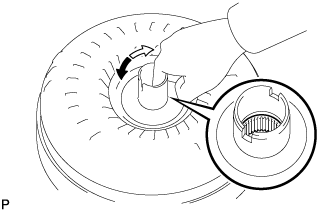
Inspect the one-way clutch.
![]() |
Press on the splines of the stator with a finger and rotate the spline. Check that the spline rotates smoothly when turned clockwise and rotates with difficulty when turned counterclockwise.
![]() | Difficult |
![]() | Smooth |
![]() |
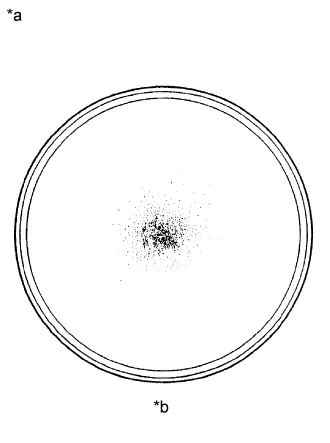
Inspect the torque converter assembly.
| *a | Sample showing maximum allowable amount of powder in ATF |
| *b | Full Scale |
Replace the ATF in the torque converter assembly.
![]() |
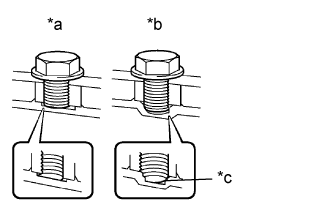
Prevent deformation of the torque converter assembly and damage to the oil pump gear.
| *a | Correct |
| *b | Incorrect |
| *c | Bottom is damaged |
| 2. INSTALL TORQUE CONVERTER ASSEMBLY |
![]() |
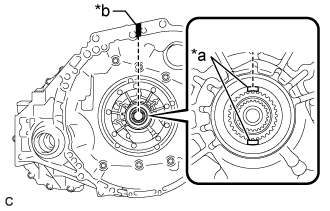
Turn the front oil pump drive gear so that the key is at the top and place a matchmark on the transaxle housing to indicate the position of the key.
| *a | Key |
| *b | Matchmark |
![]() |
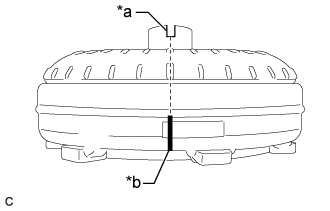
Place a matchmark on the torque converter assembly so that the position of its groove is clearly indicated.
| *a | Groove |
| *b | Matchmark |
![]() |
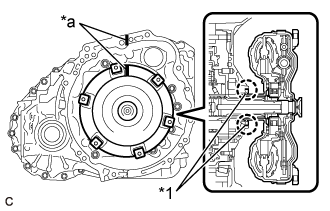
Align the matchmark on the transaxle housing with the one on the torque converter assembly and engage the splines of the input shaft with the turbine runner splines.
| *1 | Front Oil Pump Oil Seal |
| *a | Matchmark |
![]() |
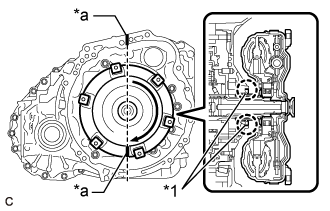
Rotate the torque converter assembly approximately 180° and engage the splines of the stator shaft with the stator assembly.
| *1 | Front Oil Pump Oil Seal |
| *a | Matchmark |
![]() |
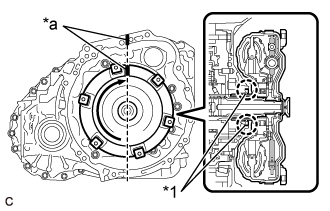
Rotate the torque converter assembly approximately 180° again, align the matchmark on the torque converter assembly with the one on the transaxle housing and insert the groove of the torque converter assembly into the key of the front oil pump drive gear.
| *1 | Front Oil Pump Oil Seal |
| *a | Matchmark |
Clean the drive plate and torque converter assembly setting bolt holes.
![]() |
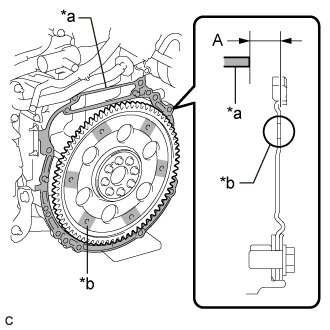
Using a vernier caliper and straightedge, measure the dimension (A) between the automatic transaxle assembly contact surface of the engine assembly*a and the torque converter assembly contact surface of the drive plate and ring gear sub-assembly*b.
| *a | Engine Assembly Surface |
| *b | Drive Plate and Ring Gear Sub-assembly Surface |
![]() |
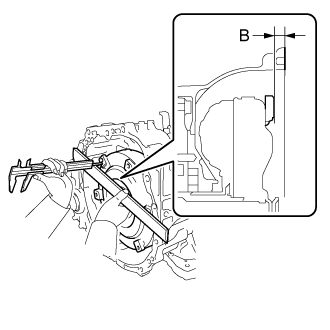
Using a vernier caliper and straightedge, measure the dimension (B) shown in the illustration and check that the dimension (B) is more than the dimension (A), which was measured in the previous step.
| 3. INSTALL TRANSMISSION CASE PLUG ASSEMBLY |
Coat a new O-ring with ATF and install it to the transmission case plug assembly.
Install the transmission case plug assembly to the transaxle housing.
| 4. INSTALL WIRE HARNESS CLAMP BRACKET |
Install the 3 wire harness clamp brackets to the transaxle case sub-assembly with the 3 bolts.
Install the wire harness clamp bracket to the rear transaxle cover sub-assembly with the bolt.
| 5. INSTALL NO. 1 TRANSMISSION CONTROL CABLE BRACKET |
Install the No. 1 transmission control cable bracket to the transaxle case sub-assembly with the 2 bolts.
| 6. INSTALL AUTOMATIC TRANSAXLE ASSEMBLY |
![]() |
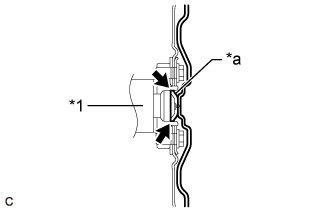
Apply clutch spline grease to the surface of the crankshaft that contacts the torque converter assembly centerpiece.
| *1 | Crankshaft |
| *a | Torque Converter Assembly Centerpiece |
![]() | Clutch Spline Grease |
![]() |
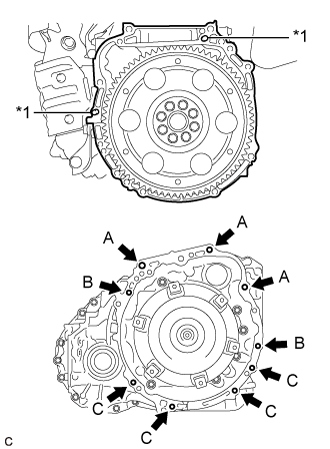
Confirm that the knock pins are installed to the engine assembly and are not damaged.
| *1 | Knock Pin |
While keeping the engine assembly and automatic transaxle assembly horizontal, align the knock pins with the holes in the automatic transaxle assembly and install the 9 bolts shown in the illustration.
| Bolt | Bolt Length | Torque |
| (A) | 55 mm (2.17 in.) | 64 N*m (653 kgf*cm, 47 ft.*lbf) |
| (B) | 50 mm (1.97 in.) | 46 N*m (469 kgf*cm, 34 ft.*lbf) |
| (C) | 32 mm (1.26 in.) | 44 N*m (449 kgf*cm, 32 ft.*lbf) |
| 33 mm (1.30 in.) | 43 N*m (438 kgf*cm, 32 ft.*lbf) |
| 7. INSTALL FRONT ENGINE MOUNTING BRACKET |
Install the front engine mounting bracket to the transaxle housing with the 3 bolts.
| 8. CONNECT ENGINE WIRE |
Engage the 4 clamps to connect the engine wire to the transaxle case sub-assembly.
Install the nut to the wire harness clamp bracket.
Connect the park/neutral position switch assembly connector.
Connect the ground cable to the transaxle case sub-assembly with the bolt.
| 9. INSTALL WIRE HARNESS CLAMP BRACKET |
Install the wire harness clamp bracket to the transaxle housing with the bolt.
Engage the 4 clamps to connect the wire harness to the wire harness clamp bracket.
Connect the oxygen sensor connector.
Install the clamp to the wire harness clamp bracket.
Connect the transmission breather hose sub-assembly to the clamp.
| 10. INSTALL WIRING HARNESS CONNECTOR |
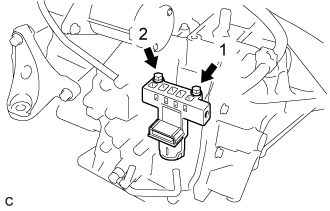
Temporarily install the wiring harness connector to the transaxle case sub-assembly.
![]() |
Install the wiring harness connector with the 2 bolts in the order shown in the illustration.
![]() |
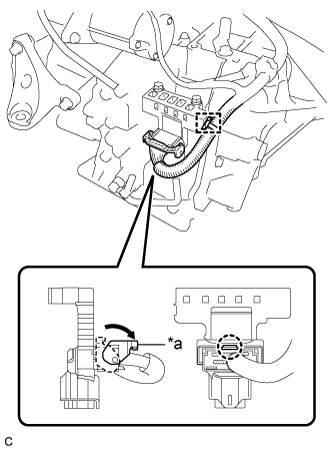
Connect the connector of the wiring harness connector and push down the lock lever to engage the claw.
| *a | Lever |
Engage the wire harness clamp.
| 11. INSTALL FRONT FRAME ASSEMBLY |
Install the engine mounting insulator LH with the nut.
Install the front engine mounting insulator with the bolt.
Install the engine mounting insulator RH with the nut.
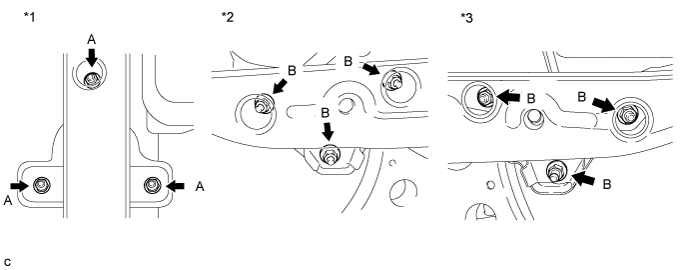
Fully tighten the 9 temporarily installed nuts of the engine mounting insulators.

| *1 | Front Engine Mounting Insulator | *2 | Engine Mounting Insulator RH |
| *3 | Engine Mounting Insulator LH | - | - |
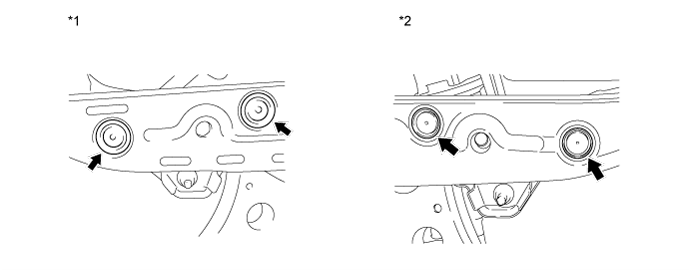
Install the 4 hole plugs.

| *1 | Engine Mounting Insulator RH | *2 | Engine Mounting Insulator LH |
| 12. INSTALL ENGINE ASSEMBLY WITH TRANSAXLE |
Set the engine assembly with transaxle on an engine lifter.
Remove the 2 bolts, No. 1 engine hanger and No. 2 engine hanger.
Install the engine assembly with transaxle to the vehicle.
![]() |
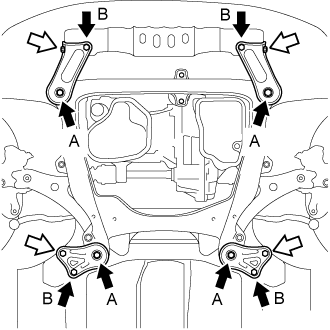
Install the frame side rail plate sub-assembly RH and frame side rail plate sub-assembly LH with the 4 bolts and 2 nuts.
![]() | Bolt |
![]() | Nut |
Install the front suspension member bracket sub-assembly RH and front suspension member bracket sub-assembly LH with the 4 bolts and 2 nuts.
| 13. INSTALL DRIVE PLATE AND TORQUE CONVERTER ASSEMBLY SETTING BOLT |
![]() |
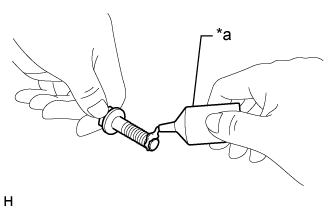
Apply a few drops of adhesive to 2 or 3 threads at the tip of each of the 6 drive plate and torque converter assembly setting bolts.
| *a | Adhesive |
Turn the crankshaft to gain access to the installation locations of the 6 drive plate and torque converter assembly setting bolts and install each drive plate and torque converter assembly setting bolt while holding the crankshaft pulley bolt with a wrench.
| 14. INSTALL FLYWHEEL HOUSING UNDER COVER |
| 15. CHECK AUTOMATIC TRANSAXLE SYSTEM |