Home › Vehicle Interior › HEATING / AIR CONDITIONING › AIR CONDITIONING UNIT (for TMMK Made)

AIR CONDITIONING UNIT (for TMMK Made) > INSTALLATION

for Preparation Click here


1. INSTALL AIR CONDITIONING UNIT ASSEMBLY


  1. Install the air conditioning unit assembly to the instrument panel reinforcement assembly with the 3 bolts.
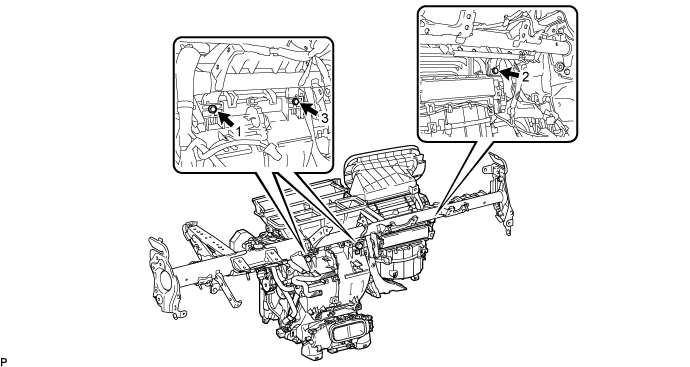

    E315345E01

    Torque:
    9.8 N*m{ 100 kgf*cm , 87 in.*lbf }

    NOTICE:
    Tighten the bolts in the order shown in the illustration to install the air conditioning unit assembly.
2. INSTALL INSTRUMENT PANEL REINFORCEMENT ASSEMBLY WITH AIR CONDITIONING UNIT

NOTICE:
  1. Be sure to support the air conditioning unit assembly when installing it because failure to do so may cause the bracket of the air conditioning unit assembly to break.
  2. When installing the air conditioning unit assembly, eliminate static electricity by touching the vehicle body to prevent the components from being damaged.


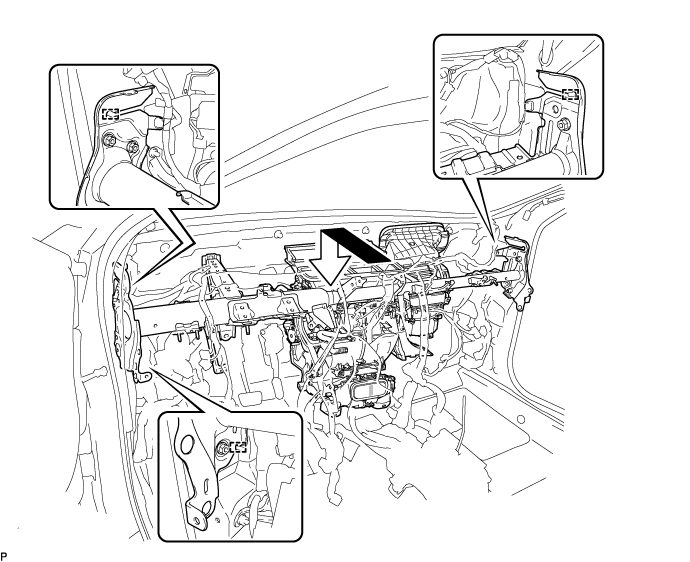
  1. Engage the 3 guides to temporarily install the instrument panel reinforcement assembly with air conditioning unit as shown in the illustration.


    E315346


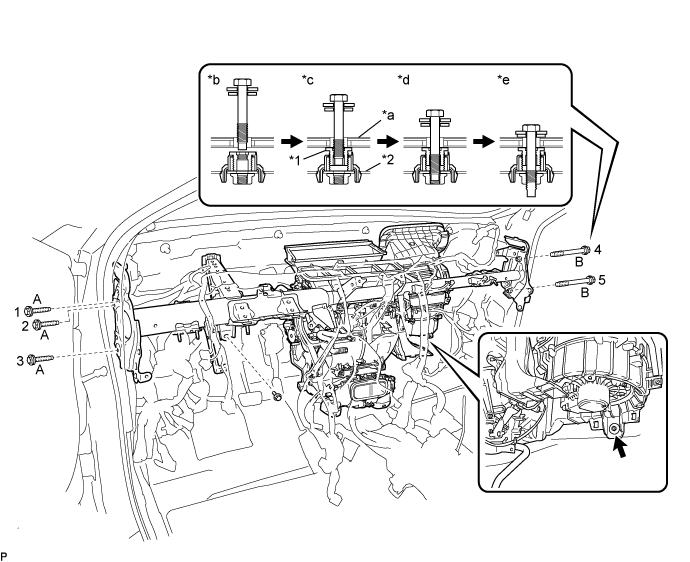
  1. Install the instrument panel reinforcement assembly with the 3 bolts (A) and 2 new bolts (B) as shown in the illustration.


    E315347E01


    Text in Illustration 
    *1
    Movable Collar
    *2
    Instrument Panel Reinforcement Assembly
    *a
    Vehicle Body
    *b
    Step 1
    *c
    Step 2
    *d
    Step 3
    *e
    Step 4
    -
    -

    Torque:
    20 N*m{ 204 kgf*cm , 15 ft.*lbf }

    NOTICE:
    Tighten the bolts in the order shown in the illustration to install the instrument panel reinforcement assembly.

  1. Install the bolt.

    Torque:
    15 N*m{ 153 kgf*cm , 11 ft.*lbf }

  1. Install the instrument panel reinforcement assembly with air conditioning unit with the nut.

    Torque:
    9.8 N*m{ 100 kgf*cm , 87 in.*lbf }


    E231353
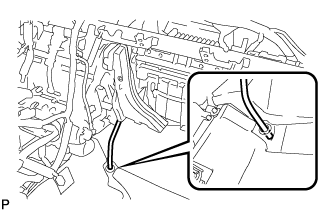
  1. Pass the drain cooler hose through the vehicle securely.

    NOTICE:
    Connect the drain cooler hose firmly to prevent water leaks.


    E227180E05
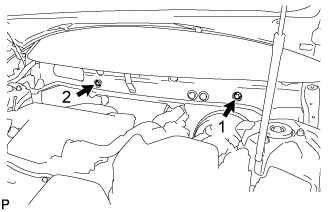
  1. Install the 2 bolts.

    Torque:
    9.8 N*m{ 100 kgf*cm , 87 in.*lbf }

    NOTICE:
    Tighten the bolts in the order shown in the illustration.

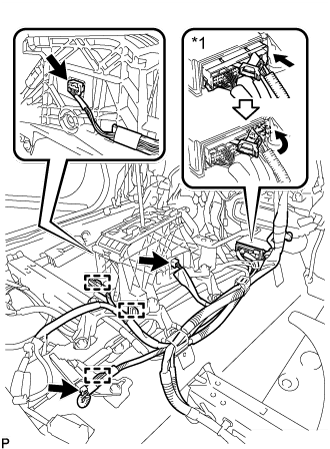
  1. Engage each clamp.

  1. Connect the connector.

  1. Connect the connector holder with the 2 nuts.

    Torque:
    8.0 N*m{ 82 kgf*cm , 71 in.*lbf }

  1. Connect the earth wire with the bolt.

    Torque:
    8.0 N*m{ 82 kgf*cm , 71 in.*lbf }

  1. Engage each clamp.

  1. Connect the 2 earth wires with the 2 bolts.

    Torque:
    8.0 N*m{ 82 kgf*cm , 71 in.*lbf }

  1. Engage each clamp.


  1. Engage the claw to connect the airbag connector as shown in the illustration.


    E227176


    E227174E03
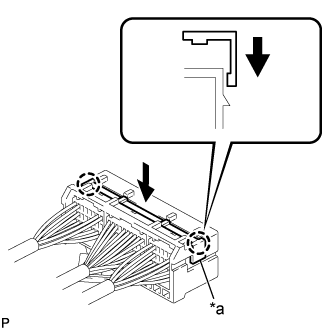
  1. Engage the 2 claws to lock the retainer as shown in the illustration.
    Text in Illustration 
    *a
    Retainer


    E236048E03
  1. Engage each clamp.
    Text in Illustration 
    *1
    Airbag Sensor Assembly

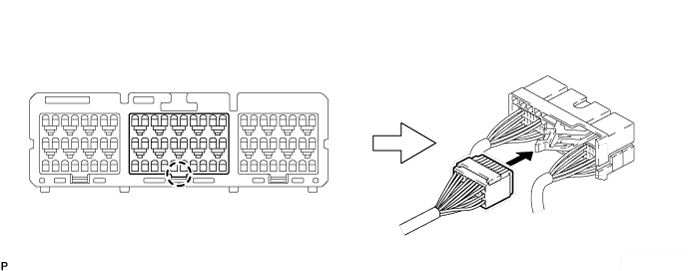
  1. Connect each connector.

  1. Connect the connector to the airbag sensor assembly as shown in the illustration.

    NOTICE:
    When connecting any airbag connector, take care not to damage the airbag wire harness.


    E227170
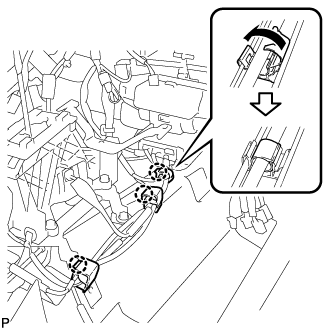
  1. Engage the 3 claws to close the 3 clamps as shown in the illustration.

  1. for 10 Speakers:

    1. Engage the 3 clamps.


3. INSTALL FRONT LOWER PANEL PACKING


    E227178
  1. Install the 2 front lower panel packings.


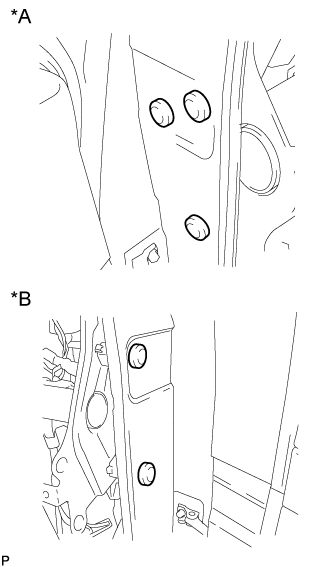
4. INSTALL INSTRUMENT PANEL SAFETY PAD CAP


    E227872E02
  1. Install 5 new instrument panel safety pad caps.
    Text in Illustration 
    *A
    for LH Side
    *B
    for RH Side


5. INSTALL NO. 2 INSTRUMENT PANEL BRACE SUB-ASSEMBLY
  1. Install the screw and 2 nuts.

    Torque:
    Nut:
    20 N*m{ 204 kgf*cm , 15 ft.*lbf }

  1. Install the No. 2 instrument panel brace sub-assembly with the bolt.

    Torque:
    20 N*m{ 204 kgf*cm , 15 ft.*lbf }

  1. Connect the earth wire with the bolt.

    Torque:
    8.0 N*m{ 82 kgf*cm , 71 in.*lbf }

  1. Engage each clamp.

  1. Connect each connector.


6. INSTALL INSTRUMENT PANEL TO COWL BRACE SUB-ASSEMBLY
  1. Install the screw and 2 nuts.

    Torque:
    Nut:
    20 N*m{ 204 kgf*cm , 15 ft.*lbf }

  1. Install the instrument panel to cowl brace sub-assembly with the bolt.

    Torque:
    20 N*m{ 204 kgf*cm , 15 ft.*lbf }

  1. Connect the earth wire with the bolt.

    Torque:
    8.0 N*m{ 82 kgf*cm , 71 in.*lbf }

  1. Engage each clamp.


7. INSTALL ROOM TEMPERATURE SENSOR (COOLER THERMISTOR)
  1. Connect the connector and cooler thermistor hose to install the room temperature sensor (cooler thermistor).


8. INSTALL NO. 1 CONSOLE BOX DUCT
  1. Install the No. 1 console box duct with the clip.


9. INSTALL REAR NO. 3 AIR DUCT
  1. Engage the 2 claws to install the rear No. 3 air duct.


10. INSTALL FLOOR CARPET BRACKET LH
  1. Engage the 2 guides.

  1. Install the floor carpet bracket LH with the 2 clips.


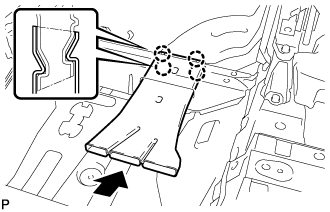
11. INSTALL REAR NO. 4 AIR DUCT


    E227158
  1. Engage the 4 claws to install the rear No. 4 air duct as shown in the illustration.


12. INSTALL FRONT FLOOR CARPET LH
  1. Engage each fastener and the guide to install the front floor carpet LH.


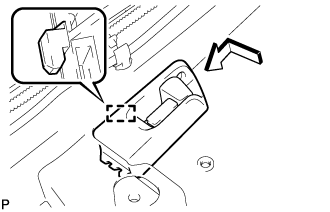
13. CONNECT FUEL LID LOCK OPEN LEVER SUB-ASSEMBLY


    E227151
  1. Engage the guide to connect the fuel lid lock open lever sub-assembly as shown in the illustration.

  1. Install the screw.


14. INSTALL REAR NO. 1 AIR DUCT
  1. Engage the 2 claws to install the rear No. 1 air duct.


15. INSTALL FLOOR CARPET BRACKET RH
  1. Engage the 2 guides.

  1. Install the floor carpet bracket RH with the 2 clips.


16. INSTALL REAR NO. 2 AIR DUCT


    E227876
  1. Engage the 4 claws to install the rear No. 2 air duct as shown in the illustration.


17. INSTALL FRONT FLOOR CARPET RH
  1. Engage each fastener and the guide to install the front floor carpet RH.


18. INSTALL FLOOR CARPET HOOK
  1. Engage the 6 claws to install the 6 floor carpet hooks.

  1. Engage the 6 guides.


19. INSTALL AIR CONDITIONING AMPLIFIER ASSEMBLY
  1. Engage the 2 guides.

  1. Install the air conditioning amplifier assembly with the 2 screws.

  1. Connect each connector.


20. INSTALL STEERING POST ASSEMBLY
(Click here)


21. INSTALL INSTRUMENT PANEL SAFETY PAD ASSEMBLY
(Click here)


22. INSTALL STEREO COMPONENT AMPLIFIER ASSEMBLY WITH BRACKET (for 10 Speakers)
  1. Engage the 2 guides to the vehicle body to temporarily install the stereo component amplifier assembly with bracket.

  1. Install the stereo component amplifier assembly with bracket with the bolt.

  1. Connect each connector and engage the clamp.

  1. Connect the ground wire with the bolt.

    Torque:
    8.0 N*m{ 82 kgf*cm , 71 in.*lbf }


23. INSTALL AUDIO AMPLIFIER COVER (for 10 Speakers)
  1. Install the audio amplifier cover with the 2 clips.


24. INSTALL FRONT SEAT ASSEMBLY LH (for Manual Seat)
(Click here)


25. INSTALL FRONT SEAT ASSEMBLY LH (for Power Seat)
(Click here)


26. INSTALL FRONT SEAT ASSEMBLY RH (for Manual Seat)

HINT:
Use the same procedure as for the LH side.


27. INSTALL FRONT SEAT ASSEMBLY RH (for Power Seat)

HINT:
Use the same procedure as for the LH side.


28. CONNECT AIR CONDITIONER TUBE AND ACCESSORY ASSEMBLY
  1. Remove the vinyl tape from the air conditioner tube and accessory assembly.

  1. Sufficiently apply compressor oil to a new O-ring and the fitting surface of the air conditioner tube and accessory assembly.

    Compressor Oil:
    ND-OIL 8 or equivalent

  1. Install the O-ring to the air conditioner tube and accessory assembly.

    NOTICE:
    Keep the O-ring and O-ring fitting surface free from dirt and foreign matter.

  1. Connect the air conditioner tube and accessory assembly.


29. CONNECT SUCTION HOSE SUB-ASSEMBLY
  1. Remove the vinyl tape from the suction hose sub-assembly.

  1. Sufficiently apply compressor oil to a new O-ring and the fitting surface of the suction hose sub-assembly.

    Compressor Oil:
    ND-OIL 8 or equivalent

  1. Install the O-ring to the suction hose sub-assembly.

    NOTICE:
    Keep the O-ring and O-ring fitting surface free from dirt and foreign matter.

  1. Connect the suction hose sub-assembly.


    E227143
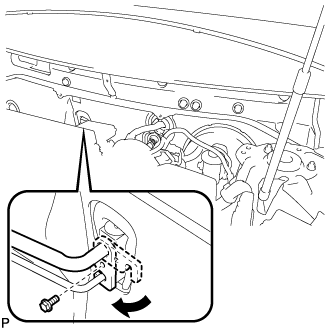
  1. Rotate the hook connector as shown in the illustration.

  1. Insert the pipe joint into the fitting hole securely and install the bolt.

    Torque:
    9.8 N*m{ 100 kgf*cm , 87 in.*lbf }


30. CONNECT HEATER INLET WATER HOSE
  1. Connect the heater inlet water hose and attach the clip.


31. CONNECT HEATER OUTLET WATER HOSE
  1. Connect the heater outlet water hose and attach the clip.


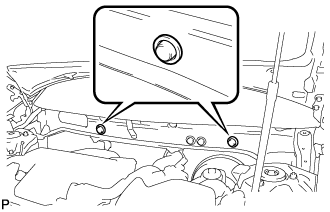
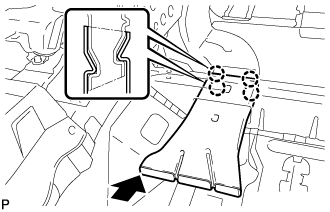
32. INSTALL FRONT OUTER COWL TOP PANEL SUB-ASSEMBLY
  1. Install the front outer cowl top panel sub-assembly with the 10 bolts.

    Torque:
    10 N*m{ 102 kgf*cm , 7 ft.*lbf }

  1. Engage the 2 clamps to install the wire harness to the front outer cowl top panel sub-assembly.

  1. w/ Windshield Deicer System:

    1. Connect the connector.

    2. Engage the 2 clamps to install the wire harness to the front outer cowl top panel sub-assembly.

  1. w/ Heated Windshield Defroster System:

    1. Connect the 2 connectors.

    2. Engage the 4 clamps to install the wire harness to the front outer cowl top panel sub-assembly.


33. INSTALL WINDSHIELD WIPER MOTOR AND LINK ASSEMBLY
(Click here)


34. ADD ENGINE COOLANT
  1. Tighten the radiator drain cock plug by hand.


    A260080E01
  1. Slowly fill the radiator assembly with engine coolant.
    Text in Illustration 
    *a
    Code Mark
    Specified Capacity 
    Code Mark "M"
    6.9 liters (7.3 US qts, 6.1 Imp. qts)
    Code Mark "G"
    7.0 liters (7.4 US qts, 6.2 Imp. qts)
    Code Mark "Z"
    7.3 liters (7.7 US qts, 6.4 Imp. qts)

    NOTICE:
    Do not substitute plain water for engine coolant.

    HINT:
    TOYOTA vehicles are filled with TOYOTA SLLC at the factory. In order to avoid damaging the engine cooling system and other technical problems, only use TOYOTA SLLC or similar high quality ethylene glycol based non-silicate, non-amine, non-nitrite, non-borate coolant with long-life hybrid organic acid technology (coolant with long-life hybrid organic acid technology is a combination of low phosphates and organic acids).

  1. Remove the reserve tank cap.

  1. Slowly pour engine coolant into the radiator reserve tank assembly until it reaches the full line.

  1. Squeeze the No. 1 radiator hose and No. 2 radiator hose several times by hand, and then check the level of the engine coolant.
    If the engine coolant level is low, add engine coolant.

  1. Install the radiator cap sub-assembly and reserve tank cap.

  1. Bleed air from the cooling system.

    NOTICE:
    1. Before starting the engine, turn the A/C switch off.
    2. Adjust the heater control to the maximum hot setting.
    3. Adjust the blower speed to the low setting.


    1. Warm up the engine until the thermostat opens. While the thermostat is open, circulate the engine coolant for several minutes.

      HINT:
      The thermostat open timing can be confirmed by squeezing the No. 2 radiator hose by hand, and sensing vibrations when the engine coolant starts to flow inside the No. 2 radiator hose.

    2. Maintain the engine speed at 2500 to 3000 rpm.

    3. Squeeze the No. 1 radiator hose and No. 2 radiator hose several times by hand to bleed air from the cooling system.

      CAUTION:
      When squeezing the No. 1 radiator hose and No. 2 radiator hose:
      1. Wear protective gloves.
      2. Be careful as the No. 1 radiator hose and No. 2 radiator hose are hot.
      3. Keep your hands away from the fan and No. 2 fan.

      NOTICE:
      1. If the coolant temperature gauge indicates an excessive temperature, turn off the engine and let it cool.
      2. Make sure that the radiator reserve tank assembly still has some engine coolant in it.
      3. If the radiator reserve tank assembly does not have enough engine coolant, the engine may overheat or be seriously damaged.
      4. If the radiator reserve tank assembly does not have enough engine coolant, perform the following: 1) stop the engine, 2) wait until the engine coolant has cooled down, and 3) add engine coolant until the radiator reserve tank assembly is filled to the full line.

  1. Stop the engine, and wait until the engine coolant cools down.

  1. Add engine coolant to the full line on the radiator reserve tank assembly.


35. INSPECT FOR COOLANT LEAK

NOTICE:
Before performing each inspection, turn the A/C switch off.


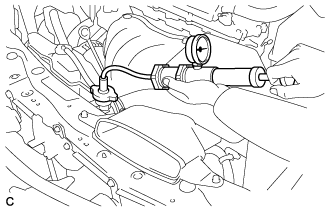
    A255285
  1. Fill the radiator with coolant and attach a radiator cap tester.

  1. Warm up the engine.

  1. Using a radiator cap tester, increase the pressure inside the radiator to 118 kPa (1.2 kgf/cm2, 17 psi), and check that the pressure does not drop.
    If the pressure drops, check the hoses, radiator and water pump for leaks. If no external leaks are found, check the heater core, cylinder block and cylinder head.


36. CHARGE AIR CONDITIONING SYSTEM WITH REFRIGERANT
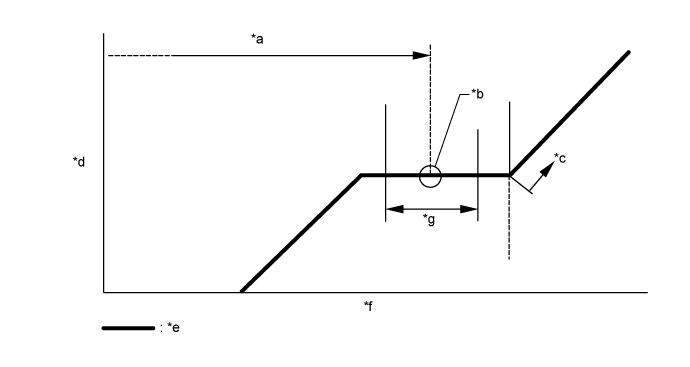
  1. Perform vacuum purging using a vacuum pump or appropriate equipment.


  1. Charge the air conditioning system with refrigerant.

    Refrigerant type:
    HFC-134a (R134a)


    E247093E08


    Text in Illustration 
    *a
    Standard Charge Amount
    *b
    Mean Value in Proper Range
    *c
    Overcharged
    *d
    High Pressure
    *e
    Sub-cool System
    *f
    Refrigerant Amount
    *g
    +/-50 g (+/-1.76 oz)
    -
    -

    Standard charge amount:
    450 to 550 g (15.9 to 19.3 oz)

    SST
    09985-20010   (09985-02010, 09985-02050, 09985-02060, 09985-02070, 09985-02080, 09985-02090, 09985-02110, 09985-02130, 09985-02140, 09985-02150)

    NOTICE:
    1. Do not turn the A/C switch on before charging the air conditioning system with refrigerant. Doing so may cause the compressor to work without refrigerant, resulting in overheating of the compressor.
    2. The refrigerant amount should be checked by quantity (weight).
    3. The graph above is shown for reference only.

    HINT:
    Ensure that sufficient refrigerant is available to recharge the system when using a refrigerant recovery unit. Refrigerant recovery units are not always able to recover 100% of the refrigerant from an air conditioning system.


37. WARM UP ENGINE
  1. Keep the A/C switch on for at least 2 minutes to warm up the compressor.

    NOTICE:
    To prevent damage to the compressor, be sure to warm up the compressor when turning the air conditioning on after removing and installing any air conditioning system lines (including the compressor).


38. INSPECT FOR REFRIGERANT LEAK
  1. After recharging the air conditioning system with refrigerant, inspect for refrigerant leaks using a halogen leak detector.

  1. Carry out the test under the following conditions:

    1. Ignition switch off.
    2. Secure good ventilation (the halogen leak detector may react to volatile gases which are not refrigerant, such as gasoline vapor and exhaust gas).
    3. Repeat the inspection 2 or 3 times.
    4. Measure the pressure to make sure that there is some refrigerant remaining in the air conditioning system.
      Pressure when the compressor is off: approx. 392 to 588 kPa (4.0 to 6.0 kgf/cm2, 57 to 85 psi)


    E268308E01
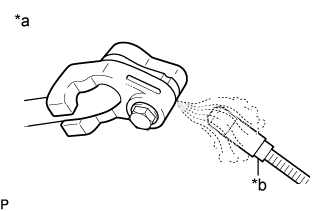
  1. Using a halogen leak detector, inspect for refrigerant leaks from the air conditioning system.
    Text in Illustration 
    *a
    Inspect for Leak
    *b
    Halogen Leak Detector


    E280081E01
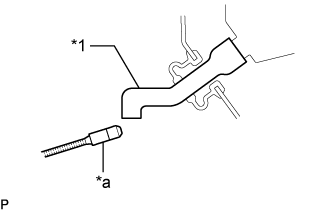
  1. Bring the halogen leak detector close to the drain cooler hose with the detector power off, and then turn the detector on.
    Text in Illustration 
    *1
    Drain Cooler Hose
    *a
    Halogen Leak Detector

    HINT:
    1. After the blower motor has stopped, leave the cooling unit for more than 15 minutes.
    2. Bring the halogen leak detector sensor under the drain cooler hose.
    3. When bringing the halogen leak detector close to the drain cooler hose, make sure that the halogen leak detector does not react to volatile gases. If it is not possible to avoid interference from volatile gases, the vehicle should be lifted up to allow checking for leaks.

  1. If a refrigerant leak is not detected from the drain cooler hose, remove the blower motor control from the cooling unit. Insert the halogen leak detector sensor into the unit and check for a leak.

  1. Disconnect the pressure sensor connector and leave it for approximately 20 minutes. Bring the halogen leak detector close to the pressure sensor and check for a leak.

    HINT:
    When checking for leaks, the presence of oily dirt at a joint can indicate a leak.


39. INITIALIZATION SERVO MOTOR
(Click here)