Home › Engine / Hybrid System ยท 2GR-FE › FUEL › FUEL PUMP

FUEL PUMP > REMOVAL

for Preparation Click here


HINT:
  1. If a malfunction such as pump lock occurs and the fuel pump is damaged, excessive current may be continuously applied to the fuel pump control ECU, damaging its internal parts. Make sure to replace the fuel pump control ECU at the same time when replacing the fuel pump.
  2. Perform "Inspection After Repair" after replacing the fuel pump assembly (Click here).


1. PRECAUTION

NOTICE:
After turning the engine switch off, waiting time may be required before disconnecting the cable from the negative (-) battery terminal. Therefore, make sure to read the disconnecting the cable from the negative (-) battery terminal notice before proceeding with work (Click here).


2. DISCHARGE FUEL SYSTEM PRESSURE
(Click here)


3. DISCONNECT CABLE FROM NEGATIVE BATTERY TERMINAL

NOTICE:
When disconnecting the cable, some systems need to be initialized after the cable is reconnected (Click here).


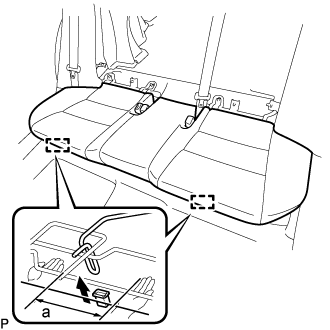
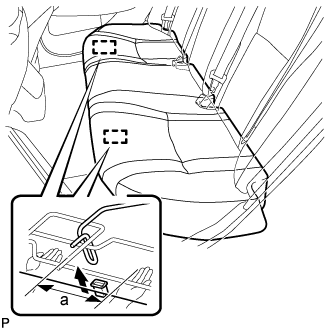
4. REMOVE REAR SEAT CUSHION ASSEMBLY (for Fold Down Seat Type)


    B383050E01
  1. Lift up the front edge of the rear seat cushion assembly as shown in the illustration and disengage the 2 rear seat cushion frame hooks on the front side of the rear seat cushion assembly from the 2 rear seat cushion lock hooks.
    Standard Measurement 
    a
    100 mm (3.94 in.) or less

    NOTICE:
    Be sure to hold the part of the rear seat cushion assembly directly next to the rear seat cushion lock hooks when lifting it up. Lifting a different part of the rear seat cushion assembly may deform the rear seat cushion frame.
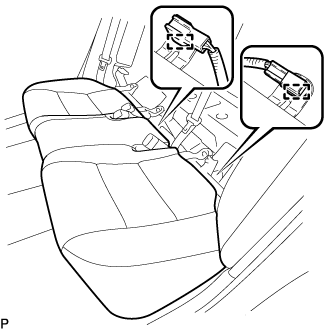
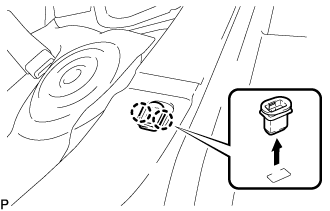
  1. w/ Seat Heater System:

    1. Disconnect the connector.


    2. B384060
    3. Disengage the 2 clamps.

  1. Pass the 2 rear seat inner belt assemblies through the rear seat cushion assembly and remove the rear seat cushion assembly.

    NOTICE:
    Be careful not to damage the vehicle body.


5. REMOVE REAR SEAT CUSHION ASSEMBLY (for Reclining Seat Type)


    B290774E01
  1. Lift up the front edge of the rear seat cushion assembly as shown in the illustration and disengage the 2 rear seat cushion frame hooks on the front side of the rear seat cushion assembly from the 2 rear seat cushion lock hooks.
    Standard Measurement 
    a
    100 mm (3.94 in.) or less

    NOTICE:
    Be sure to hold the part of the rear seat cushion assembly directly next to the rear seat cushion lock hooks when lifting it up. Lifting a different part of the rear seat cushion assembly may deform the rear seat cushion frame.
  1. Disconnect the 2 seat heater connectors.

  1. Pass the 2 rear seat inner belt assemblies through the rear seat cushion assembly and remove the rear seat cushion assembly.

    NOTICE:
    Be careful not to damage the vehicle body.


6. REMOVE REAR SEAT CUSHION LOCK HOOK (for Fold Down Seat Type)


    B393387
  1. Disengage the 2 claws to remove the rear seat cushion lock hook as shown in the illustration.

    NOTICE:
    Rear seat cushion lock hooks must not be reused.

    HINT:
    Use the same procedure for the RH side and LH side.


7. REMOVE REAR SEAT CUSHION LOCK HOOK (for Reclining Seat Type)


    B393387
  1. Disengage the 2 claws to remove the rear seat cushion lock hook as shown in the illustration.

    NOTICE:
    Rear seat cushion lock hooks must not be reused.

    HINT:
    Use the same procedure as for the LH side.


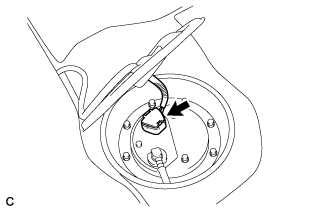
8. REMOVE REAR FLOOR SERVICE HOLE COVER


    A254977
  1. Remove the rear floor service hole cover.

  1. Disconnect the fuel pump connector.


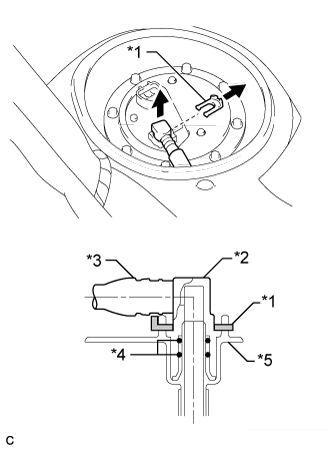
9. DISCONNECT FUEL PUMP TUBE SUB-ASSEMBLY


    A255953E01
  1. Remove the tube joint clip, and pull out the fuel pump tube.
    Text in Illustration 
    *1
    Tube Joint Clip
    *2
    Fuel Tube Joint
    *3
    Fuel Pump Tube
    *4
    O-ring
    *5
    Fuel Suction Plate

    NOTICE:
    1. Remove any dirt or foreign matter on the fuel tube joint before performing this work.
    2. Do not allow any scratches or foreign matter to get on the parts when disconnecting them as the fuel tube joint has O-rings that seal the pipe.
    3. Only disconnect the fuel tube joint by hand.
    4. Do not forcibly bend, twist or turn the fuel pump tube.
    5. Protect the disconnected part by covering it with a plastic bag after disconnecting the fuel tube joint.
    6. If the fuel tube joint and fuel suction plate are stuck, push and pull to release them.


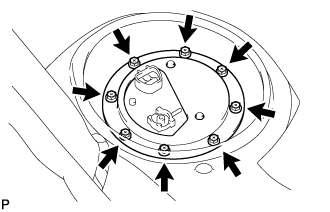
10. REMOVE FUEL TANK VENT TUBE SET PLATE


    A129480
  1. Remove the 8 bolts and set plate.


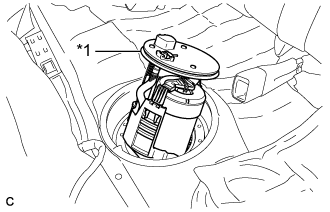
11. REMOVE FUEL SUCTION TUBE WITH PUMP AND GAUGE ASSEMBLY


    A259327E01
  1. Remove the fuel suction tube with pump and gauge assembly from the fuel tank.
    Text in Illustration 
    *1
    Fuel Suction Tube Set Gasket

    NOTICE:
    1. Do not damage the suction filter.
    2. Make sure that the fuel sender gauge arm does not bend.

  1. Remove the fuel suction tube set gasket from the fuel suction tube assembly.