Home › Engine / Hybrid System ยท 2GR-FE › FUEL › FUEL TANK

FUEL TANK > INSTALLATION

for Preparation Click here


1. INSTALL NO. 4 FUEL TUBE CLAMP
  1. Install the 3 No. 4 fuel tube clamps.


2. INSTALL FUEL MAIN TUBE SUPPORT
  1. Install the fuel main tube support with the bolt.

    Torque:
    5.4 N*m{ 55 kgf*cm , 48 in.*lbf }


3. INSTALL FUEL PUMP TUBE SUB-ASSEMBLY
  1. Install the fuel pump tube sub-assembly to the fuel main tube support and No. 4 fuel tube clamp.


4. INSTALL FUEL CUT OFF WITH TUBE VALVE ASSEMBLY
  1. Install 2 new fuel tank breather tube gaskets to the fuel tank assembly.


    A060494E03
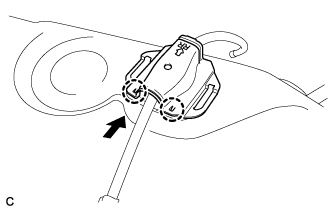
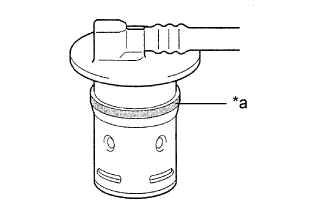
  1. Apply a light coat of gasoline around 2 new fuel cut off with tube valve assemblies as shown in the illustration, and carefully insert them into the fuel tank assembly.
    Text in Illustration 
    *a
    Apply gasoline around the valve

    NOTICE:
    Be careful not to drop the fuel tank breather tube gaskets into the fuel tank assembly.
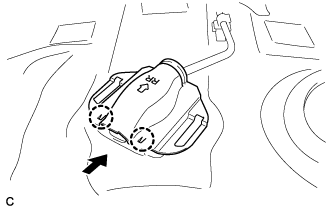
  1. Check that the fuel cut off with tube valve assembly is fully inserted.


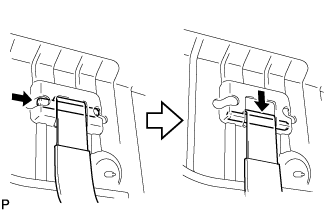
5. INSTALL NO. 3 FUEL TANK PROTECTOR


    A255936E02
  1. Install the No. 3 fuel tank protector by sliding it as shown in the illustration.


6. INSTALL NO. 2 FUEL TANK PROTECTOR


    A255937E02
  1. Install the No. 2 fuel tank protector by sliding it as shown in the illustration.


7. INSTALL NO. 1 FUEL TANK CUSHION


    A255938E01
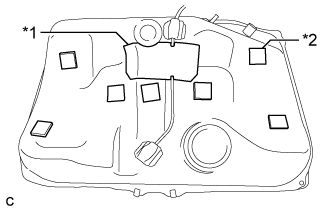
  1. Install a new No. 1 fuel tank cushion as shown in the illustration.
    Text in Illustration 
    *1
    No. 1 Fuel Tank Cushion
    *2
    No. 2 Fuel Tank Cushion


8. INSTALL NO. 2 FUEL TANK CUSHION
  1. Install 7 new No. 2 fuel tank cushions as shown in the illustration.


9. INSTALL FUEL TANK ASSEMBLY
  1. Install the 4 clip nuts.


    A129491
  1. Install the 2 fuel tank bands with the 2 pins.

  1. Support the fuel tank using an engine lifter.


    A255940E01
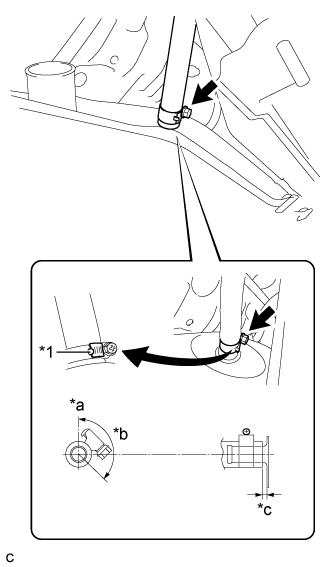
  1. Raise the engine lifter so that the breather tube fuel hose can be connected as shown in the illustration.
    Text in Illustration 
    *1
    Claw
    *a
    Up
    *b
    135°
    *c
    0 to 3 mm (0 to 0.12 in.)

    NOTICE:
    Slowly raise the engine lifter so as not to drop the fuel tank assembly.


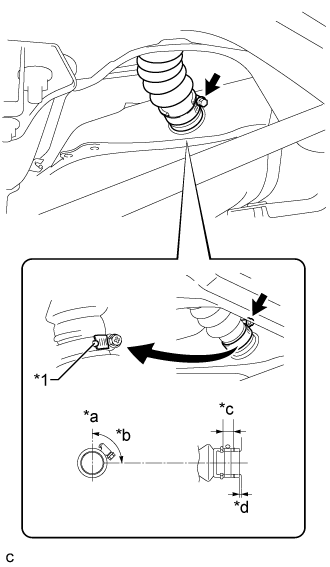
    A255939E01
  1. Connect the fuel tank to filler pipe hose to the fuel tank as shown in the illustration, then fit the hose with the clamp.
    Text in Illustration 
    *1
    Claw
    *a
    Up
    *b
    90°
    *c
    Clamp Area
    *d
    0 to 3 mm (0 to 0.12 in.)

  1. Slightly lift the engine lifter, then install the fuel tank to the vehicle.

  1. Tighten the 2 bolts of the fuel tank bands.

    Torque:
    45 N*m{ 459 kgf*cm , 33 ft.*lbf }


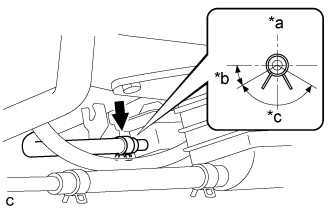
    A255941E01
  1. Connect the fuel emission hose to the charcoal canister, then fit it with the clip as shown in the illustration.
    Text in Illustration 
    *a
    Up
    *b
    30°
    *c
    120°


10. CONNECT FUEL PUMP TUBE SUB-ASSEMBLY


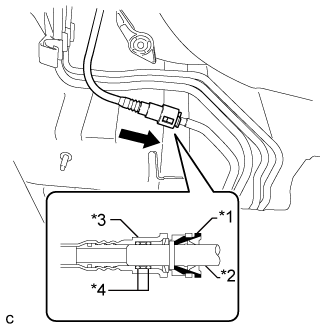
    A255958E01
  1. Align the fuel pump tube connector with the pipe, push the fuel pump tube connector in until the retainer makes a "click" sound.
    Text in Illustration 
    *1
    Retainer
    *2
    Pipe
    *3
    Quick Connector
    *4
    O-ring

    NOTICE:
    1. Check that there are no scratches or foreign matter around the connected part of the fuel pump tube connector and pipe before starting this step.
    2. After connecting the fuel pump tube connector, check that the fuel pump tube connector is securely connected by pulling on the fuel pump tube connector.


11. INSTALL LOWER CENTER FUEL TANK PROTECTOR
  1. Install the lower center fuel tank protector with the 4 bolts.

    Torque:
    5.4 N*m{ 55 kgf*cm , 48 in.*lbf }


12. INSTALL REAR NO. 1 STABILIZER BAR BRACKET
  1. Install the 2 rear No. 1 stabilizer bar brackets with the 4 bolts.

    Torque:
    31 N*m{ 316 kgf*cm , 23 ft.*lbf }


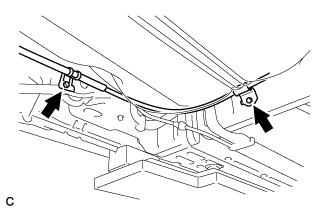
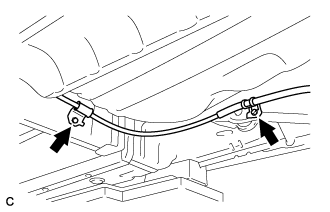
13. INSTALL NO. 3 PARKING BRAKE CABLE ASSEMBLY


    A135223
  1. Install the No. 3 parking brake cable assembly with the bolt and nut.

    Torque:
    6.0 N*m{ 61 kgf*cm , 53 in.*lbf }


14. INSTALL NO. 2 PARKING BRAKE CABLE ASSEMBLY


    A135222
  1. Install the No. 2 parking brake cable assembly with the bolt and nut.

    Torque:
    6.0 N*m{ 61 kgf*cm , 53 in.*lbf }


15. INSTALL NO. 1 FLOOR UNDER COVER
  1. for TMC Made:

    1. Install the No. 1 floor under cover with the 5 nuts and 2 clips.

      HINT:
      The 5 nuts and 2 clips are attached to the No. 1 floor under cover.

      Torque:
      Nut:
      4.0 N*m{ 41 kgf*cm , 35 in.*lbf }

    2. Install the screw.

  1. for TMMR Made:

    1. Install the No. 1 floor under cover with the 5 nuts and 2 clips.

      HINT:
      The 5 nuts and 2 clips are attached to the No. 1 floor under cover.

      Torque:
      Nut:
      4.0 N*m{ 41 kgf*cm , 35 in.*lbf }


16. INSTALL NO. 2 FLOOR UNDER COVER
  1. for TMC Made:

    1. Install the No. 2 floor under cover with the 6 nuts.

      HINT:
      The 6 nuts are attached to the No. 2 floor under cover.

      Torque:
      4.0 N*m{ 41 kgf*cm , 35 in.*lbf }

    2. Install the screw and 2 clips.

  1. for TMMR Made:

    1. Install the No. 2 floor under cover with the 6 nuts.

      HINT:
      The 6 nuts are attached to the No. 2 floor under cover.

      Torque:
      4.0 N*m{ 41 kgf*cm , 35 in.*lbf }

    2. Install the 2 clips.


17. INSTALL CENTER EXHAUST PIPE ASSEMBLY
(Click here)


18. INSTALL FUEL SUCTION TUBE WITH PUMP AND GAUGE ASSEMBLY
(Click here)


19. ADD FUEL


20. INSPECT FOR EXHAUST GAS LEAK