 |
Disconnect each connector.
BLACK OUT TAPE (for Front Door) > REMOVAL |
| 1. PRECAUTION |
| 2. DISCONNECT CABLE FROM NEGATIVE BATTERY TERMINAL |
| 3. REMOVE OUTER REAR VIEW MIRROR ASSEMBLY (for TMMK Made) |
| 4. REMOVE FRONT DOOR SERVICE HOLE COVER (for TMMK Made) |
|
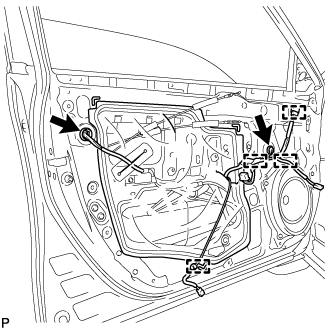
Disconnect each connector.
Disengage the 4 clamps.
Remove the front door service hole cover.
| 5. REMOVE FRONT DOOR GLASS SUB-ASSEMBLY (for TMMK Made) |
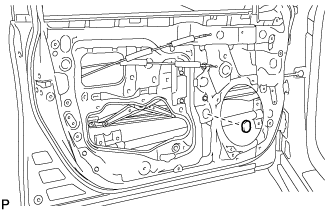 |
Remove the grommet.
Connect the cable to the negative (-) battery terminal.
Connect the multiplex network master switch assembly and move the front door glass sub-assembly so that the door glass bolts can be seen.
Disconnect the cable from the negative (-) battery terminal.
Disconnect the multiplex network master switch assembly.
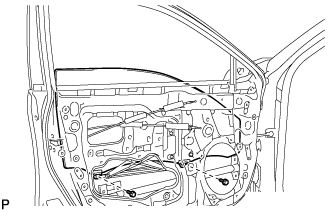 |
Remove the 2 bolts.
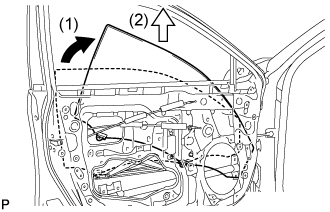 |
Remove the front door glass sub-assembly as indicated by the arrows, in the order shown in the illustration.
| 6. REMOVE FRONT DOOR GLASS RUN (for TMMK Made) |
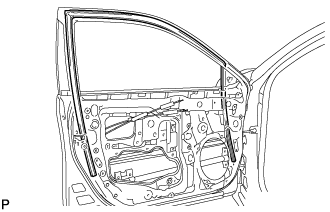 |
Remove the front door glass run.
| 7. REMOVE FRONT DOOR CHECK ASSEMBLY (for TMMK Made) |
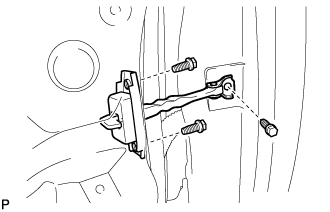 |
Remove the 3 bolts and front door check assembly.
| 8. REMOVE FRONT DOOR WEATHERSTRIP (for TMMK Made) |
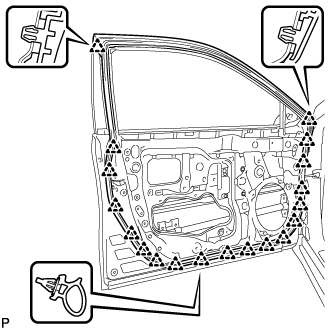 |
Using a clip remover, disengage the 19 clips and remove the front door weatherstrip.
| 9. REMOVE DOOR FRAME GARNISH (for TMMK Made) |
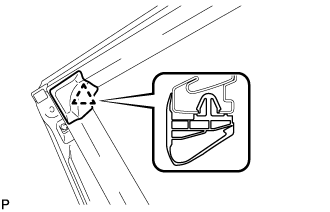 |
Disengage the clip and remove the door frame garnish.
| 10. REMOVE OUTER REAR VIEW MIRROR ASSEMBLY (for TMC, TMMR Made) |
| 11. REMOVE FRONT DOOR SERVICE HOLE COVER (for TMC, TMMR Made) |
|
Disconnect each connector.
Disengage the 4 clamps.
Remove the front door service hole cover.
| 12. REMOVE FRONT DOOR GLASS SUB-ASSEMBLY (for TMC, TMMR Made) |
|
Remove the grommet.
Connect the cable to the negative (-) battery terminal.
Connect the multiplex network master switch assembly and move the front door glass sub-assembly so that the door glass bolts can be seen.
Disconnect the cable from the negative (-) battery terminal.
Disconnect the multiplex network master switch assembly.
|
Remove the 2 bolts.
|
Remove the front door glass sub-assembly as indicated by the arrows, in the order shown in the illustration.
| 13. REMOVE FRONT DOOR GLASS RUN (for TMC, TMMR Made) |
|
Remove the front door glass run.
| 14. REMOVE FRONT DOOR CHECK ASSEMBLY (for TMC, TMMR Made) |
|
Remove the 3 bolts and front door check assembly.
| 15. REMOVE FRONT DOOR WEATHERSTRIP (for TMC, TMMR Made) |
|
Using a clip remover, disengage the 19 clips and remove the front door weatherstrip.
| 16. REMOVE DOOR FRAME GARNISH (for TMC, TMMR Made) |
|
Disengage the clip and remove the door frame garnish.
| 17. REMOVE FRONT DOOR STRIPE |
Using a heat light, heat the front door stripe and vehicle body.
| Item | Temperature |
| Vehicle Body and Front Door Outside Stripe | 40 to 60°C (104 to 140°F) |
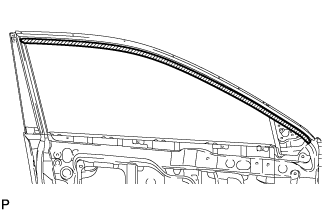 |
Pull back on one of the ends of the front door stripe to remove it.
| 18. REMOVE FRONT DOOR LOWER OUTSIDE STRIPE |
Using a heat light, heat the front door lower outside stripe and vehicle body.
| Item | Temperature |
| Vehicle Body and Front Door Rear Outside Stripe | 40 to 60°C (104 to 140°F) |
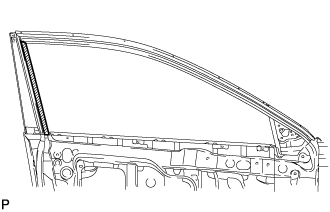 |
Pull back on one of the ends of the front door lower outside stripe to remove it.