Install the No. 3 parking brake cable assembly with the 4 bolts and nut.
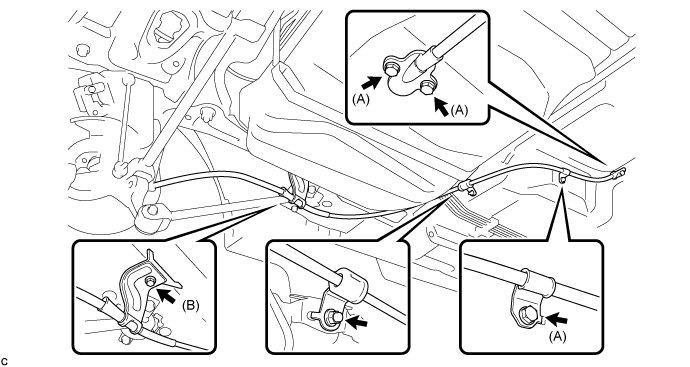
- Torque:
- Bolt (A):
- 8.5 N*m{ 87 kgf*cm , 75 in.*lbf }
- Bolt (B) and Nut:
- 6.0 N*m{ 61 kgf*cm , 53 in.*lbf }
PARKING BRAKE CABLE (for TMMK Made) > INSTALLATION |
| 1. INSTALL NO. 2 PARKING BRAKE CABLE CLAMP |
Install a new No. 2 parking brake cable clamp to the No. 3 parking brake cable assembly.
| 2. INSTALL NO. 3 PARKING BRAKE CABLE ASSEMBLY |
Install the No. 3 parking brake cable assembly with the 4 bolts and nut.
Install the No. 3 parking brake cable assembly with the bolt.
Install the clip to the No. 3 parking brake cable assembly.
| 3. INSTALL NO. 2 FLOOR UNDER COVER (for LH Side) |
Install the No. 2 floor under cover with the 2 bolts, 3 nuts, screw and 2 clips.
| 4. INSTALL NO. 1 FLOOR UNDER COVER (for RH Side) |
Install the No. 1 floor under cover with the 2 bolts, 3 nuts, screw and 2 clips.
| 5. INSTALL PARKING BRAKE SHOE LEVER |
| 6. INSTALL FRONT NO. 2 FLOOR HEAT INSULATOR |
Install the front No. 2 floor heat insulator with the 3 nuts.
| 7. INSTALL FRONT EXHAUST PIPE ASSEMBLY |
| 8. INSTALL NO. 4 PARKING BRAKE CABLE ASSEMBLY |
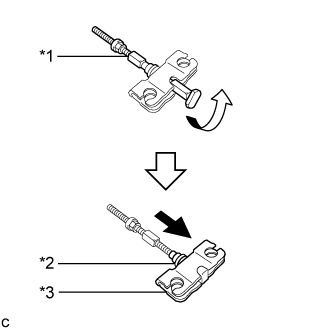 |
Install the No. 4 parking brake cable assembly to the parking brake equalizer.
| *1 | No. 4 Parking Brake Cable Assembly |
| *2 | Rubber Boot |
| *3 | Parking Brake Equalizer |
Slide the parking brake equalizer and rubber boot as shown in the illustration.
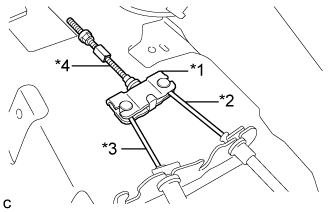 |
Connect the No. 3 parking brake cable assembly to the parking brake equalizer.
| *1 | Parking Brake Equalizer |
| *2 | No. 2 Parking Brake Cable Assembly |
| *3 | No. 3 Parking Brake Cable Assembly |
| *4 | No. 4 Parking Brake Cable Assembly |
Connect the No. 2 parking brake cable assembly to the parking brake equalizer.
| 9. INSTALL NO. 4 CROSS MEMBER FLOOR REINFORCEMENT SUB-ASSEMBLY |
Install the No. 4 cross member floor reinforcement sub-assembly with the 8 bolts.
Install the floor carpet.
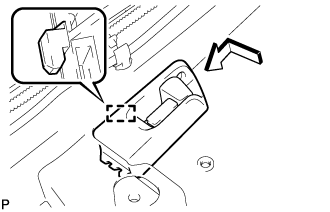 |
Engage the guide to connect the fuel lid lock open lever sub-assembly as shown in the illustration.
Install the screw.
| 10. INSTALL FLOOR CARPET HOOK |
Engage the 6 claws to install the 6 floor carpet hooks.
Engage the 6 guides.
| 11. INSTALL STEREO COMPONENT AMPLIFIER ASSEMBLY WITH BRACKET (for 10 Speakers) |
Engage the 2 guides to the vehicle body to temporarily install the stereo component amplifier assembly with bracket.
Install the stereo component amplifier assembly with bracket with the bolt.
Connect each connector and engage the clamp.
Connect the ground wire with the bolt.
| 12. INSTALL AUDIO AMPLIFIER COVER (for 10 Speakers) |
Install the audio amplifier cover with the 2 clips.
| 13. INSTALL FRONT SEAT ASSEMBLY LH |
| 14. INSTALL FRONT SEAT ASSEMBLY RH |
for Power Seat:
for Manual Seat: (Click here)
| 15. INSTALL CENTER PILLAR LOWER GARNISH LH |
Engage the 2 claws and 3 clips to install the center pillar lower garnish LH.
| 16. CONNECT FRONT SEAT OUTER BELT ASSEMBLY LH |
Install the floor anchor of the front seat outer belt assembly with the bolt.
Check if the ELR locks.
With the belt assembly installed, check that the belt locks when it is pulled out quickly.
| 17. INSTALL LAP BELT OUTER ANCHOR COVER (for LH Side) |
Engage the 3 claws to install the lap belt outer anchor cover.
| 18. INSTALL REAR DOOR OPENING TRIM WEATHERSTRIP LH |
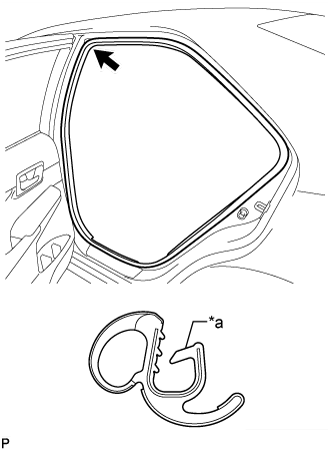 |
Align the alignment mark (Pink) on the weatherstrip with the protruding portion on the vehicle body indicated by the arrow in the illustration, and install the rear door opening trim weatherstrip LH.
| *a | Alignment Mark (Pink) |
| 19. INSTALL REAR DOOR SCUFF PLATE LH |
Engage the 6 claws to install the rear door scuff plate LH.
| 20. INSTALL CENTER PILLAR LOWER GARNISH RH |
| 21. CONNECT FRONT SEAT OUTER BELT ASSEMBLY RH |
| 22. INSTALL LAP BELT OUTER ANCHOR COVER (for RH Side) |
| 23. INSTALL REAR DOOR OPENING TRIM WEATHERSTRIP RH |
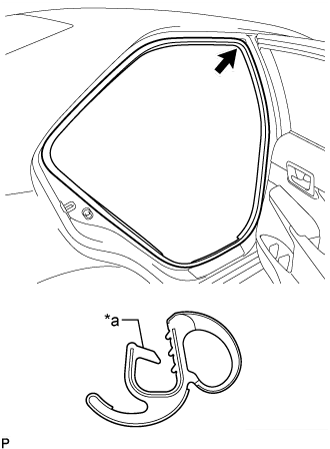 |
Align the alignment mark (Blue) on the weatherstrip with the protruding portion on the vehicle body indicated by the arrow in the illustration, and install the rear door opening trim weatherstrip RH.
| *a | Alignment Mark (Blue) |
| 24. INSTALL REAR DOOR SCUFF PLATE RH |
| 25. INSTALL NO. 1 PARKING BRAKE CABLE ASSEMBLY |
Pass the No. 1 parking brake cable assembly through the parking brake pedal assembly.
Install the clip to the No. 1 parking brake cable assembly.
Temporarily install the adjusting nut.
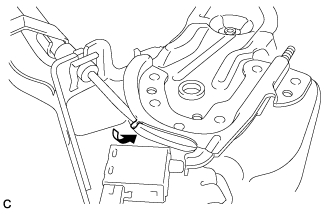 |
Bend the parking brake pedal claw.
| 26. INSTALL PARKING BRAKE CONTROL PEDAL ASSEMBLY |