Home › Engine / Hybrid System ยท 2GR-FE › ENGINE CONTROL › HEATED OXYGEN SENSOR

HEATED OXYGEN SENSOR > INSTALLATION

for Preparation Click here


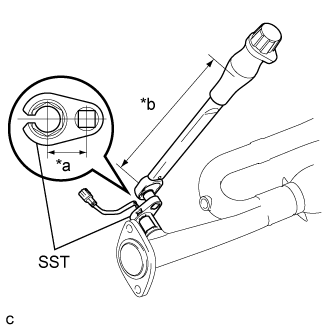
1. INSTALL HEATED OXYGEN SENSOR (for Bank 2 Sensor 2)


    A255020E01
  1. Using SST, install the heated oxygen sensor to the front exhaust pipe assembly.
    Text in Illustration 
    *a
    Fulcrum Length
    30 mm (1.18 in.)
    *b
    Fulcrum Length
    180 mm (7.09 in.)

    SST
    09224-00011  

    Torque:
    without SST:
    44 N*m{ 449 kgf*cm , 33 ft.*lbf }
    with SST:
    40 N*m{ 408 kgf*cm , 30 ft.*lbf }

    NOTICE:
    1. The "with SST" torque value is effective when using SST with a fulcrum length of 30 mm (1.18 in.) and a torque wrench with a fulcrum length of 180 mm (7.09 in.) (Click here).
    2. The "with SST" torque value is effective when SST is parallel to the torque wrench.
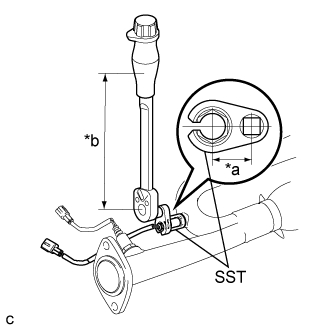


2. INSTALL HEATED OXYGEN SENSOR (for Bank 1 Sensor 2)


    A255018E01
  1. Using SST, install the heated oxygen sensor to the center exhaust pipe assembly.
    Text in Illustration 
    *a
    Fulcrum Length
    30 mm (1.18 in.)
    *b
    Fulcrum Length
    180 mm (7.09 in.)

    SST
    09224-00011  

    Torque:
    without SST:
    44 N*m{ 449 kgf*cm , 33 ft.*lbf }
    with SST:
    40 N*m{ 408 kgf*cm , 30 ft.*lbf }

    NOTICE:
    1. The "with SST" torque value is effective when using SST with a fulcrum length of 30 mm (1.18 in.) and a torque wrench with a fulcrum length of 180 mm (7.09 in.) (Click here).
    2. The "with SST" torque value is effective when SST is parallel to the torque wrench.


3. INSTALL FRONT EXHAUST PIPE ASSEMBLY
(Click here).