 |
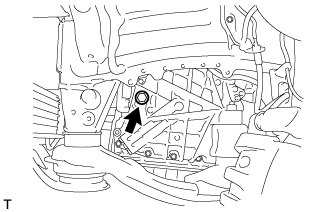
Remove the refill plug and gasket from the rear transaxle cover sub-assembly.
DIFFERENTIAL OIL SEAL > REPLACEMENT |
| 1. REMOVE FRONT WHEEL OPENING EXTENSION PAD LH |
Remove the 3 screws and front wheel opening extension pad LH.
| 2. REMOVE ENGINE UNDER COVER LH |
Remove the 3 screws, 2 clips and engine under cover LH.
| 3. REMOVE FRONT FENDER APRON SEAL LH |
Remove the 2 bolts, clip and front fender apron seal LH.
| 4. DRAIN AUTOMATIC TRANSAXLE FLUID |
|
Remove the refill plug and gasket from the rear transaxle cover sub-assembly.
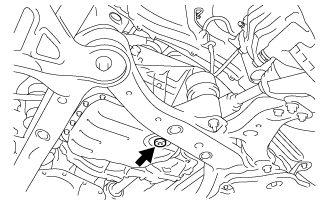 |
Using a 6 mm hexagon socket wrench, remove the overflow plug and gasket from the automatic transaxle oil pan sub-assembly.
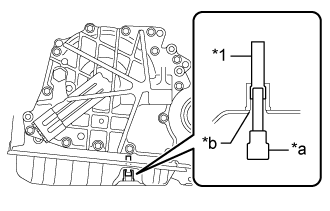 |
Using a 6 mm hexagon socket wrench, remove the No. 1 transmission oil filler tube from the automatic transaxle oil pan sub-assembly.
| *1 | No. 1 Transmission Oil Filler Tube |
| *a | 6 mm Hexagon Socket Wrench |
| *b | Overflow Plug Hole |
Drain automatic transaxle fluid from the automatic transaxle assembly.
|
Using a 6 mm hexagon socket wrench, install the No. 1 transmission oil filler tube to the automatic transaxle oil pan sub-assembly.
| *1 | No. 1 Transmission Oil Filler Tube |
| *a | 6 mm Hexagon Socket Wrench |
| *b | Overflow Plug Hole |
|
Using a 6 mm hexagon socket wrench, temporarily install the gasket and overflow plug to the automatic transaxle oil pan sub-assembly.
|
Temporarily install the gasket and refill plug to the automatic transaxle assembly.
| 5. REMOVE FRONT DRIVE SHAFT ASSEMBLY |
| 6. REMOVE FRONT DRIVE SHAFT OIL SEAL LH |
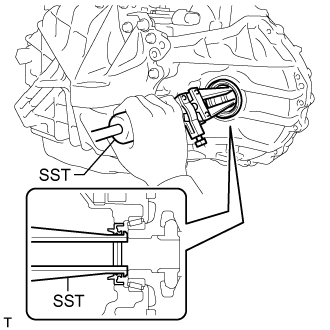 |
Using SST, remove the front drive shaft oil seal LH from the transaxle case sub-assembly.
| 7. REMOVE DRIVE SHAFT BEARING BRACKET |
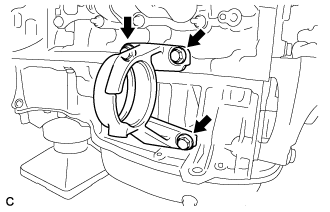 |
Remove the 3 bolts and drive shaft bearing bracket.
| 8. REMOVE FRONT DRIVE SHAFT OIL SEAL RH |
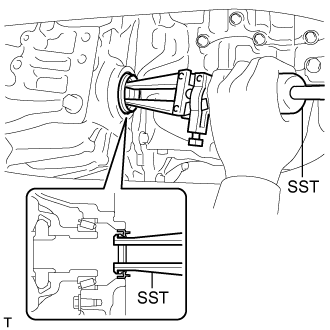 |
Using SST, remove the front drive shaft oil seal RH from the transaxle housing.
| 9. INSTALL FRONT DRIVE SHAFT OIL SEAL RH |
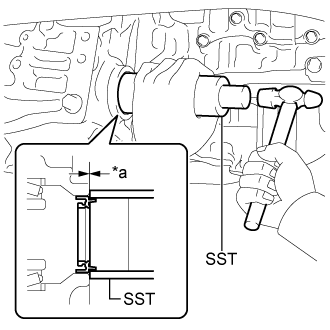 |
Using SST and a hammer, install a new front drive shaft oil seal RH to the transaxle housing.
| *a | Depth |
Coat the lip of the front drive shaft oil seal RH with MP grease.
| 10. INSTALL DRIVE SHAFT BEARING BRACKET |
Install the drive shaft bearing bracket with the 3 bolts.
| 11. INSTALL FRONT DRIVE SHAFT OIL SEAL LH |
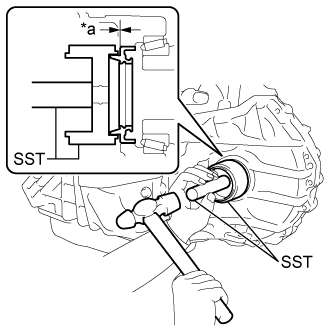 |
Using SST and a hammer, install a new front drive shaft oil seal LH to the transaxle case sub-assembly.
| *a | Depth |
Coat the lip of the front drive shaft oil seal LH with MP grease.
| 12. INSTALL FRONT DRIVE SHAFT HOLE SNAP RING LH |
Install a new front drive shaft hole snap ring LH.
| 13. INSTALL FRONT DRIVE SHAFT ASSEMBLY |
| 14. ADD AUTOMATIC TRANSAXLE FLUID |
| 15. INSTALL FRONT FENDER APRON SEAL LH |
Install the front fender apron seal LH with the 2 bolts and clip.
| 16. INSTALL ENGINE UNDER COVER LH |
Install the engine under cover LH with the 3 screws and 2 clips.
| 17. INSTALL FRONT WHEEL OPENING EXTENSION PAD LH |
Install the front wheel opening extension pad LH with the 3 screws.