Home › Vehicle Exterior › EXTERIOR PANELS / TRIM › LUGGAGE COMPARTMENT DOOR OUTSIDE GARNISH (for TMC, TMMR Made)

LUGGAGE COMPARTMENT DOOR OUTSIDE GARNISH (for TMC, TMMR Made) > INSTALLATION

for Preparation Click here


1. INSTALL BACK DOOR GARNISH MOULDING PROTECTOR LH
  1. Clean the luggage compartment door outside garnish.

    1. Remove any remaining double-sided tape from the luggage compartment door outside garnish.

    2. Wipe off any tape adhesive residue with cleaner.


  1. Install a new back door garnish moulding protector LH.

    1. Remove the release paper from a new back door garnish moulding protector LH.

      HINT:
      After removing the release paper, keep the exposed adhesive free from foreign matter.


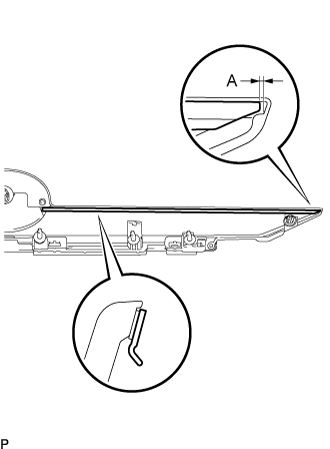
    2. B385532E01
    3. Install the back door garnish moulding protector LH as shown in the illustration.
      Standard Measurement 
      Area
      Measurement
      A
      1.5 mm (0.0591 in.)


2. INSTALL BACK DOOR GARNISH MOULDING PROTECTOR RH

HINT:
Use the same procedure as for the LH side.


3. INSTALL UPPER BACK DOOR GARNISH MOULDING PROTECTOR
  1. Clean the luggage compartment door outside garnish.

    1. Remove any remaining double-sided tape from the luggage compartment door outside garnish.

    2. Wipe off any tape adhesive residue with cleaner.

  1. Install a new upper back door garnish moulding protector.

    1. Remove the release paper from a new upper back door garnish moulding protector.

      HINT:
      After removing the release paper, keep the exposed adhesive free from foreign matter.

    2. Install the upper back door garnish moulding protector.


4. INSTALL NO. 2 LUGGAGE COMPARTMENT DOOR OUTSIDE GARNISH
  1. Engage the 4 claws.

  1. Install the No. 2 luggage compartment door outside garnish with the 2 screws.


5. INSTALL REAR TELEVISION CAMERA ASSEMBLY (w/ Rear View Monitor System)
  1. Engage the 2 claws to install the rear television camera assembly.


6. INSTALL LUGGAGE COMPARTMENT DOOR EMBLEM
  1. Clean the vehicle body surface.

    1. Using a heat light, heat the vehicle body surface.

    2. Remove the double-sided tape from the vehicle body.

    3. Wipe off any tape adhesive residue with cleaner.


  1. Install a new luggage compartment door emblem.

    1. Using a heat light, heat the vehicle body and luggage compartment door emblem.

    2. Remove the release paper from the luggage compartment door emblem.

      HINT:
      After removing the release paper, keep the exposed adhesive free from foreign matter.


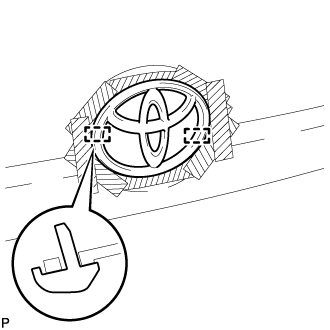
    3. B282055
    4. Engage the 2 pins and install the luggage compartment door emblem as shown in the illustration.


7. INSTALL LUGGAGE ELECTRICAL KEY SWITCH COVER (w/o Smart Entry and Start System)
  1. Install the luggage electrical key switch cover.


8. INSTALL LUGGAGE DOOR OPENING SWITCH ASSEMBLY (w/ Smart Entry and Start System)
  1. Install the luggage door opening switch assembly.


9. INSTALL LUGGAGE COMPARTMENT DOOR OUTSIDE GARNISH SUB-ASSEMBLY
  1. Install 5 new gaskets to the luggage compartment door outside garnish sub-assembly.

  1. Install a new clip (back door outside garnish clip) and 2 new clips to the luggage compartment door outside garnish sub-assembly.

  1. Engage the 3 clips to install the luggage compartment door outside garnish sub-assembly.

  1. Install the 5 nuts.

  1. w/ Rear View Monitor System:

    1. Connect the connector.

  1. w/ Smart Entry and Start System:

    1. Connect the connector.


10. INSTALL REAR LIGHT ASSEMBLY LH


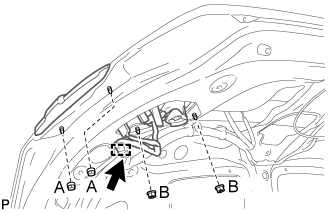
    E227533E04
  1. Install the rear light assembly with the 4 nuts.

    Torque:
    Nut (A):
    3.6 N*m{ 37 kgf*cm , 32 in.*lbf }
    Nut (B):
    4.1 N*m{ 42 kgf*cm , 36 in.*lbf }

  1. Engage the clamp.

  1. Connect the connector.


11. INSTALL REAR LIGHT ASSEMBLY RH

HINT:
Use the same procedure as for the LH side.


12. INSTALL LUGGAGE COMPARTMENT DOOR COVER


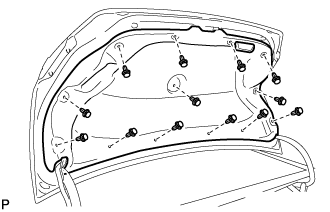
    B281699
  1. Install the luggage compartment door cover with the 13 clips.


13. ADJUST REAR TELEVISION CAMERA ASSEMBLY OPTICAL AXIS (w/ Parking Assist Monitor System)
(Click here)