 |
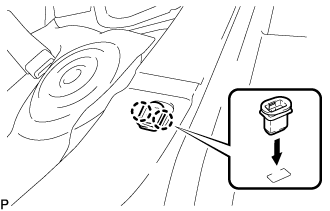
Engage the 2 claws to install a new rear seat cushion lock hook as shown in the illustration.
- NOTICE:
- Rear seat cushion lock hooks must not be reused.
- HINT:
- Use the same procedure for the RH side and the LH side.
REAR DOOR COURTESY SWITCH (for TMMK Made) > INSTALLATION |
| 1. INSTALL REAR DOOR COURTESY LIGHT SWITCH ASSEMBLY |
Using a T30 "TORX" socket wrench, install the rear door courtesy light switch assembly with the screw.
Connect the connector.
| 2. INSTALL REAR SIDE SEATBACK ASSEMBLY |
Engage the hook.
Install the rear side seatback assembly LH with the 2 bolts.
Connect the connector.
Connect the rear seat outer belt assembly to the rear seat shoulder belt guide.
| 3. INSTALL REAR SEAT CUSHION LOCK HOOK |
|
Engage the 2 claws to install a new rear seat cushion lock hook as shown in the illustration.
| 4. INSTALL REAR SEAT CUSHION ASSEMBLY |
Place the rear seat cushion assembly in the cabin.
Pass the 2 rear seat inner belt assemblies through the rear seat cushion assembly.
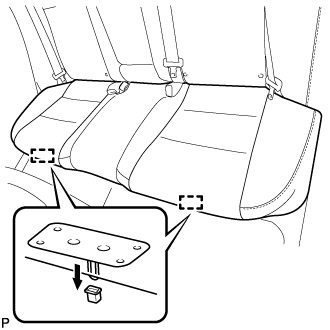 |
Engage the 2 rear seat cushion frame hooks on the front side of the rear seat cushion assembly to the 2 rear seat cushion lock hooks as shown in the illustration.
Confirm that the rear seat cushion assembly is securely installed.
| 5. CONNECT CABLE TO NEGATIVE BATTERY TERMINAL |
| 6. INSPECT SRS WARNING LIGHT |