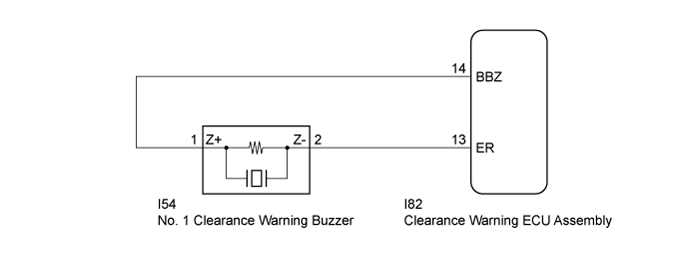
TOYOTA PARKING ASSIST-SENSOR SYSTEM > Clearance Warning Buzzer Circuit |
| 1.PERFORM ACTIVE TEST USING INTELLIGENT TESTER |
Connect the intelligent tester to the DLC3.
Turn the ignition switch to ON.
Turn the intelligent tester on.
Enter the following menus: Body / Clearance Sonar / Active Test.
Check that the buzzer operates by performing the Active Test.
| Tester Display | Test Part | Control Range | Diagnostic Note |
| Buzzer | No. 1 clearance warning buzzer | Operate or Stop | Confirm that the vehicle is stopped and the ignition switch is ON |
|
| ||||
| OK | ||
 | ||
| ||
| 2.CHECK HARNESS AND CONNECTOR (CLEARANCE WARNING ECU ASSEMBLY - NO. 1 CLEARANCE WARNING BUZZER) |
Disconnect the I54 connector from the No. 1 clearance warning buzzer.
Disconnect the I82 connector from the clearance warning ECU assembly.
Measure the resistance according to the value(s) in the table below.
| Tester Connection | Condition | Specified Condition |
| I82-14 (BBZ) - I54-1 (Z+) | Always | Below 1 Ω |
| I82-13 (ER) - I54-2 (Z-) | ||
| I82-14 (BBZ) - Body ground | 10 kΩ or higher | |
| I82-13 (ER) - Body ground |
|
| ||||
| OK | |
 |
| 3.REPLACE NO. 1 CLEARANCE WARNING BUZZER |
Replace the No. 1 clearance warning buzzer with a new or known good one (Click here).
| NEXT | |
|
| 4.PERFORM ACTIVE TEST USING INTELLIGENT TESTER |
Connect the intelligent tester to the DLC3.
Turn the ignition switch to ON.
Turn the intelligent tester on.
Enter the following menus: Body / Clearance Sonar / Active Test.
Check that the buzzer operates by performing the Active Test.
| Tester Display | Test Part | Control Range | Diagnostic Note |
| Buzzer | No. 1 clearance warning buzzer | Operate or Stop | Confirm that the vehicle is stopped and the ignition switch is ON |
|
| ||||
| OK | ||
| ||
| ||

