2AR-FE ENGINE MECHANICAL CYLINDER HEAD INSPECTION
PROCEDURE

 11101
1.INSPECT CYLINDER HEAD SUB-ASSEMBLY
Using a precision straightedge and feeler gauge, measure the warpage of the contact surfaces where the cylinder head sub-assembly contacts the cylinder block sub-assembly, intake manifold and exhaust manifold converter sub-assembly (TWC: Front Catalyst).
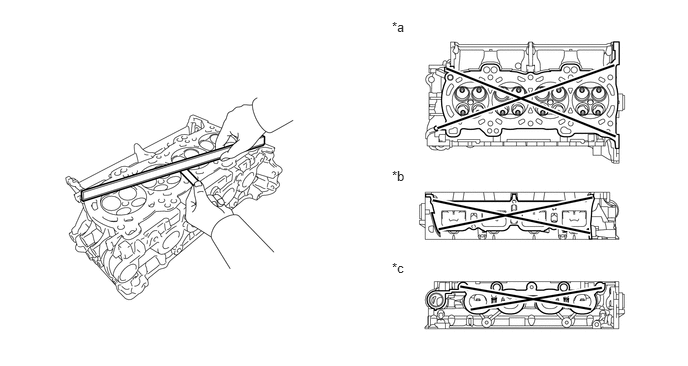
| *a | Cylinder Head Lower Side | *b | Intake Manifold Side |
| *c | Exhaust Manifold Converter Sub-assembly (TWC: Front Catalyst) Side | - | - |
- Maximum Warpage:
Item Specified Condition Bottom side 0.05 mm (0.00197 in.) Intake manifold side 0.10 mm (0.00394 in.) Exhaust manifold converter sub-assembly (TWC: Front Catalyst) side 0.10 mm (0.00394 in.)
- HINT:
-
If the warpage is more than the maximum, replace the cylinder head sub-assembly.
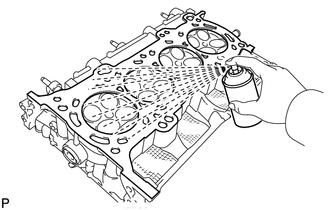
Using a dye penetrant, check the intake ports, exhaust ports and cylinder head sub-assembly surface for cracks.
If cracked are found, replace the cylinder head sub-assembly.
13711B
2.INSPECT COMPRESSION SPRING
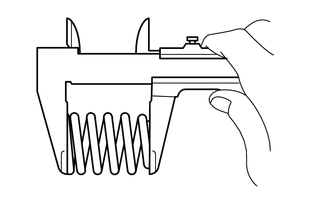
Using a vernier caliper, measure the free length of the compression spring.
- Standard Free Length:
47.38 mm (1.87 in.)
- HINT:
-
If the free length is not as specified, replace the compression spring.
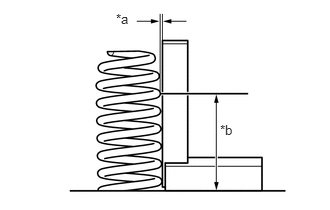
| *a | Deviation |
| *b | 30 mm (1.18 in.) |
Using a steel square, measure the deviation of the compression spring at the position shown in the illustration.
- Maximum Deviation:
1.0 mm (0.0394 in.)
- HINT:
-
If the deviation is more than the maximum, replace the compression spring.
13711
3.INSPECT INTAKE VALVE
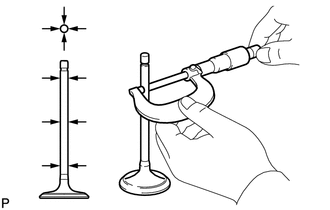
Using a micrometer, measure the diameter of the valve stem.
- Standard Valve Stem Diameter:
5.470 mm to 5.485 mm (0.21535 to 0.21594 in.)
- HINT:
-
If the valve stem diameter is not as specified, check the intake valve guide bush oil clearance.
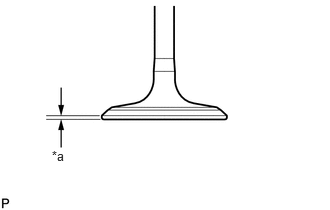
| *a | Margin Thickness |
Using a vernier caliper, measure the valve head margin thickness.
- Standard Margin Thickness:
1.0 mm (0.0394 in.)
- Minimum Margin Thickness:
0.50 mm (0.0197 in.)
- HINT:
-
If the margin thickness is less than the minimum, replace the intake valve.
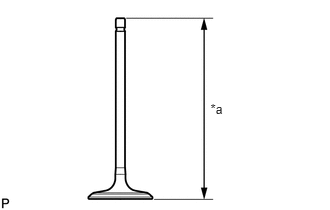
| *a | Overall Length |
Using a vernier caliper, measure the overall length of the valve.
- Standard Overall Length:
103.92 mm (4.09 in.)
- Minimum Overall Length:
103.42 mm (4.07 in.)
- HINT:
-
If the overall length is less than the minimum, replace the intake valve.
13715
4.INSPECT EXHAUST VALVE
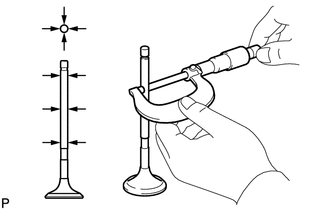
Using a micrometer, measure the diameter of the valve stem.
- Standard Valve Stem Diameter:
5.465 mm to 5.480 mm (0.21516 to 0.21575 in.)
- HINT:
-
If the valve stem diameter is not as specified, check the exhaust valve guide bush oil clearance.
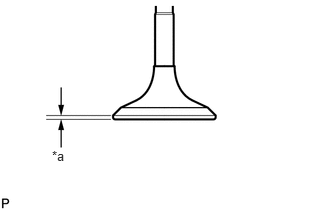
| *a | Margin Thickness |
Using a vernier caliper, measure the valve head margin thickness.
- Standard Margin Thickness:
1.0 mm (0.0394 in.)
- Minimum Margin Thickness:
0.50 mm (0.0197 in.)
- HINT:
-
If the margin thickness is less than the minimum, replace the exhaust valve.
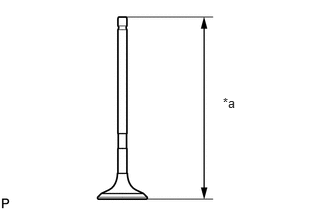
| *a | Overall Length |
Using a vernier caliper, measure the overall length of the valve.
- Standard Overall Length:
112.91 mm (4.45 in.)
- Minimum Overall Length:
112.41 mm (4.43 in.)
- HINT:
-
If the overall length is less than the minimum, replace the exhaust valve.
11122
5.INSPECT VALVE GUIDE BUSH OIL CLEARANCE
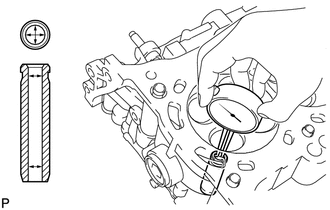
Using a caliper gauge, measure the inside diameter of the guide bush.
- Standard Bush Inside Diameter:
5.510 to 5.530 mm (0.2169 to 0.2177 in.)
Subtract the valve stem diameter measurement from the guide bush inside diameter measurement.
- Standard Oil Clearance:
Item Specified Condition Intake 0.025 to 0.060 mm (0.000984 to 0.00236 in.) Exhaust 0.030 to 0.065 mm (0.00118 to 0.00256 in.)
- Maximum Oil Clearance:
Item Specified Condition Intake 0.08 mm (0.00315 in.) Exhaust 0.10 mm (0.00394 in.)
- HINT:
-
If the oil clearance is more than the maximum, replace the valve and guide bush.
11131
6.INSPECT INTAKE VALVE SEAT
Apply a light coat of Prussian blue to the valve face.
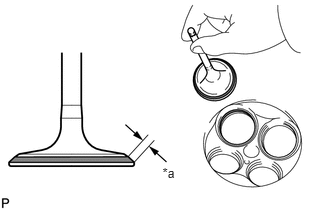
| *a | Width |
Lightly press the valve face against the valve seat.
- HINT:
-
Do not rotate the valve while pressing the valve.
Check the valve face and intake valve seat by using the following procedure:
If Prussian blue appears 360° around the entire intake valve face, the valve face is concentric. If the valve face is not concentric replace the intake valve.
If Prussian blue appears 360° around the entire intake valve seat, the intake valve seat and valve face are concentric.
- HINT:
-
If the valve face is not concentric resurface the intake valve seat.
Measure the width of the contact area of the intake valve seat and valve face.
- Standard Width:
1.0 and 1.4 mm (0.0394 and 0.0551 in.)
11135
7.INSPECT EXHAUST VALVE SEAT
Apply a light coat of Prussian blue to the valve face.
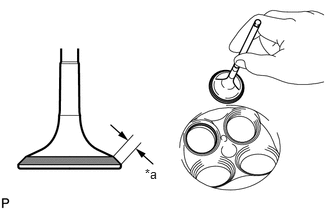
| *a | Width |
Lightly press the valve face against the exhaust valve seat.
- HINT:
-
Do not rotate the exhaust valve while pressing it.
Check the valve face and exhaust valve seat by using the following procedure:
If Prussian blue appears 360° around the entire exhaust valve face, the valve face is concentric. If the valve face is not concentric replace the exhaust valve.
If Prussian blue appears 360° around the entire exhaust valve seat, the exhaust valve seat and valve face are concentric.
- HINT:
-
If the valve face is not concentric resurface the exhaust valve seat.
Measure the width of the contact area of the exhaust valve seat and valve face.
- Standard Width:
1.2 and 1.6 mm (0.0472 and 0.0630 in.)
13511
8.INSPECT CAMSHAFT THRUST CLEARANCE
Clean the No. 1 camshaft bearing cap, No. 2 camshaft bearing cap, 3 No. 3 camshaft bearing caps, camshaft housing sub-assembly and camshaft journals.
Place the camshaft and No. 2 camshaft on the camshaft housing sub-assembly.
Install the camshaft bearing caps.
Click hereEngine / Hybrid System>2AR-FE (ENGINE MECHANICAL)>CYLINDER HEAD GASKET>INSTALLATION
Install the camshaft housing sub-assembly.
Click hereEngine / Hybrid System>2AR-FE (ENGINE MECHANICAL)>CYLINDER HEAD GASKET>INSTALLATION
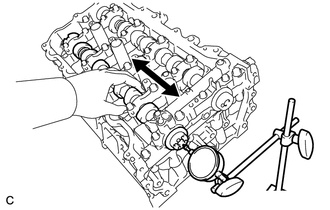
Using a dial indicator, measure the thrust clearance while moving the camshaft back and forth.
- Standard Thrust Clearance:
Item Specified Condition Intake 0.060 to 0.155 mm (0.00236 to 0.00610 in.) Exhaust 0.060 to 0.155 mm (0.00236 to 0.00610 in.)
- Maximum Thrust Clearance:
Item Specified Condition Intake 0.170 mm (0.00669 in.) Exhaust 0.170 mm (0.00669 in.)
- HINT:
-
If the thrust clearance is more than the maximum, replace the camshaft housing sub-assembly. If the thrust surface is damaged, replace the camshaft.