INTERIOR PANELS / TRIM REAR SUNSHADE SYSTEM Rear Sunshade Shift-linked Function does not Operate when Shift Lever is Moved to R Position
DESCRIPTION
When the ignition switch ON and the shift lever is moved to R, the shift position sensors send a reverse signal to the ECM. Then, the ECM sends this signal to the main body ECU (multiplex network body ECU) via CAN communication. When the rear sunshade relay receives this signal with the rear sunshade raised, the rear sunshade is lowered.
WIRING DIAGRAM
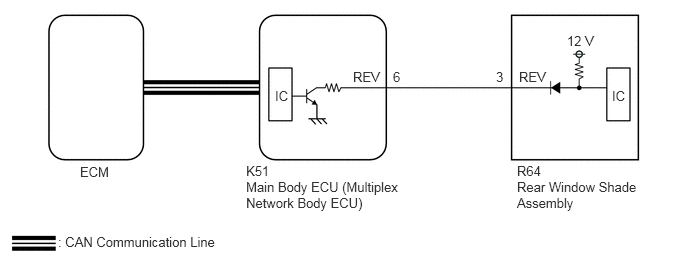
CAUTION / NOTICE / HINT
- NOTICE:
- ·
The rear sunshade system uses the CAN communication system. First, confirm that there are no malfunctions in the CAN communication system. Refer to How to Proceed with Troubleshooting procedure.
Click hereVehicle Interior>INTERIOR PANELS / TRIM>REAR SUNSHADE SYSTEM>HOW TO PROCEED WITH TROUBLESHOOTING
·The shift-linked operation of the rear sunshade system operates only when the customize setting "R-pos to Rear Sun Shade COM" is set to "ON".
Click hereVehicle Interior>INTERIOR PANELS / TRIM>REAR SUNSHADE SYSTEM>CUSTOMIZE PARAMETERS
·If the main body ECU (multiplex network body ECU) is replaced, refer to Service Bulletin.*
*: w/ Smart Entry and Start System
·The vehicle battery supplies power to the main body ECU (multiplex network body ECU) via the door control battery. Therefore, before performing this troubleshooting procedure, make sure to perform an on-vehicle inspection to confirm that the main body ECU (multiplex network body ECU) power source circuit is normal.*
Click hereVehicle Interior>DOOR LOCK>POWER DOOR LOCK CONTROL SYSTEM>ON-VEHICLE INSPECTION
*: w/ Door Control Battery
PROCEDURE
Connect the GTS to the DLC3.
Turn the ignition switch to ON.
Turn the GTS on.
Enter the following menus: Powertrain / Engine and ECT*1 or Engine*2 / Data List.
*1: for 2AR-FE
*2: except 2AR-FE
Read the Data List according to the display on the GTS.
- Powertrain > Engine and ECT > Data List
-
Tester Display Measurement Item Range Normal Condition Diagnostic Note Shift SW Status (R Range) Park/Neutral position switch assembly ON or OFF ON: Shift lever in R
OFF: Shift lever not in R-
- Powertrain > Engine and ECT > Data List
-
Tester Display Shift SW Status (R Range) - 50003 234 126
- Powertrain > Engine > Data List
-
Tester Display Measurement Item Range Normal Condition Diagnostic Note Shift SW Status (R Range) Park/Neutral position switch assembly ON or OFF ON: Shift lever in R
OFF: Shift lever not in R-
- Powertrain > Engine > Data List
-
Tester Display Shift SW Status (R Range) - 50003 372 14
- OK:
The GTS display changes according to the shift position selected by using the shift lever.
- Result:
Proceed to OK NG
OK
NG
for 2AR-FE: Click hereEngine / Hybrid System>2AR-FE (ENGINE CONTROL)>SFI SYSTEM>HOW TO PROCEED WITH TROUBLESHOOTING
for A25A-FKS: Click hereEngine / Hybrid System>A25A-FKS (ENGINE CONTROL)>SFI SYSTEM (w/ Canister Pump Module)>HOW TO PROCEED WITH TROUBLESHOOTING
for 2GR-FKS: Click hereEngine / Hybrid System>2GR-FKS (ENGINE CONTROL)>SFI SYSTEM>HOW TO PROCEED WITH TROUBLESHOOTING
Enter the following menus: Body Electrical / Main Body / Active Test.
Perform the Active Test according to the display on the GTS.
- HINT:
-
Make sure that the rear window shade assembly is raised before performing the Active Test.
- Body Electrical > Main Body > Active Test
-
Tester Display Measurement Item Control Range Diagnostic Note Reverse Gear Signal Reverse signal OFF/ON -
- Body Electrical > Main Body > Active Test
-
Tester Display Reverse Gear Signal - 50004 123 24
- OK:
The rear window shade assembly is lowered.
- Result:
Proceed to OK NG
OK
NG
Measure the voltage according to the value(s) in the table below.
- Standard Voltage:
Tester Connection Condition Specified Condition R64-3 (REV) - Body ground Ignition switch ON, shift lever in any position other than R → R 11 to 14 V → Below 1 V
- Result:
Proceed to OK NG
OK
NG
Disconnect the K51 main body ECU (multiplex network body ECU) connector.
Measure the resistance according to the value(s) in the table below.
- Standard Resistance:
Tester Connection Condition Specified Condition K51-6 (REV) - R64-3 (REV) Always Below 1 Ω K51-6 (REV) or R64-3 (REV) - Body ground Always 10 kΩ or higher
- Result:
Proceed to OK NG
OK
NG