UB80E AUTOMATIC TRANSMISSION / TRANSAXLE OIL COOLER INSTALLATION
PROCEDURE

 33493A
1.INSTALL TRANSMISSION OIL COOLER
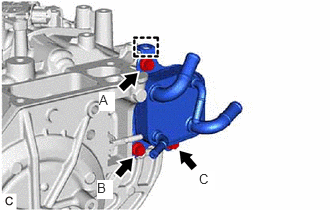
Engage the hook and temporarily install the transmission oil cooler to the automatic transaxle case sub-assembly with the bolt (A).
Install the bolt (B).
- Torque:
- 13.5 N*m (138 kgf*cm, 10 ft.*lbf)
Install the bolt (C).
- Torque:
- 13.5 N*m (138 kgf*cm, 10 ft.*lbf)
Fully tighten the bolt (A) to install the transmission oil cooler.
- Torque:
- 13.5 N*m (138 kgf*cm, 10 ft.*lbf)
16260
2.CONNECT WATER BY-PASS HOSE ASSEMBLY
Connect the water by-pass hose assembly to the transmission oil cooler and slide the clip to secure it.
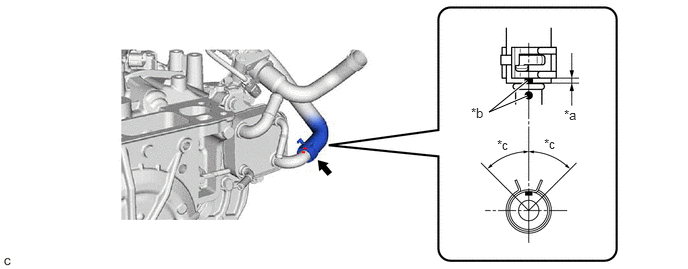
| *a | 2 to 7 mm (0.0787 to 0.276 in.) | *b | Paint Mark |
| *c | 45° (Claw of Clip Location) | - | - |
- NOTICE:
- ·
Make sure to slide the water by-pass hose assembly until it contacts the hose stopper of the transmission oil cooler.
·Make sure to align the paint mark of the water by-pass hose assembly with the paint mark of the transmission oil cooler.
·Make sure that the claws of the clip are within the location shown in the illustration.
16261G
3.CONNECT NO. 1 WATER BY-PASS HOSE
Connect the No. 1 water by-pass hose to the transmission oil cooler and slide the clip to secure it.
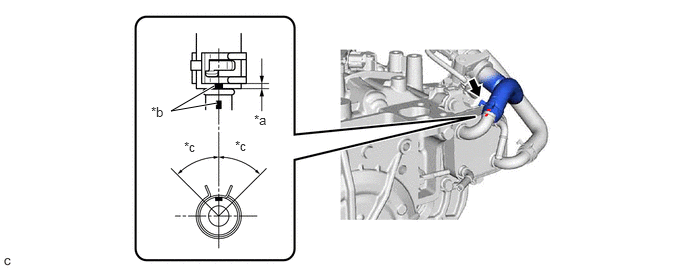
| *a | 2 to 7 mm (0.0787 to 0.276 in.) | *b | Paint Mark |
| *c | 45° (Claw of Clip Location) | - | - |
- NOTICE:
- ·
Make sure to slide the No. 1 water by-pass hose until it contacts the hose stopper of the transmission oil cooler.
·Make sure to align the paint mark of the No. 1 water by-pass hose with the paint mark of the transmission oil cooler.
·Make sure that the claws of the clip are within the location shown in the illustration.
Engage the 3 clamps to install the transmission breather clamp.
32907C
4.INSTALL NO. 1 OIL COOLER TUBE SUB-ASSEMBLY WITHOUT HOSE
Install the inlet No. 1 oil cooler hose, inlet No. 2 oil cooler hose, outlet No. 1 oil cooler hose and outlet No. 2 oil cooler hose to the No. 1 oil cooler tube sub-assembly without hose and slide the 4 clips to secure them.
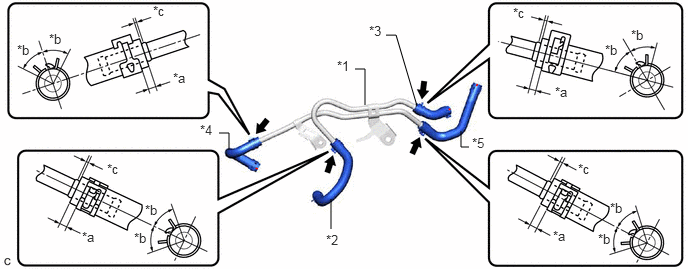
| *1 | No. 1 Oil Cooler Tube Sub-assembly without Hose | *2 | Inlet No. 1 Oil Cooler Hose |
| *3 | Inlet No. 2 Oil Cooler Hose | *4 | Outlet No. 1 Oil Cooler Hose |
| *5 | Outlet No. 2 Oil Cooler Hose | - | - |
| *a | 2 to 7 mm (0.0787 to 0.276 in.) | *b | 45° (Claw of Clip Location) |
| *c | 0 to 3 mm (0 to 0.118 in.) | - | - |
- NOTICE:
- ·
Make sure to slide the inlet No. 1 oil cooler hose, inlet No. 2 oil cooler hose, outlet No. 1 oil cooler hose and outlet No. 2 oil cooler hose until each contacts the hose stopper of the No. 1 oil cooler tube sub-assembly without hose.
·Make sure that the claws of each clip are within the location shown in the illustration.
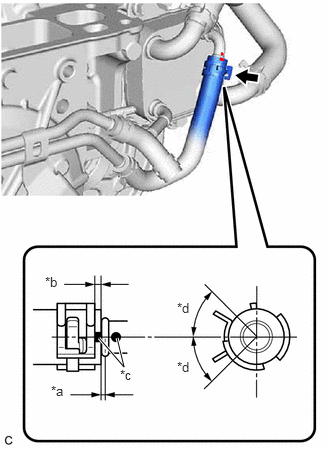
| *a | 0 to 3 mm (0 to 0.118 in.) |
| *b | 2 to 7 mm (0.0787 to 0.276 in.) |
| *c | Paint Mark |
| *d | 45° (Claw of Clip Location) |
Connect the outlet No. 2 oil cooler hose to the transmission oil cooler and slide the clip to secure it.
- NOTICE:
- ·
Make sure to slide the outlet No. 2 oil cooler hose until it contacts the hose stopper of the transmission oil cooler.
·Make sure to align the paint mark of the outlet No. 2 oil cooler hose with the paint mark of the transmission oil cooler.
·Make sure that the claws of the clip are within the location shown in the illustration.
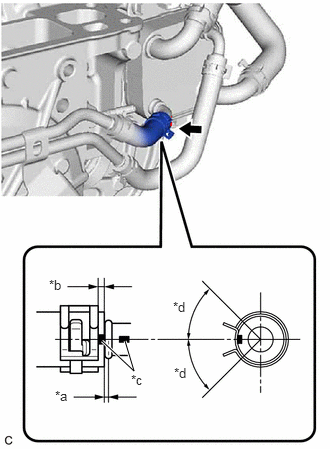
| *a | 0 to 3 mm (0 to 0.118 in.) |
| *b | 2 to 7 mm (0.0787 to 0.276 in.) |
| *c | Paint Mark |
| *d | 45° (Claw of Clip Location) |
Connect the inlet No. 2 oil cooler hose to the transmission oil cooler and slide the clip to secure it.
- NOTICE:
- ·
Make sure to slide the inlet No. 2 oil cooler hose until it contacts the hose stopper of the transmission oil cooler.
·Make sure to align the paint mark of the inlet No. 2 oil cooler hose with the paint mark of the transmission oil cooler.
·Make sure that the claws of the clip are within the location shown in the illustration.
Temporarily install the No. 1 oil cooler tube sub-assembly without hose to the automatic transaxle case sub-assembly with the 2 bolts.
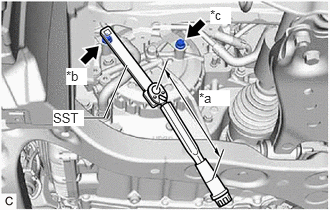
| *a | Torque Wrench Fulcrum Length |
| *b | Bolt (A) |
| *c | Bolt (B) |
Using SST, tighten the bolt (A).
- SST
- 09961-00950
- Torque:
- Specified tightening torque : 13.5 N*m (138 kgf*cm, 10 ft.*lbf)
- HINT:
- ·
Calculate the torque wrench reading when changing the fulcrum length of the torque wrench.
Click hereGeneral>INTRODUCTION>REPAIR INSTRUCTION>PRECAUTION
·When using SST (fulcrum length of 150 mm (5.91 in.)) + torque wrench (fulcrum length of 162 mm (6.38 in.)):
7.0 N*m (71 kgf*cm, 62 in.*lbf)
Tighten the bolt (B).
- Torque:
- 13.5 N*m (138 kgf*cm, 10 ft.*lbf)
32941
5.CONNECT INLET NO. 1 OIL COOLER HOSE
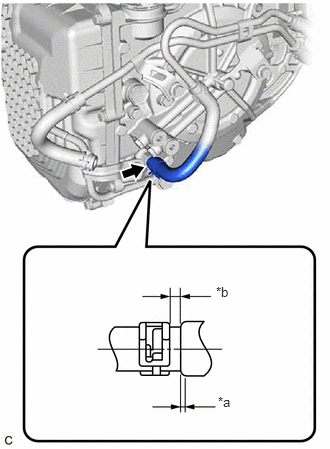
| *a | 0 to 3 mm (0 to 0.118 in.) |
| *b | 2 to 7 mm (0.0787 to 0.276 in.) |
Connect the inlet No. 1 oil cooler hose to the No. 1 oil cooler outlet tube sub-assembly and slide the clip to secure it.
- NOTICE:
-
Make sure to slide the inlet No. 1 oil cooler hose until it contacts the hose stopper of the No. 1 oil cooler outlet tube sub-assembly.
32942
6.CONNECT OUTLET NO. 1 OIL COOLER HOSE
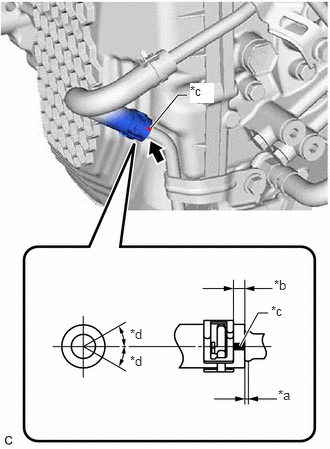
| *a | 0 to 3 mm (0 to 0.118 in.) |
| *b | 2 to 7 mm (0.0787 to 0.276 in.) |
| *c | Paint Mark (Left Side of Vehicle) |
| *d | 30° (Paint Mark Location) |
Connect the outlet No. 1 oil cooler hose to the oil cooler union sub-assembly and slide the clip to secure it.
- NOTICE:
- ·
Make sure to slide the outlet No. 1 oil cooler hose until it contacts the hose stopper of the oil cooler union sub-assembly.
·Make sure that the paint mark of the outlet No. 1 oil cooler hose is within the location shown in the illustration.
74404A
7.INSTALL BATTERY CLAMP SUB-ASSEMBLY
89661
8.INSTALL ECM
28800
9.INSTALL BATTERY
10.ADD ENGINE COOLANT
11.ADJUST AUTOMATIC TRANSAXLE FLUID
12.INSPECT FOR OIL LEAK
13.INSPECT FOR COOLANT LEAK
53737B
14.INSTALL FRONT FENDER APRON SEAL LH
15.INSTALL NO. 2 ENGINE UNDER COVER ASSEMBLY
51441
16.INSTALL NO. 1 ENGINE UNDER COVER
53852K
17.INSTALL FRONT WHEEL OPENING EXTENSION PAD LH
53851M
18.INSTALL FRONT WHEEL OPENING EXTENSION PAD RH
19.INSTALL FRONT WHEEL LH