SLIDING ROOF / CONVERTIBLE SLIDING ROOF HOUSING INSTALLATION
PROCEDURE

 1.INSTALL SLIDING ROOF HOUSING ASSEMBLY
Pass a string under the windshield outside moulding as shown in the illustration.
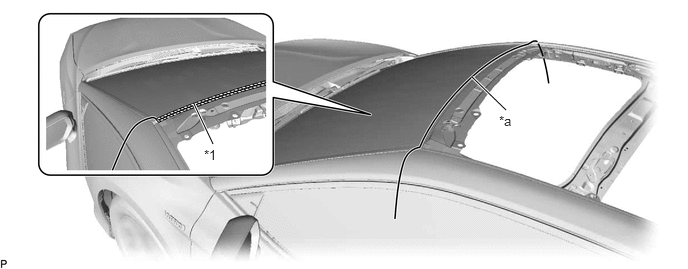
| *1 | Windshield Outside Moulding | - | - |
| *a | String | - | - |
Engage the 2 guides.
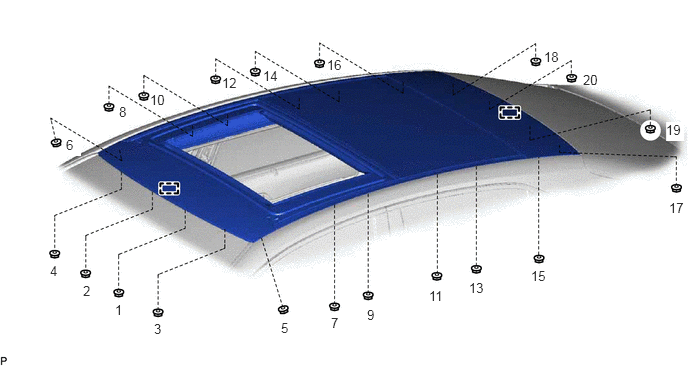
Temporarily install the sliding roof housing assembly with the 20 nuts.
Tighten the 20 nuts to install the sliding roof housing assembly.
- HINT:
-
Tighten the nuts in the order shown in the illustration.
- Torque:
- 8.0 N*m (82 kgf*cm, 71 in.*lbf)
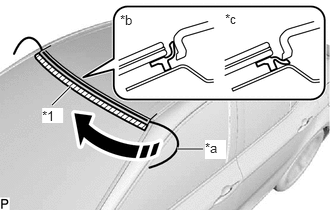
| *1 | Windshield Outside Moulding |
| *a | String |
| *b | Correct |
| *c | Incorrect |

|
String Pulling Direction |
Apply soapy water to the windshield outside moulding.
Slowly pull out the string to install the windshield outside moulding to the correct position.
63246D
2.INSTALL REAR SLIDING ROOF HOUSING MOUNTING BRACKET LH
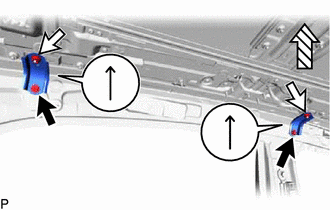

|
Bolt |

|
Nut |

|
Upper Side of Vehicle |
Install the 2 rear sliding roof housing mounting brackets LH with the 2 bolts and 2 nuts.
- Torque:
- 8.0 N*m (82 kgf*cm, 71 in.*lbf)
- HINT:
-
Make sure to install the rear sliding roof housing mounting bracket LH with its arrow facing the upper side of the vehicle.
63245D
3.INSTALL REAR SLIDING ROOF HOUSING MOUNTING BRACKET RH
- HINT:
-
Use the same procedure as for the LH side.
63244C
4.INSTALL CENTER SLIDING ROOF HOUSING MOUNTING BRACKET LH
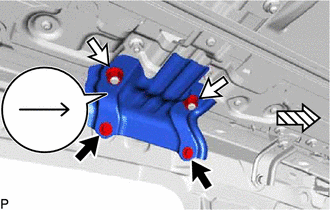
|
|
Bolt |
|
|
Nut |
|
|
Front of the Vehicle |
Install the center sliding roof housing mounting bracket LH with the 2 bolts and 2 nuts.
- Torque:
- 8.0 N*m (82 kgf*cm, 71 in.*lbf)
- HINT:
-
Make sure to install the center sliding roof housing mounting bracket with its arrow facing the front of the vehicle.
63243C
5.INSTALL CENTER SLIDING ROOF HOUSING MOUNTING BRACKET RH
- HINT:
-
Use the same procedure as for the LH side.
63242A
6.INSTALL FRONT SLIDING ROOF HOUSING MOUNTING BRACKET LH
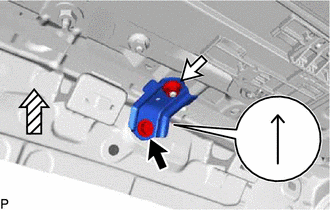
|
|
Bolt |
|
|
Nut |
|
|
Upper Side of Vehicle |
Install the front sliding roof housing mounting bracket LH with the bolt and nut.
- Torque:
- 8.0 N*m (82 kgf*cm, 71 in.*lbf)
- HINT:
-
Make sure to install the front sliding roof housing mounting bracket LH with its arrow facing the upper side of the vehicle.
63241A
7.INSTALL FRONT SLIDING ROOF HOUSING MOUNTING BRACKET RH
- HINT:
-
Use the same procedure as for the LH side.
63249E
8.CONNECT SLIDING ROOF DRAIN HOSE
- HINT:
-
Use the same procedure for all of the sliding roof drain hoses.
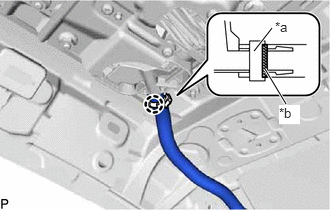
| *a | Clamp |
| *b | Marking |
for Clamp Type:
Connect the sliding roof drain hose.
- HINT:
-
Slide the hose to the base of the drain pipe.
Engage the claw to secure the sliding roof drain hose.
- HINT:
-
Make sure that the clamp is on the marking or between the marking and hose end.
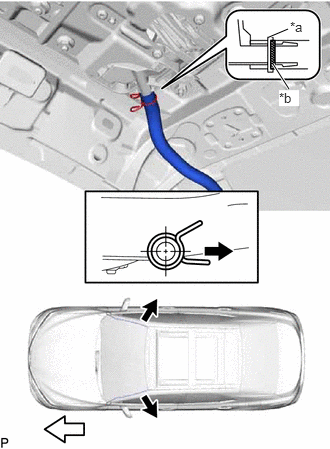
| *a | Clip |
| *b | Marking |
|
|
Outside |
|
|
Front Side |
for Clip Type:
Expand the clip to connect the sliding roof drain hose.
- HINT:
-
Slide the hose to the base of the drain pipe.
Release the clip to secure the sliding roof drain hose.
- NOTICE:
-
The clip must face toward the outside of the vehicle and also be above the lower surface of the sliding roof housing sub-assembly when installing the drain hoses.
- HINT:
-
Make sure that the clip is on the marking or between the marking and hose end.
63201G
9.INSTALL SLIDING ROOF GLASS SUB-ASSEMBLY
Using a T25 "TORX" socket wrench, temporarily install the sliding roof glass sub-assembly with the 6 screws.
Perform a level check.
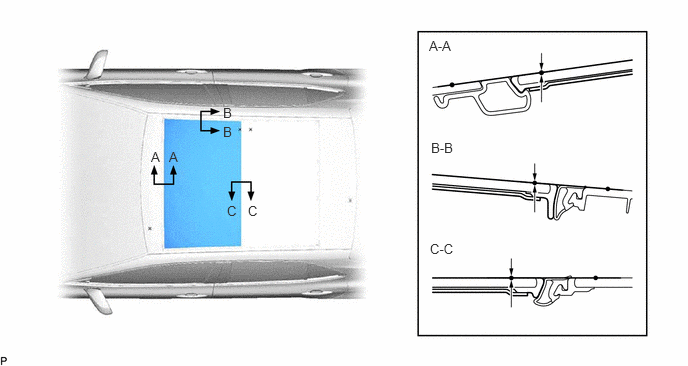
Check the difference in level of the sliding roof glass sub-assembly when the sliding roof glass sub-assembly is fully closed.
| Area | Measurement | Area | Measurement |
|---|---|---|---|
| A-A | -1.0 to 2.0 mm (-0.0394 to 0.0787 in.) | B-B | -2.2 to 2.2 mm (-0.0866 to 0.0866 in.) |
| C-C | -1.0 to 2.4 mm (-0.0394 to 0.0945 in.) | - | - |
Perform a gap check.
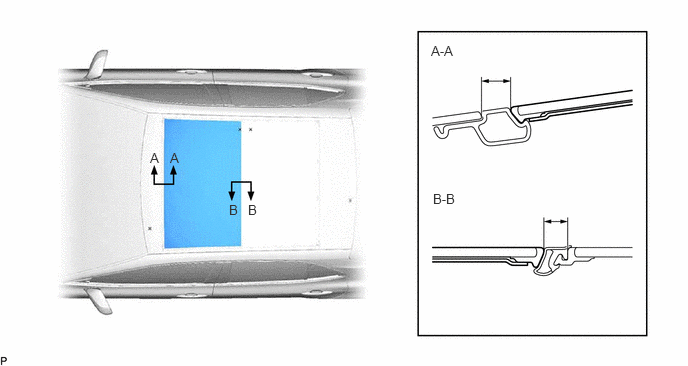
Check the gap between the sliding roof glass sub-assembly and sliding roof housing assembly.
| Area | Measurement | Area | Measurement |
|---|---|---|---|
| A-A | 11.2 to 13.2 mm (0.4409 to 0.5197 in.) | B-B | 8.4 to 11.6 mm (0.3307 to 0.4567 in.) |
After adjusting the sliding roof glass sub-assembly, using a T25 "TORX" socket wrench, tighten the 6 screws.
- Torque:
- 5.0 N*m (51 kgf*cm, 44 in.*lbf)
10. CHECK FOR WATER LEAK
After adjusting the sliding roof glass sub-assembly, check for water leakage into the vehicle interior.
If there are any leaks, readjust the sliding roof glass sub-assembly.
62180A
11.INSTALL CURTAIN SHIELD AIRBAG ASSEMBLY LH
62170A
12.INSTALL CURTAIN SHIELD AIRBAG ASSEMBLY RH
- HINT:
-
Use the same procedure as for the LH side.
63218M
13.INSTALL NO. 4 SLIDING ROOF SIDE GARNISH LH
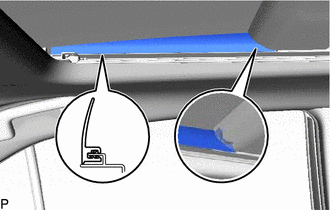
Insert the front edge of the No. 4 sliding roof side garnish LH behind the rear sliding roof side garnish and then install the No. 4 sliding roof side garnish LH.
63217K
14.INSTALL NO. 4 SLIDING ROOF SIDE GARNISH RH
- HINT:
-
Use the same procedure as for the LH side.
63218M
15.INSTALL NO. 3 SLIDING ROOF SIDE GARNISH LH
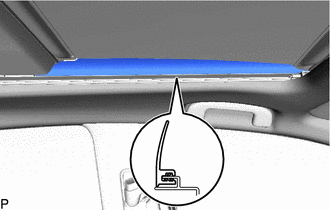
Install the No. 3 sliding roof side garnish LH.
63217K
16.INSTALL NO. 3 SLIDING ROOF SIDE GARNISH RH
- HINT:
-
Use the same procedure as for the LH side.
63218M
17.INSTALL NO. 2 SLIDING ROOF SIDE GARNISH LH
Move the sliding roof glass sub-assembly to the fully tilted up position.
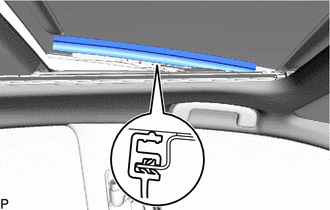
Install the No. 2 sliding roof side garnish LH.
63217K
18.INSTALL NO. 2 SLIDING ROOF SIDE GARNISH RH
- HINT:
-
Use the same procedure as for the LH side.
19.INITIALIZE PANORAMIC MOON ROOF SYSTEM
20.CHECK PANORAMIC MOON ROOF SYSTEM