DOOR / HATCH FRONT DOOR DISASSEMBLY
CAUTION / NOTICE / HINT
The necessary procedures (adjustment, calibration, initialization, or registration) that must be performed after parts are removed and installed, or replaced during front door removal/installation are shown below.
| Replaced Part or Performed Procedure | Necessary Procedure | Effect/Inoperative Function when Necessary Procedure not Performed | Link |
|---|---|---|---|
| Disconnect cable from negative battery terminal | Perform steering sensor zero point calibration | Lane departure alert system (w/ Steering Control) | ( ) |
| Pre-collision system | |||
| Memorize steering angle neutral point | Parking assist monitor system | ()
|
|
·
Door window regulator sub-assembly ·
Door glass ·
Door glass run |
Initialize power window control system | ·
Auto up and down function ·
Jam protection function ·
Remote control function ·
Key-linked function ·
Wireless transmitter-linked function ·
Key-off operation function ·
Catch protection function ·
Window open warning function |
()
|
- HINT:
- ·
Use the same procedure for the RH side and LH side.
·The following procedure is for the LH side.
PROCEDURE

 1. PRECAUTION
- CAUTION:
-
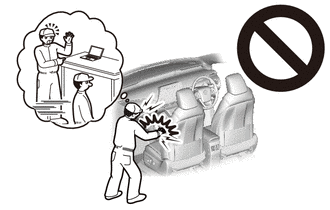
-
Be sure to read Precaution thoroughly before servicing.
-
Click hereVehicle Interior>SUPPLEMENTAL RESTRAINT SYSTEMS>AIRBAG SYSTEM>PRECAUTION
- NOTICE:
-
After turning the ignition switch off, waiting time may be required before disconnecting the cable from the negative (-) battery terminal. Therefore, make sure to read the disconnecting the cable from the negative (-) battery terminal notices before proceeding with work.
-
Click hereGeneral>INTRODUCTION>REPAIR INSTRUCTION>PRECAUTION
2.DISCONNECT CABLE FROM NEGATIVE BATTERY TERMINAL
for 2AR-FE:
Click hereGeneral>MAINTENANCE>2AR-FE BATTERY>REMOVAL
for A25A-FKS:
Click hereGeneral>MAINTENANCE>A25A-FKS BATTERY>REMOVAL
for 2GR-FKS:
Click hereGeneral>MAINTENANCE>2GR-FKS BATTERY>REMOVAL
- CAUTION:
-
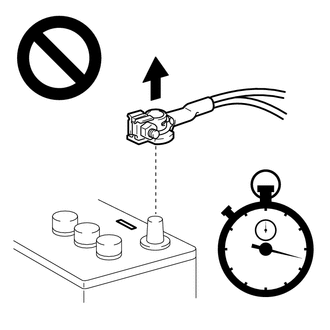
-
Wait at least 90 seconds after disconnecting the cable from the negative (-) battery terminal to disable the SRS system.
67492A
3.REMOVE FRONT DOOR LOWER FRAME BRACKET GARNISH
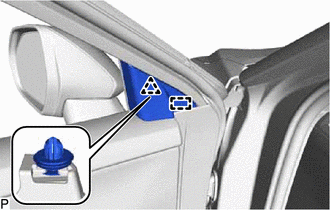
Disengage the clip and guide to remove the front door lower frame bracket garnish.
74038A
4.REMOVE FRONT DOOR ARMREST COVER SUB-ASSEMBLY
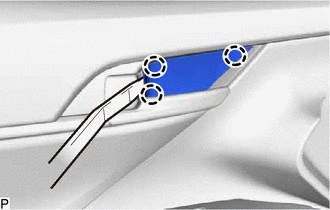
Using a moulding remover, disengage the 3 claws to remove the front door armrest cover sub-assembly.
5.REMOVE MULTIPLEX NETWORK MASTER SWITCH ASSEMBLY WITH FRONT DOOR UPPER ARMREST BASE PANEL (for Driver Side)
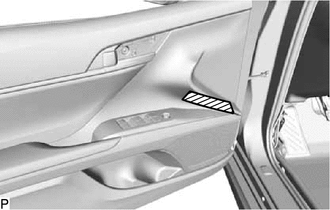

|
Protective Tape |
Apply protective tape to the front door trim board sub-assembly as shown in the illustration.
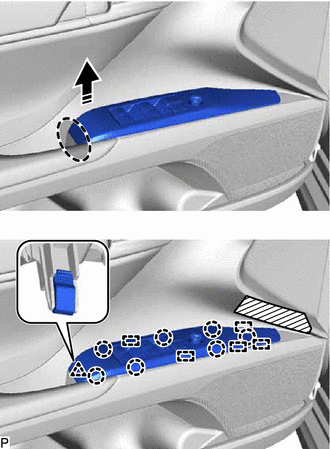

|
Place Hand Here |

|
Remove in this Direction |
Disengage the clip, 7 claws and 5 guides as shown in the illustration.
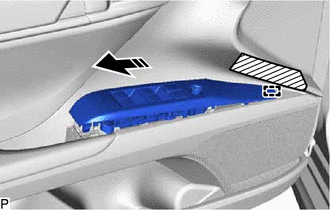
|
|
Remove in this Direction |
Disengage the guide as shown in the illustration.
Disconnect the connector to remove the multiplex network master switch assembly with front door upper armrest base panel.
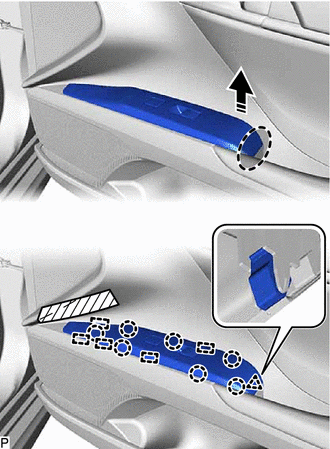
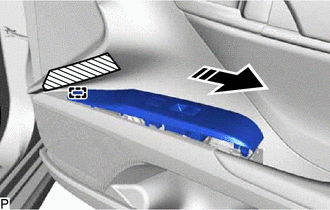
6.REMOVE POWER WINDOW REGULATOR SWITCH ASSEMBLY WITH FRONT DOOR UPPER ARMREST BASE PANEL (for Front Passenger Side)
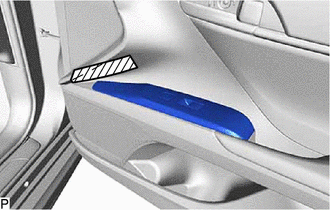
|
|
Protective Tape |
Apply protective tape to the front door trim board sub-assembly as shown in the illustration.
|
|
Place Hand Here |
|
|
Remove in this Direction |
Disengage the clip, 7 claws and 5 guides as shown in the illustration.
|
|
Remove in this Direction |
Disengage the guide as shown in the illustration.
Disconnect the connector to remove the power window regulator switch assembly with front door upper armrest base panel.
74220
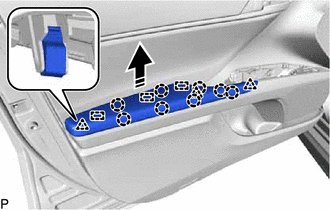
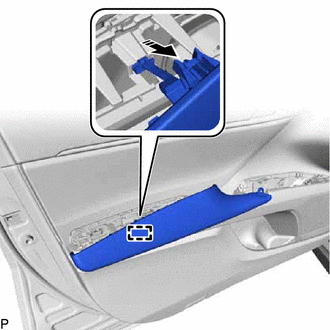
7.REMOVE FRONT ARMREST ASSEMBLY
|
|
Remove in this Direction |
Disengage the 3 clips, 8 claws and 3 guides as shown in the illustration.
|
|
Remove in this Direction |
Disengage the guide to remove the front armrest assembly as shown in the illustration.
81230
8.REMOVE COURTESY LIGHT ASSEMBLY
67602
9.REMOVE FRONT DOOR TRIM BOARD SUB-ASSEMBLY
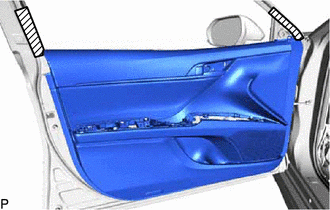
|
|
Protective Tape |
Apply protective tape to the front door panel as shown in the illustration.
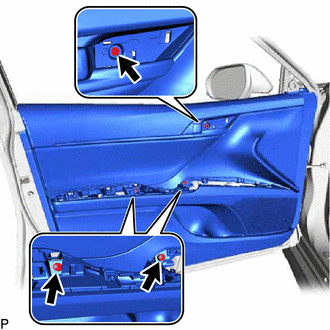
Remove the 3 screws.
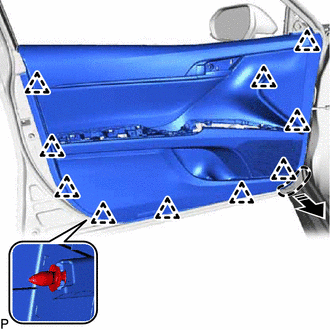
|
|
Place Hand Here |
|
|
Remove in this Direction |
Disengage the 10 clips as shown in the illustration.
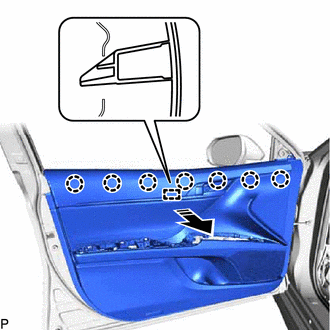
|
|
Remove in this Direction |
Disengage the 7 claws and guide as shown in the illustration.
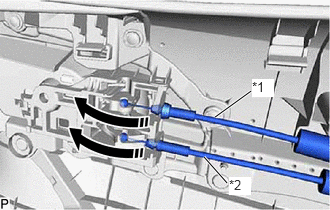
| *1 | Front Door Inside Locking Cable Assembly |
| *2 | Front Door Lock Remote Control Cable Assembly |
|
|
Remove in this Direction |
Disconnect the front door lock remote control cable assembly and front door inside locking cable assembly to remove the front door trim board sub-assembly as shown in the illustration.
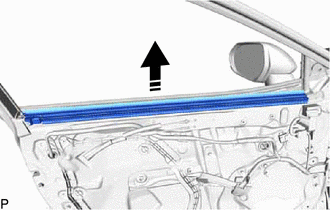
10.REMOVE FRONT DOOR INNER GLASS WEATHERSTRIP WITH FRONT DOOR VENT SEAL
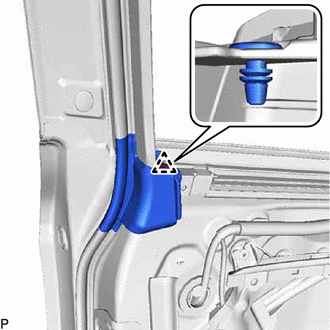
Disengage the clip.
|
|
Remove in this Direction |
Remove the front door inner glass weatherstrip with front door vent seal as shown in the illustration.
67838A
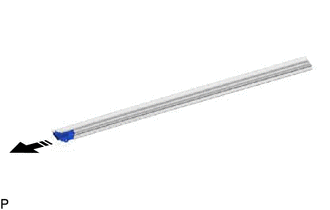
11.REMOVE FRONT DOOR VENT SEAL
|
|
Remove in this Direction |
Remove the front door vent seal from the front door inner glass weatherstrip as shown in the illustration.
69206B
12.REMOVE FRONT DOOR INSIDE HANDLE SUB-ASSEMBLY
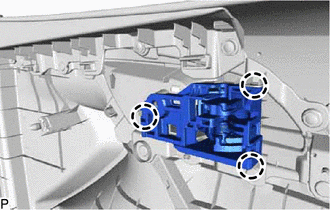
Disengage the 3 claws to remove the front door inside handle sub-assembly.
89430A
13.REMOVE OUTER MIRROR CONTROL ECU ASSEMBLY
14.REMOVE HOLE PLUG
87964
15.REMOVE OUTER MIRROR INSTALL HOLE COVER
16.REMOVE OUTER REAR VIEW MIRROR ASSEMBLY WITH COVER
86160
17.REMOVE FRONT NO. 1 SPEAKER ASSEMBLY
67832
18.REMOVE FRONT DOOR SERVICE HOLE COVER
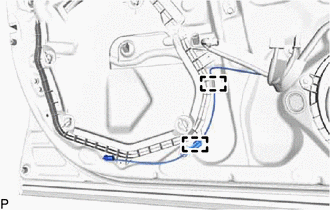
Disengage the 2 clamps.
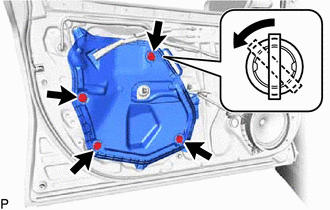
Turn each front door weatherstrip clip 45 degrees and remove the 4 front door weatherstrip clips as shown in the illustration.
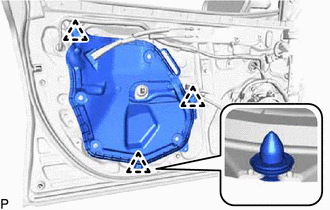
Disengage the 3 clips to remove the front door service hole cover.
89835
19.REMOVE DOOR SIDE AIRBAG SENSOR
68102
20.REMOVE FRONT DOOR GLASS SUB-ASSEMBLY
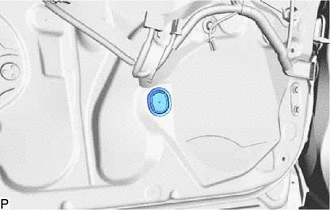
Remove the hole plug.
for Driver Side:
Connect the multiplex network master switch assembly.
for Front Passenger Side:
Connect the power window regulator switch assembly.
Connect the cable to the negative (-) battery terminal.
Turn the ignition switch to ON.
Move the front door glass sub-assembly so that the door glass bolts can be seen.
Turn the ignition switch off.
Disconnect the cable from the negative (-) battery terminal.
for Driver Side:
Disconnect the multiplex network master switch assembly.
for Front Passenger Side:
Disconnect the power window regulator switch assembly.
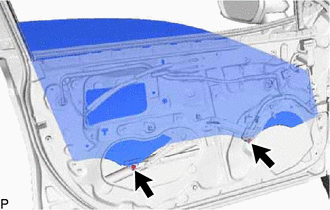
Remove the 2 bolts.
- NOTICE:
-
After the bolts are removed, do not allow the front door glass sub-assembly to fall.
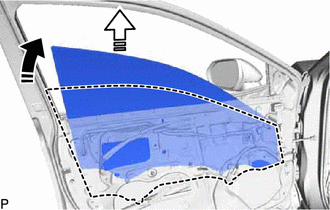
|
|
Remove in this Direction (1) |

|
Remove in this Direction (2) |
Remove the front door glass sub-assembly as indicated by the arrows, in the order shown in the illustration.
- NOTICE:
-
Do not damage the front door glass sub-assembly.
21.REMOVE FRONT DOOR WINDOW REGULATOR ASSEMBLY
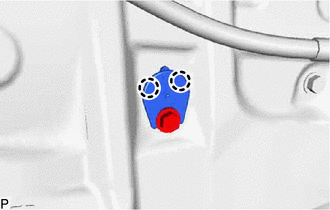
Disengage the 2 claws to remove the front door No. 2 service hole cover.
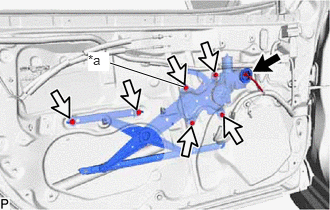
| *a | Temporary Bolt |
Disconnect the connector.
Loosen the temporary bolt.
- NOTICE:
-
Do not remove the temporary bolt. If the temporary bolt is removed, the front door window regulator assembly may fall and cause damage.
Remove the 5 bolts.
Remove the front door window regulator assembly.
Remove the temporary bolt from the front door window regulator assembly.
67856B
22.REMOVE FRONT DOOR PANEL PROTECTOR
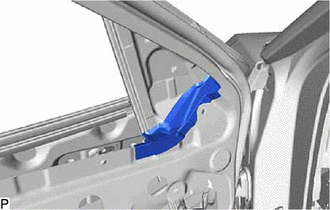
Remove the front door panel protector.
68151C
23.REMOVE FRONT DOOR GLASS RUN
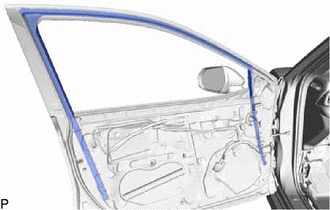
Remove the front door glass run.
67404F
24.REMOVE FRONT DOOR REAR LOWER FRAME SUB-ASSEMBLY
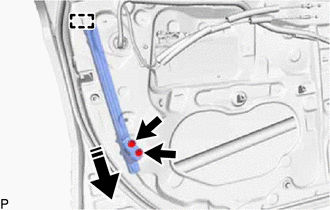
|
|
Remove in this Direction |
Remove the 2 bolts.
Disengage the guide and remove the front door rear lower frame sub-assembly as shown in the illustration.
69220
25.REMOVE FRONT DOOR OUTSIDE HANDLE ASSEMBLY
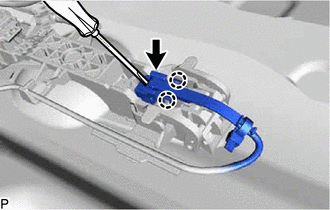
Disengage the 2 claws.
Using a screwdriver, disconnect the connector.
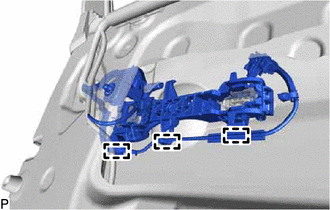
Disengage the 3 clamps.
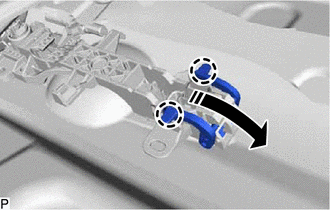
|
|
Disengage in this Direction |
Disengage the 2 claws and move the lever as shown in the illustration.
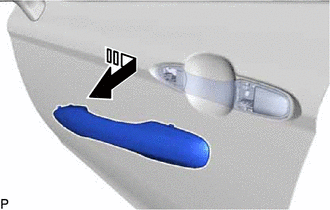
|
|
Remove in this Direction |
Remove the front door outside handle assembly as shown in the illustration.
26.REMOVE FRONT DOOR LOCK CYLINDER ASSEMBLY (for Driver Side)
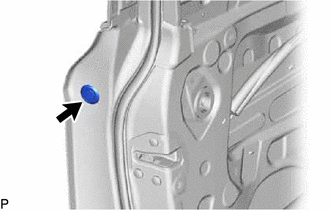
Remove the hole plug.
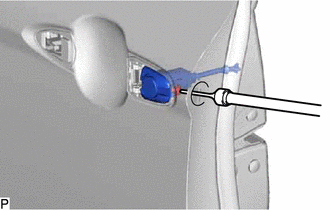
Using a T30 "TORX" socket wrench, loosen the screw and remove the front door lock cylinder assembly.
69217F
27.REMOVE FRONT DOOR OUTSIDE HANDLE COVER (for Front Passenger Side)
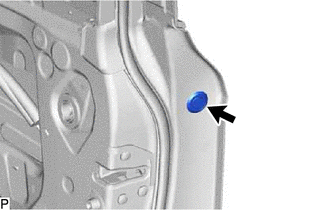
Remove the hole plug.
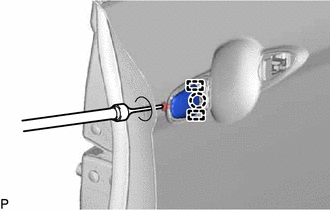
Using a T30 "TORX" socket wrench, loosen the screw.
Disengage the 2 guides and claw and remove the front door outside handle cover.
69241H
28.REMOVE FRONT DOOR FRONT OUTSIDE HANDLE PAD
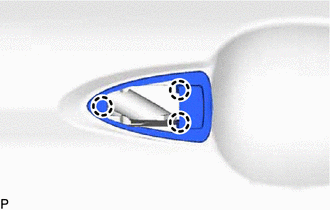
Disengage the 3 claws to remove the front door front outside handle pad.
69242E
29.REMOVE FRONT DOOR REAR OUTSIDE HANDLE PAD
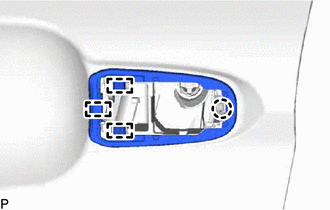
Disengage the 3 guides and claw to remove the front door rear outside handle pad.
69040A
30.REMOVE FRONT DOOR LOCK WITH MOTOR ASSEMBLY
69202A
31.REMOVE FRONT DOOR OUTSIDE HANDLE FRAME SUB-ASSEMBLY
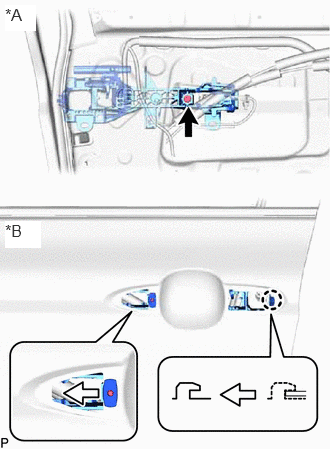
| *A | Inside |
| *B | Outside |
Using a T30 "TORX" socket wrench, remove the screw.
Slide the front door outside handle frame sub-assembly as shown in the illustration to disengage the claw and then remove the front door outside handle frame sub-assembly.
69312
32.REMOVE FRONT DOOR LOCK OPEN ROD
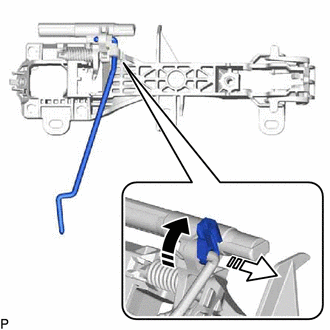
|
|
Remove in this Direction (1) |
|
|
Remove in this Direction (2) |
Remove the front door lock open rod as indicated by the arrows, in the order shown in the illustration.
68620
33.REMOVE FRONT DOOR CHECK ASSEMBLY
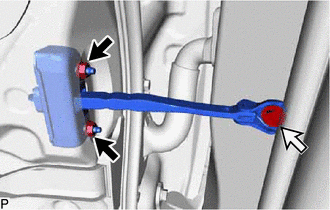

|
Nut |

|
Bolt |
Remove the 2 nuts, bolt and front door check assembly.
67862
34.REMOVE FRONT DOOR WEATHERSTRIP
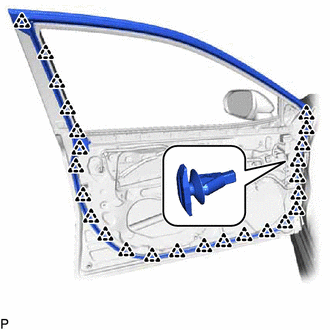
Using a clip remover, disengage the 25 clips and remove the front door weatherstrip.
67664C
35.REMOVE DOOR FRAME GARNISH
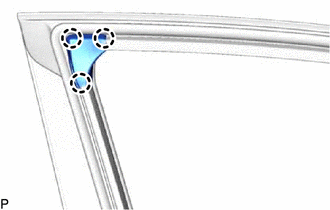
Disengage the 3 claws to remove the door frame garnish.
67402F
36.REMOVE FRONT DOOR FRONT LOWER FRAME SUB-ASSEMBLY
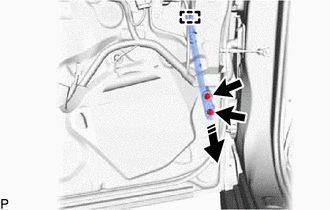
|
|
Remove in this Direction |
Remove the 2 bolts.
Disengage the guide and remove the front door front lower frame sub-assembly as shown in the illustration.
67001A
37.REMOVE FRONT DOOR PANEL CUSHION
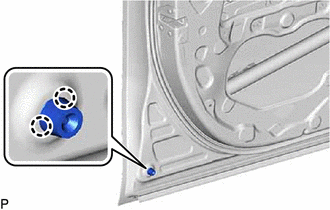
Disengage the 2 claws to remove the front door panel cushion.
67864B
38.REMOVE FRONT DOOR NO. 2 WEATHERSTRIP
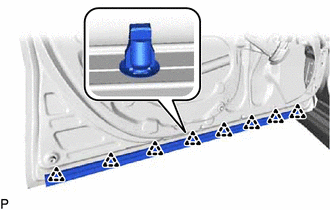
Disengage the 8 clips to remove the front door No. 2 weatherstrip.
75720
39.REMOVE FRONT DOOR BELT MOULDING ASSEMBLY
67496A
40.REMOVE FRONT DOOR FRONT LOWER FRAME UPPER COVER
75792
41.REMOVE DOOR WINDOW FRAME MOULDING CLIP
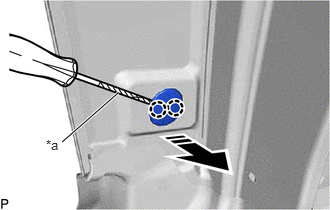
| *a | Protective Tape |
|
|
Remove in this Direction |
Using a screwdriver with its tip wrapped with protective tape, disengage the 2 claws to remove the door window frame moulding clip.
75756C
42.REMOVE FRONT DOOR REAR WINDOW FRAME MOULDING
67852D
43.REMOVE FRONT DOOR REAR OUTSIDE SEAL
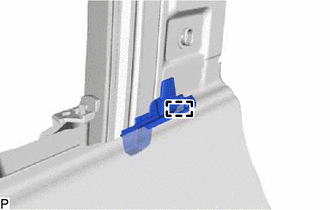
Disengage the guide to remove the front door rear outside seal.
75754A
44.REMOVE FRONT DOOR UPPER WINDOW FRAME MOULDING
75976G
45.REMOVE FRONT DOOR NO. 2 STRIPE
75986B
46.REMOVE FRONT DOOR NO. 3 STRIPE