THEFT DETERRENT / KEYLESS ENTRY SMART ENTRY AND START SYSTEM(for Start Function) B2271 Ignition Hold Monitor Malfunction
DESCRIPTION
This DTC is stored when a malfunction in the IG drive circuit or IG hold circuit of the certification ECU (smart key ECU assembly) or a malfunction in the IG output circuit between the output terminal of the certification ECU (smart key ECU assembly) and IG relay is detected.
| DTC No. | Detection Item | DTC Detection Condition | Trouble Area | Note |
|---|---|---|---|---|
| B2271 | Ignition Hold Monitor Malfunction | When either of the following conditions is met (1-trip detection logic*1):
·
The IG circuit of the certification ECU (smart key ECU assembly) is malfunctioning.*2 ·
The IG hold circuit of the certification ECU (smart key ECU assembly) is malfunctioning.*3 ·
There is a malfunction in a circuit outside of the certification ECU (smart key ECU assembly) circuit. |
·
Certification ECU (smart key ECU assembly) ·
Instrument panel junction block assembly ·
Wire harness or connector |
DTC Output Confirmation Operation:
Turn the engine switch on (IG). |
*1: Only detected while a malfunction is present and the engine switch is on (IG).
*2: The IG circuit and IG hold circuit activate the IG relay.
*3: After the IG circuit turns on, even if the certification ECU (smart key ECU assembly) malfunctions, the IG hold circuit will maintain the power source mode in on (IG).
| Vehicle Condition when Malfunction Detected | Fail-safe Function when Malfunction Detected |
|---|---|
| The engine switch cannot be turned on (IG) (the engine cannot be started). | The power source mode cannot be changed to on (IG). |
| DTC No. | Data List and Active Test |
|---|---|
| B2271 | Power Source Control
·
IG Relay Monitor (Inside) ·
Latch Circuit Starting Control
·
Ignition |
WIRING DIAGRAM
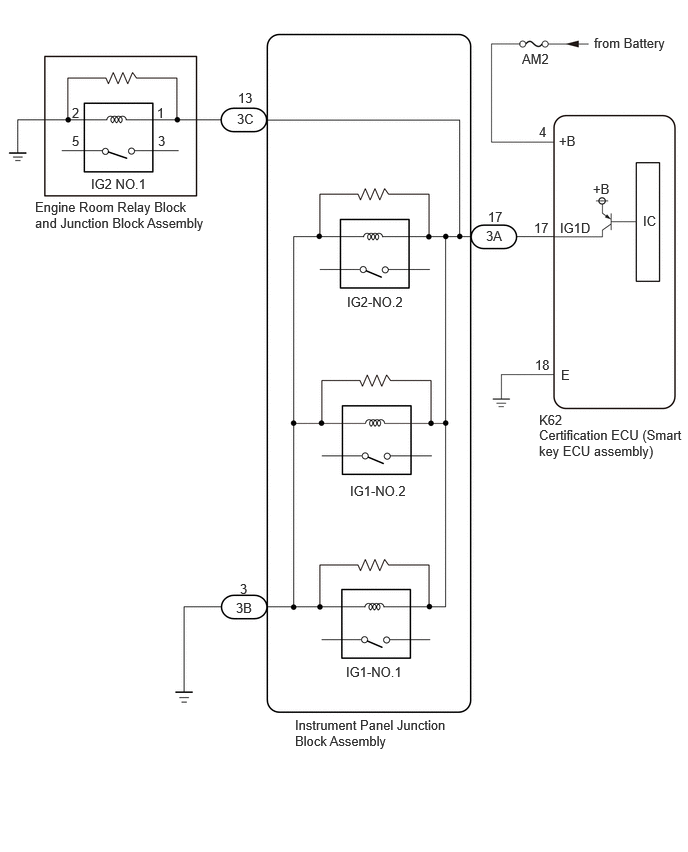
CAUTION / NOTICE / HINT
- NOTICE:
- ·
When using the GTS with the engine switch off, connect the GTS to the DLC3 and turn a courtesy light switch on and off at intervals of 1.5 seconds or less until communication between the GTS and the vehicle begins. Then select Model Code "KEY REGIST" under manual mode and enter the following menus: Body Electrical / Entry&Start(CAN). While using the GTS, periodically turn a courtesy light switch on and off at intervals of 1.5 seconds or less to maintain communication between the GTS and the vehicle.
·The smart entry and start system (for Start Function) uses the LIN communication system and CAN communication system. Inspect the communication function by following How to Proceed with Troubleshooting. Troubleshoot the smart entry and start system (for Start Function) after confirming that the communication systems are functioning properly.
·Before replacing the certification ECU (smart key ECU assembly), refer to Service Bulletin.
·After repair, confirm that no DTCs are output by performing "DTC Output Confirmation Operation".
PROCEDURE
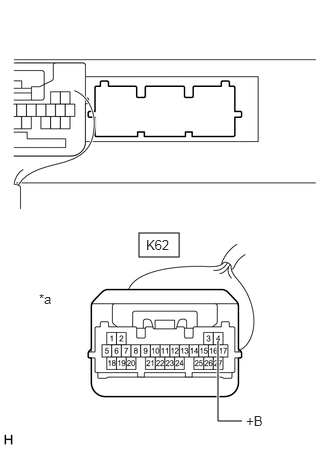
| *a | Front view of wire harness connector
(to Certification ECU (Smart Key ECU Assembly)) |
Disconnect the K62 certification ECU (smart key ECU assembly) connector.
Measure the voltage according to the value(s) in the table below.
- Standard Voltage:
Tester Connection Condition Specified Condition K62-4 (+B) - Body ground Always 11 to 14 V
- Result:
Proceed to OK NG
OK
NG
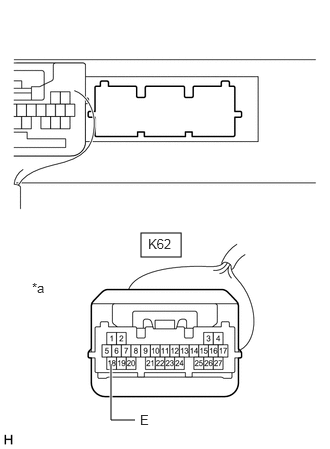
| *a | Front view of wire harness connector
(to Certification ECU (Smart Key ECU Assembly)) |
Measure the resistance according to the value(s) in the table below.
- Standard Resistance:
Tester Connection Condition Specified Condition K62-18 (E) - Body ground Always Below 1 Ω
- Result:
Proceed to OK NG
OK
NG
Disconnect the 3A instrument panel junction block assembly connector.
Measure the resistance according to the value(s) in the table below.
- Standard Resistance:
Tester Connection Condition Specified Condition K62-17 (IG1D) - 3A-17 Always Below 1 Ω K62-17 (IG1D) or 3A-17 - Other terminals and body ground Always 10 kΩ or higher
- Result:
Proceed to OK NG
OK
NG
Disconnect the 3C instrument panel junction block assembly connector.
Measure the resistance according to the value(s) in the table below.
- Standard Resistance:
Tester Connection Condition Specified Condition 3A-17 - 3C-13 Always Below 1 Ω 3A-17 or 3C-13 - Other terminals Always 10 kΩ or higher
- Result:
Proceed to OK NG
OK
NG
Remove the IG2 NO. 1 relay from the engine room relay block and junction block assembly.
Measure the resistance according to the value(s) in the table below.
- Standard Resistance:
Tester Connection Condition Specified Condition 3C-13 - Engine room relay block and junction block assembly IG2 NO. 1 relay terminal 1 Always Below 1 Ω 3C-13 or engine room relay block and junction block assembly IG2 NO. 1 relay terminal 1 - Other terminals and body ground Always 10 kΩ or higher
- Result:
Proceed to OK NG
OK
NG
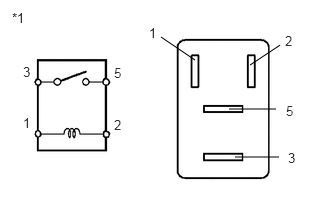
| *1 | IG2 NO. 1 Relay |
Measure the resistance according to the value(s) in the table below.
- Standard Resistance:
Tester Connection Condition Specified Condition 3 - 5 Battery voltage not applied between terminals 1 and 2 10 kΩ or higher 3 - 5 Battery voltage applied between terminals 1 and 2 Below 1 Ω
- Result:
Proceed to OK NG
OK
NG
Disconnect the 3B instrument panel junction block assembly connector.
Measure the resistance according to the value(s) in the table below.
- Standard Resistance:
Tester Connection Condition Specified Condition 3A-17 - 3B-3 Always 20 Ω or higher 3A-17 or 3B-3 - Other terminals Always 10 kΩ or higher
- Result:
Proceed to OK NG
OK
NG