PARKING BRAKE ELECTRIC PARKING BRAKE SYSTEM C13A7 Actuator Malfunction
DESCRIPTION
| DTC No. | Detection Item | DTC Detection Condition | Trouble Area | Memory | Note |
|---|---|---|---|---|---|
| C13A7 | Actuator Malfunction | When the electric parking brake is operating, motor lock, gear lock, motor spinning or repeated slipping occurs. | ·
Parking brake actuator assembly ·
Rear brake ·
Wire harness or connector |
DTC stored | An electric parking brake system malfunction is displayed on the multi-information display. |
WIRING DIAGRAM
CAUTION / NOTICE / HINT
- NOTICE:
- ·
This DTC may be stored when the system changes to pad replacement mode, but this is not a malfunction.
·This DTC may be stored when the parking brake is forcibly released, but this is not a malfunction.
·The electric parking brake may still operate up to 20 seconds after the ignition switch is turned off. Before disconnecting connectors or fuses, turn the ignition switch off and wait 20 seconds or more.
·When replacing the skid control ECU (brake actuator assembly), operate the electric parking brake switch (electric parking brake switch assembly) as the parking brake indicator light (red) blinks when the ignition switch is first turned ON.
PROCEDURE
Check for DTCs.
- Chassis > ABS/VSC/TRC > Trouble Codes
- 50001 105
- Result:
Result Proceed to Only DTC C13A7/43 is output A DTCs other than C13A7/43 are output B
A
B
Turn the ignition switch off.
Connect the GTS to the DLC3.
Turn the ignition switch to ON.
Turn the GTS on.
Enter the following menus: Chassis / ABS/VSC/TRC/EPB / Data List.
Read the Data List according to the display on the GTS.
- Chassis > ABS/VSC/TRC > Data List
-
Tester Display Measurement Item Range Normal Condition Diagnostic Note Permission of RH Interlocking PKB Lock Parking brake actuator assembly RH parking brake lock control permission status OK or NG OK - Permission of LH Interlocking PKB Lock Parking brake actuator assembly LH parking brake lock control permission status OK or NG OK -
- Chassis > ABS/VSC/TRC > Data List
-
Tester Display Permission of RH Interlocking PKB Lock Permission of LH Interlocking PKB Lock - 50003 105 469,473
- Result:
Proceed to NEXT
NEXT
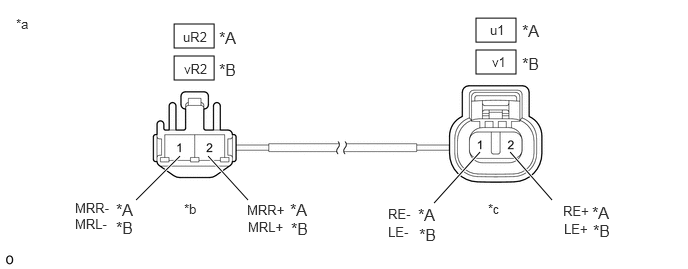
| *A | RH | *B | LH |
| *a | Front view of Parking Brake Wire Assembly | *b | (to wire harness connector) |
| *c | (to Parking Brake Actuator Assembly) | - | - |
Remove the parking brake wire assembly.
Check the parking brake wire assembly for damage.
- OK:
No damage.
- HINT:
-
If damaged, there may be a short in the wire harness or a short to ground.
Inspect the parking brake wire assembly.
- Standard Resistance:
RH Tester Connection Condition Specified Condition uR2-1 (MRR-) - u1-1 (RE-) Always Below 1 Ω uR2-1 (MRR-) - u1-2 (RE+) Always 10 kΩ or higher uR2-1 (MRR-) or u1-1 (RE-) - Body ground Always 10 kΩ or higher uR2-2 (MRR+) - u1-2 (RE+) Always Below 1 Ω uR2-2 (MRR+) - u1-1 (RE-) Always 10 kΩ or higher uR2-2 (MRR+) or u1-2 (RE+) - Body ground Always 10 kΩ or higher
LH Tester Connection Condition Specified Condition vR2-1 (MRL-) - v1-1 (LE-) Always Below 1 Ω vR2-1 (MRL-) - v1-2 (LE+) Always 10 kΩ or higher vR2-1 (MRL-) or v1-1 (LE-) - Body ground Always 10 kΩ or higher vR2-2 (MRL+) - v1-2 (LE+) Always Below 1 Ω vR2-2 (MRL+) - v1-1 (LE-) Always 10 kΩ or higher vR2-2 (MRL+) or v1-2 (LE+) - Body ground Always 10 kΩ or higher
- Result:
Proceed to OK NG
OK
NG
Turn the ignition switch off.
Make sure the parking brake wire assembly is securely installed.
Disconnect the A34 skid control ECU (brake actuator assembly) connector.
Disconnect the u1 or v1 parking brake actuator assembly connector.
Measure the resistance according to the value(s) in the table below.
- Standard Resistance:
RH Tester Connection Condition Specified Condition A34-2 (MRR+) - u1-2 (RE+) Always Below 1 Ω A34-3 (MRR-) - u1-1 (RE-) Always Below 1 Ω A34-2 (MRR+) or u1-2 (RE+) - Body ground Always 10 kΩ or higher A34-3 (MRR-) or u1-1 (RE-) - Body ground Always 10 kΩ or higher
LH Tester Connection Condition Specified Condition A34-13 (MRL+) - v1-2 (LE+) Always Below 1 Ω A34-12 (MRL-) - v1-1 (LE-) Always Below 1 Ω A34-13 (MRL+) or v1-2 (LE+) - Body ground Always 10 kΩ or higher A34-12 (MRL-) or v1-1 (LE-) - Body ground Always 10 kΩ or higher
- Result:
Proceed to OK NG
OK
NG
Enter rear brake pad replacement mode.
Click hereBrake>PARKING BRAKE>ELECTRIC PARKING BRAKE SYSTEM>TEST MODE PROCEDURE
Turn the ignition switch off.
Check that the rotating parts are not seized or the actuator is not spinning freely.
Check that the parking brake actuator assembly is installed properly to the rear brake caliper and that it is not spinning freely.
For the parking brake actuator assembly removal procedure: Click hereBrake>PARKING BRAKE>ELECTRIC PARKING BRAKE ACTUATOR>REMOVAL
Check that there is no damage to the rotating parts from the parking brake actuator assembly to the rear brake caliper.
Inspect the parking brake actuator assembly and check that it operates correctly.
Click hereBrake>PARKING BRAKE>ELECTRIC PARKING BRAKE ACTUATOR>INSPECTION
Check that the rear brake caliper threaded part rotates and that the rear disc brake piston moves outward.
- HINT:
-
For the check procedures, refer to the parking brake forced release method when not using the GTS.
-
Click hereBrake>PARKING BRAKE>FORCED RELEASE>OPERATION METHOD
- HINT:
-
Return to normal mode after work is complete.
-
Click hereBrake>PARKING BRAKE>ELECTRIC PARKING BRAKE SYSTEM>TEST MODE PROCEDURE
- Result:
Proceed to OK NG
OK
NG