LIGHTING (EXT) LIGHTING SYSTEM(w/o Automatic Headlight Beam Level Control System) LO-beam Headlight does not Illuminate
DESCRIPTION
The main body ECU (multiplex network body ECU) controls the low beam headlights.
WIRING DIAGRAM
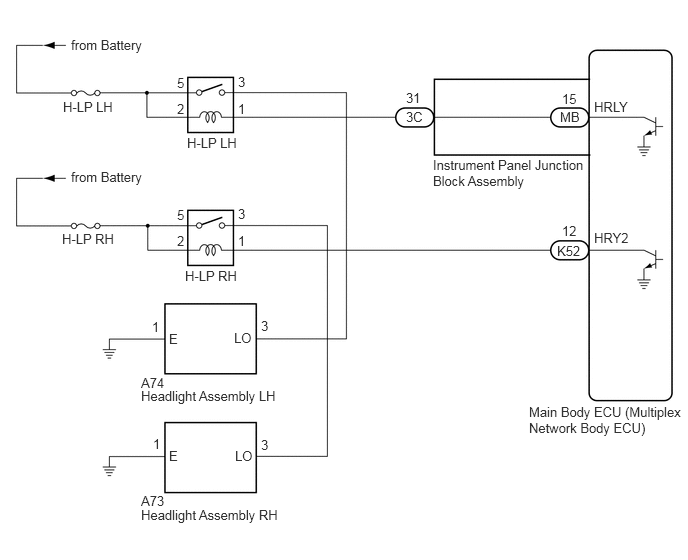
HEADLIGHT ASSEMBLY CIRCUIT
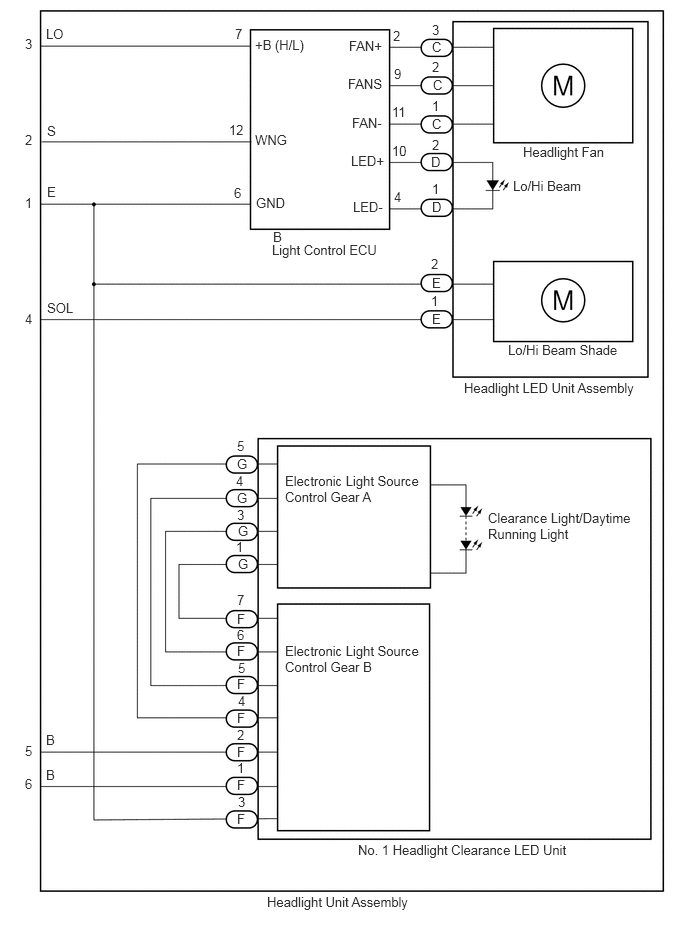
CAUTION / NOTICE / HINT
- NOTICE:
- ·
Inspect the fuses for circuits related to this system before performing the following procedure.
·Before replacing the main body ECU (multiplex network body ECU), refer to Service Bulletin.*
*: w/ Smart Entry and Start System
PROCEDURE
Connect the GTS to the DLC3.
Turn the ignition switch to ON.
Turn the GTS on.
Enter the following menus: Body Electrical / Main Body / Active Test.
Perform the Active Test according to the display on the GTS.
- Body Electrical > Main Body > Active Test
-
Tester Display Measurement Item Control Range Diagnostic Note Headlight Relay Low beam headlights OFF or ON -
- Body Electrical > Main Body > Active Test
-
Tester Display Headlight Relay - 50004 123 14
- OK:
Low beam headlights illuminate.
- Result:
Result Proceed to OK A NG (for LH Side) B NG (for RH Side) C
A
B
C
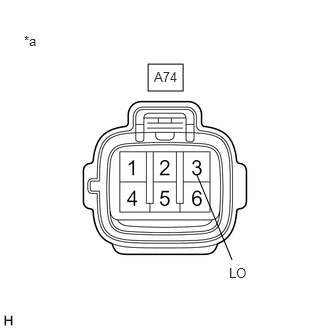
| *a | Front view of wire harness connector
(to Headlight Assembly LH) |
Disconnect the A74 headlight assembly LH connector.
Measure the voltage according to the value(s) in the table below.
- Standard Voltage:
Tester Connection Condition Specified Condition A74-3 (LO) - Body ground Light control switch in head position 11 to 14 V
- Result:
Proceed to OK NG
OK
NG
Measure the resistance according to the value(s) in the table below.
- Standard Resistance:
Tester Connection Condition Specified Condition A74-1 (E) - Body ground Always Below 1 Ω
- Result:
Proceed to OK NG
OK
NG
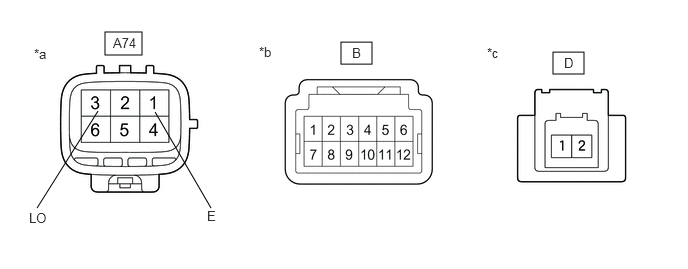
| *a | Component without harness connected
(to Wire Harness) |
*b | Component without harness connected
(to Light Control ECU) |
| *c | Component without harness connected
(to Headlight LED Unit Assembly LH) |
- | - |
Remove the headlight assembly LH.
Click hereVehicle Exterior>LIGHTING (EXT)>HEADLIGHT ASSEMBLY (for Bulb Type Turn Signal Light)>REMOVAL
Remove the headlight unit assembly LH.
Click hereVehicle Exterior>LIGHTING (EXT)>HEADLIGHT ASSEMBLY (for Bulb Type Turn Signal Light)>DISASSEMBLY
Measure the resistance according to the value(s) in the table below.
- Standard Resistance:
Tester Connection Condition Specified Condition A74-1 (E) - B-6 Always Below 1 Ω A74-3 (LO) - B-7 Always Below 1 Ω B-4 - D-1 Always Below 1 Ω B-10 - D-2 Always Below 1 Ω
- Result:
Proceed to OK NG
OK
NG
Click hereVehicle Exterior>LIGHTING (EXT)>HEADLIGHT ASSEMBLY (for Bulb Type Turn Signal Light)>DISASSEMBLY
Remove each light control ECU, interchange the light control ECU (for LH) with (for RH) and connect the connectors.
Click hereVehicle Exterior>LIGHTING (EXT)>HEADLIGHT ASSEMBLY (for Bulb Type Turn Signal Light)>DISASSEMBLY
- Result:
Proceed to NEXT
NEXT
Check that the low beam headlight operates normally.
- OK:
Low beam headlight operates normally.
- Result:
Proceed to OK NG
OK
Click hereVehicle Exterior>LIGHTING (EXT)>HEADLIGHT ASSEMBLY (for Bulb Type Turn Signal Light)>DISASSEMBLY
NG
Click hereVehicle Exterior>LIGHTING (EXT)>HEADLIGHT ASSEMBLY (for Bulb Type Turn Signal Light)>DISASSEMBLY
Remove the H-LP LH relay.
Measure the resistance according to the value(s) in the table below.
- Standard Resistance:
Tester Connection Condition Specified Condition 3 (H-LP LH relay) - A74-3 (LO) Always Below 1 Ω 3 (H-LP LH relay) or A74-3 (LO) - Body ground Always 10 kΩ or higher
- Result:
Proceed to OK NG
OK
NG
Inspect the H-LP LH relay.
Click hereVehicle Exterior>LIGHTING (EXT)>RELAY>ON-VEHICLE INSPECTION
- Result:
Proceed to OK NG
OK
NG
Measure the voltage according to the value(s) in the table below.
- Standard Voltage:
Tester Connection Condition Specified Condition 2 (H-LP LH relay) - Body ground Always 11 to 14 V 5 (H-LP LH relay) - Body ground Always 11 to 14 V
- Result:
Proceed to OK NG
OK
NG
Disconnect the 3C instrument panel junction block assembly connector.
Measure the resistance according to the value(s) in the table below.
- Standard Resistance:
Tester Connection Condition Specified Condition 1 (H-LP LH relay) - 3C-31 Always Below 1 Ω 1 (H-LP LH relay) or 3C-31 - Body ground Always 10 kΩ or higher
- Result:
Proceed to OK NG
OK
NG
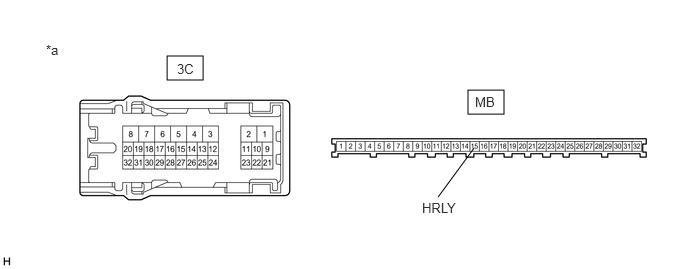
| *a | Component without harness connected
(Instrument Panel Junction Block Assembly) |
- | - |
Remove the instrument panel junction block assembly.
Click herePower Source / Network>POWER DISTRIBUTION>MAIN BODY ECU>REMOVAL
Remove the main body ECU (multiplex network body ECU) from the instrument panel junction block assembly.
Measure the resistance according to the value(s) in the table below.
- Standard Resistance:
Tester Connection Condition Specified Condition 3C-31 - MB-15 (HRLY) Always Below 1 Ω
- Result:
Proceed to OK NG
OK
NG
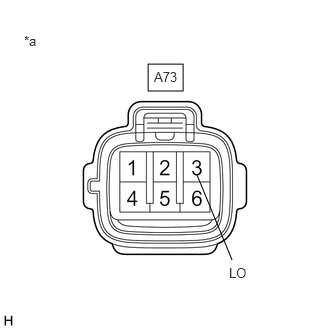
| *a | Front view of wire harness connector
(to Headlight Assembly RH) |
Disconnect the A73 headlight assembly RH connector.
Measure the voltage according to the value(s) in the table below.
- Standard Voltage:
Tester Connection Condition Specified Condition A73-3 (LO) - Body ground Light control switch in head position 11 to 14 V
- Result:
Proceed to OK NG
OK
NG
Measure the resistance according to the value(s) in the table below.
- Standard Resistance:
Tester Connection Condition Specified Condition A73-1 (E) - Body ground Always Below 1 Ω
- Result:
Proceed to OK NG
OK
NG
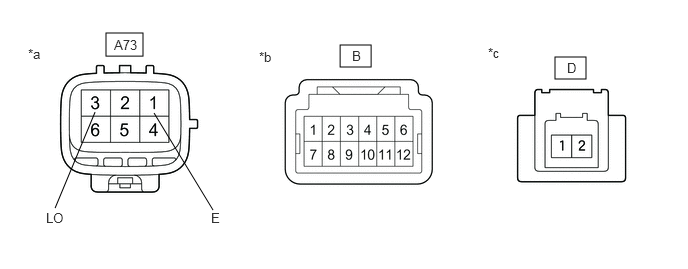
| *a | Component without harness connected
(to Wire Harness) |
*b | Component without harness connected
(to Light Control ECU) |
| *c | Component without harness connected
(to Headlight LED Unit Assembly RH) |
- | - |
Remove the headlight assembly RH.
Click hereVehicle Exterior>LIGHTING (EXT)>HEADLIGHT ASSEMBLY (for Bulb Type Turn Signal Light)>REMOVAL
Remove the headlight unit assembly RH.
Click hereVehicle Exterior>LIGHTING (EXT)>HEADLIGHT ASSEMBLY (for Bulb Type Turn Signal Light)>DISASSEMBLY
Measure the resistance according to the value(s) in the table below.
- Standard Resistance:
Tester Connection Condition Specified Condition A73-1 (E) - B-6 Always Below 1 Ω A73-3 (LO) - B-7 Always Below 1 Ω B-4 - D-1 Always Below 1 Ω B-10 - D-2 Always Below 1 Ω
- Result:
Proceed to OK NG
OK
NG
Click hereVehicle Exterior>LIGHTING (EXT)>HEADLIGHT ASSEMBLY (for Bulb Type Turn Signal Light)>DISASSEMBLY
Remove each light control ECU, interchange the light control ECU (for RH) with (for LH) and connect the connectors.
Click hereVehicle Exterior>LIGHTING (EXT)>HEADLIGHT ASSEMBLY (for Bulb Type Turn Signal Light)>DISASSEMBLY
- Result:
Proceed to NEXT
NEXT
Check that the low beam headlight operates normally.
- OK:
Low beam headlight operates normally.
- Result:
Proceed to OK NG
OK
Click hereVehicle Exterior>LIGHTING (EXT)>HEADLIGHT ASSEMBLY (for Bulb Type Turn Signal Light)>DISASSEMBLY
NG
Click hereVehicle Exterior>LIGHTING (EXT)>HEADLIGHT ASSEMBLY (for Bulb Type Turn Signal Light)>DISASSEMBLY
Remove the H-LP RH relay.
Measure the resistance according to the value(s) in the table below.
- Standard Resistance:
Tester Connection Condition Specified Condition 3 (H-LP RH relay) - A73-3 (LO) Always Below 1 Ω 3 (H-LP RH relay) or A73-3 (LO) - Body ground Always 10 kΩ or higher
- Result:
Proceed to OK NG
OK
NG
Inspect the H-LP RH relay.
Click hereVehicle Exterior>LIGHTING (EXT)>RELAY>ON-VEHICLE INSPECTION
- Result:
Proceed to OK NG
OK
NG
Measure the voltage according to the value(s) in the table below.
- Standard Voltage:
Tester Connection Condition Specified Condition 2 (H-LP RH relay) - Body ground Always 11 to 14 V 5 (H-LP RH relay) - Body ground Always 11 to 14 V
- Result:
Proceed to OK NG
OK
NG
Disconnect the K52 main body ECU (multiplex network body ECU) connector.
Measure the resistance according to the value(s) in the table below.
- Standard Resistance:
Tester Connection Condition Specified Condition 1 (H-LP RH relay) - K52-12 (HRY2) Always Below 1 Ω 1 (H-LP RH relay) or K52-12 (HRY2) - Body ground Always 10 kΩ or higher
- Result:
Proceed to OK NG
OK
NG