HEATING / AIR CONDITIONING AIR CONDITIONING SYSTEM(for Automatic Air Conditioning System) Cooling is Poor
DESCRIPTION
If the cooling effect of the air conditioning system is weak, the following factors may be the cause.
| Symptom | Factor |
|---|---|
·
Cooling effectiveness is poor ·
Cooling response is slow |
·
ECO mode control of air conditioning system is enabled*1 ·
Compressor assembly with pulley (compressor solenoid) malfunction*2 ·
Cooler compressor assembly (compressor solenoid) malfunction*3 ·
Magnet clutch assembly malfunction*3 ·
Refrigerant volume (high) ·
Refrigerant volume (low) ·
Clogged cooler condenser assembly fins ·
Cooling fan system malfunction ·
Mechanical locking of damper and damper link ·
Automatic light control sensor malfunction ·
High inlet air temperature ·
Harness or connector |
*1: w/ ECO Switch
*2: for 2AR-FE, A25A-FKS
*3: for 6AR-FSE, 2GR-FKS
WIRING DIAGRAM
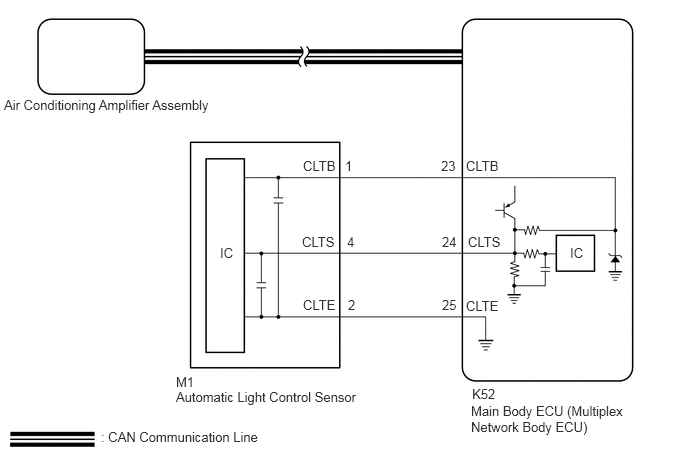
PROCEDURE
- Result:
Result Proceed to w/ ECO Switch A w/o ECO Switch B
A
B
Check if the ECO mode indicator is off.
- OK:
The ECO mode indicator is off.
- Result:
Proceed to OK NG
OK
NG
- Result:
Result Proceed to w/ ECO Switch Assembly (electric parking brake switch assembly) A w/ ECO switch assembly (air conditioning control panel (radio and display receiver assembly)) B w/ ECO switch assembly (air conditioning control assembly) C
A
B
C
Operate the ECO switch assembly (electric parking brake switch assembly) and check that the ECO mode indicator turns off and the blower speed reduction is canceled.
- HINT:
- ·
When ECO mode control is operating, the air conditioning amplifier assembly controls the air conditioning system to enhance fuel efficiency. Therefore, explain to the customer that, when ECO mode control is operating, the blower speed will be reduced.
Control Outline Blower Control When the air conditioning system is in AUTO mode, the blower speed will be reduced to a certain speed. Additionally, if warm-up control is operating, the blower speed will be further reduced. Air Inlet Control If the ambient temperature is a certain value or more, the air inlet mode will be changed to recirculation mode.
·In some situations, ECO mode control may not operate even though it is enabled.
- Result:
Result Proceed to ECO mode indicator turns off and blower speed reduction is canceled A ECO mode indicator turns off, but the blower speed reduction is not canceled B ECO mode indicator does not turn off
A
B
Operate the ECO switch assembly (air conditioning control panel (radio and display receiver assembly)) and check that the ECO mode indicator turns off and the blower speed reduction is canceled.
- HINT:
- ·
When ECO mode control is operating, the air conditioning amplifier assembly controls the air conditioning system to enhance fuel efficiency. Therefore, explain to the customer that, when ECO mode control is operating, the blower speed will be reduced.
Control Outline Blower Control When the air conditioning system is in AUTO mode, the blower speed will be reduced to a certain speed. Additionally, if warm-up control is operating, the blower speed will be further reduced. Air Inlet Control If the ambient temperature is a certain value or more, the air inlet mode will be changed to recirculation mode.
·In some situations, ECO mode control may not operate even though it is enabled.
- Result:
Result Proceed to ECO mode indicator turns off and blower speed reduction is canceled A ECO mode indicator turns off, but the blower speed reduction is not canceled B ECO mode indicator does not turn off C
A
B
C
Operate the ECO switch assembly (air conditioning control assembly) and check that the ECO mode indicator turns off and the blower speed reduction is canceled.
- HINT:
- ·
When ECO mode control is operating, the air conditioning amplifier assembly controls the air conditioning system to enhance fuel efficiency. Therefore, explain to the customer that, when ECO mode control is operating, the blower speed will be reduced.
Control Outline Blower Control When the air conditioning system is in AUTO mode, the blower speed will be reduced to a certain speed. Additionally, if warm-up control is operating, the blower speed will be further reduced. Air Inlet Control If the ambient temperature is a certain value or more, the air inlet mode will be changed to recirculation mode.
·In some situations, ECO mode control may not operate even though it is enabled.
- Result:
Result Proceed to ECO mode indicator turns off and blower speed reduction is canceled A ECO mode indicator turns off, but the blower speed reduction is not canceled B ECO mode indicator does not turn off C
A
B
C
Connect the GTS to the DLC3.
Turn the ignition switch to ON.
Turn the GTS on.
Enter the following menus: Body Electrical / Air Conditioner / Utility / Refrigerant Gas Volume Check.
- Body Electrical > Air Conditioner > Utility
-
Tester Display Refrigerant Gas Volume Check - 50005 121 3186
Check that the following conditions are met and perform the refrigerant shortage check according to the display on the GTS.
| Item | Condition |
|---|---|
| A/C switch | On |
| Ambient temperature* | 0 to 49°C (32 to 120°F) |
| Blower speed | HI |
*: If the ambient temperature is not within the range shown, do not perform this check.
- Result:
Result Amount of Refrigerant Refrigerant correct Correct Refrigerant shortage Insufficient
- OK:
"Refrigerant correct" is displayed on the GTS.
- Result:
Proceed to OK NG
OK
NG
Connect the GTS to the DLC3.
Turn the ignition switch to ON.
Turn the GTS on.
Enter the following menus: Body Electrical / Air Conditioner / Active Test.
Perform the Active Test according to the display on the GTS.
- Body Electrical > Air Conditioner > Active Test
-
Tester Display Measurement Item Control Range Diagnostic Note Air Mix Servo Targ Pulse(D) No. 1 air conditioning radiator damper servo sub-assembly (driver side air mix) pulse Min.: 128
Max.: 383for LHDOperates between 165 to 257 pulses
for RHDOperates between 255 to 347 pulses
Air Mix Servo Targ Pulse(P) No. 1 air conditioning radiator damper servo sub-assembly (front passenger side air mix) pulse Min.: 128
Max.: 383for LHD:Operates between 255 to 347 pulses
for RHD:Operates between 165 to 257 pulses
Rear Air Mix Servo Targ Pulse No. 3 air conditioning radiator damper servo sub-assembly pulse Min.: 128
Max.: 383·Operates between 165 to 257 pulses
·*
*: for 3 Zone Type
- Body Electrical > Air Conditioner > Active Test
-
Tester Display Air Mix Servo Targ Pulse(D) - 50004 121 24
- Body Electrical > Air Conditioner > Active Test
-
Tester Display Air Mix Servo Targ Pulse(P) - 50004 121 25
- Body Electrical > Air Conditioner > Active Test
-
Tester Display Rear Air Mix Servo Targ Pulse - 50004 121 36
- OK:
Each damper servo motor operates.
- Result:
Proceed to OK NG
OK
NG
Disconnect the M1 automatic light control sensor connector.
Disconnect the K52 main body ECU (multiplex network body ECU) connector.
Measure the resistance according to the value(s) in the table below.
- Standard Resistance:
Tester Connection Condition Specified
ConditionM1-1 (CLTB) - K52-23 (CLTB) Always Below 1 Ω M1-2 (CLTE) - K52-25 (CLTE) Always Below 1 Ω M1-4 (CLTS) - K52-24 (CLTS) Always Below 1 Ω M1-1 (CLTB) or K52-23 (CLTB) - Other terminals and body ground Always 10 kΩ or higher M1-2 (CLTE) or K52-25 (CLTE) - Other terminals and body ground Always 10 kΩ or higher M1-4 (CLTS) or K52-24 (CLTS) - Other terminals and body ground Always 10 kΩ or higher
- Result:
Proceed to OK NG
OK
NG
Remove the automatic light control sensor.
Click hereVehicle Interior>HEATING / AIR CONDITIONING>SOLAR SENSOR>REMOVAL
Inspect the automatic light control sensor.
Click hereVehicle Interior>HEATING / AIR CONDITIONING>SOLAR SENSOR>INSPECTION
- Result:
Proceed to OK NG
OK
NG