Home › Vehicle Interior › METER / GAUGE / DISPLAY › METER / GAUGE SYSTEM › 2018.04–2021.02
RM33A0E _58 Vehicle Interior _065381 METER / GAUGE / DISPLAY _0323396 METER / GAUGE SYSTEM J

METER / GAUGE / DISPLAY  METER / GAUGE SYSTEM  Steering Pad Switch Circuit  


DESCRIPTION

The combination meter assembly and steering pad switch assembly are connected via direct line. The multi-information display in the combination meter assembly are operated using the switches of the steering pad switch assembly.

WIRING DIAGRAM
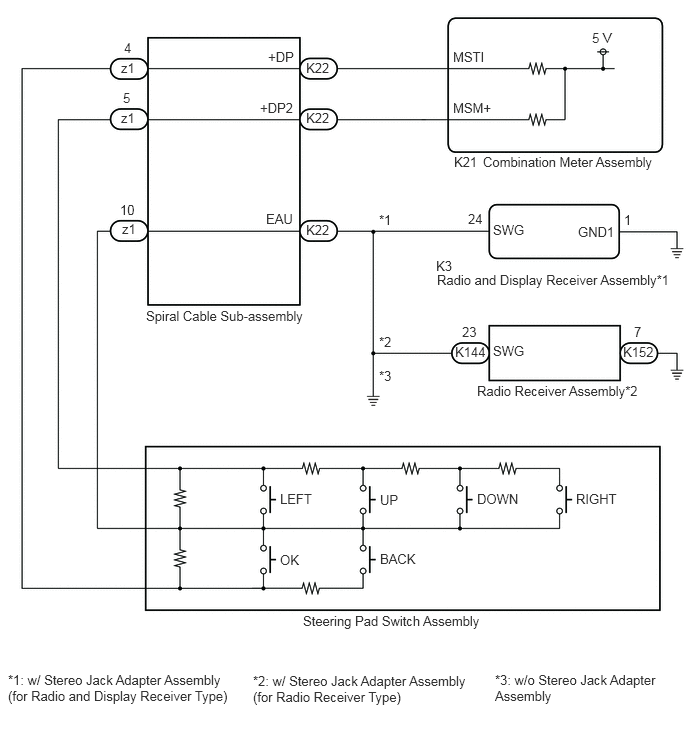
E394526E01
4.719,0.51 5.333,0.708 0.615,0.198 10 false MSTI 4.719,1.042 5.333,1.24 0.615,0.198 10 false MSM+ 6.167,0.313 6.625,0.51 0.458,0.198 10 false 5 V 4.729,1.604 5.188,1.802 0.458,0.198 10 false K21 5.031,1.604 6.917,1.948 1.885,0.344 10 false Combination Meter Assembly 5.135,3.573 5.594,3.771 0.458,0.198 10 false SWG 5.135,2.313 5.594,2.51 0.458,0.198 10 false SWG 6.021,2.333 6.635,2.531 0.615,0.198 10 false GND1 6.5,2.208 6.656,2.406 0.156,0.198 10 false 1 4.875,2.198 5.188,2.396 0.313,0.198 10 false 24 4.813,3.375 5.125,3.573 0.313,0.198 10 false 23 4.74,3.583 5.354,3.781 0.615,0.198 10 false K144 6.49,3.583 7.104,3.781 0.615,0.198 10 false K152 6.604,3.375 6.76,3.573 0.156,0.198 10 false 7 4.542,2.688 4.854,2.885 0.313,0.198 10 false K3 1.521,3.208 5.344,3.406 3.823,0.198 10 false Spiral Cable Sub-assembly 3.188,2.313 3.646,2.51 0.458,0.198 10 false K22 3.188,0.625 3.646,0.823 0.458,0.198 10 false K22 3.188,1.146 3.646,1.344 0.458,0.198 10 false K22 1.26,1.146 1.573,1.344 0.313,0.198 10 false z1 1.26,0.625 1.573,0.823 0.313,0.198 10 false z1 1.271,2.302 1.583,2.5 0.313,0.198 10 false z1 1.292,0.417 1.448,0.615 0.156,0.198 10 false 4 1.281,0.938 1.438,1.135 0.156,0.198 10 false 5 1.25,2.104 1.563,2.302 0.313,0.198 10 false 10 2.792,0.51 3.25,0.708 0.458,0.198 10 false +DP 2.708,1.042 3.323,1.24 0.615,0.198 10 false +DP2 2.771,2.198 3.229,2.396 0.458,0.198 10 false EAU 3.948,2.208 4.26,2.406 0.313,0.198 10 false *1 4.552,2.833 7.156,3.156 2.604,0.323 10 false Radio and Display Receiver Assembly*1 4.969,3.99 6.917,4.302 1.948,0.313 10 false Radio Receiver Assembly*2 3.948,3.479 4.26,3.677 0.313,0.198 10 false *2 3.948,3.833 4.26,4.031 0.313,0.198 10 false *3 2.917,5.115 3.531,5.313 0.615,0.198 10 false LEFT 3.958,5.125 4.271,5.323 0.313,0.198 10 false UP 4.969,5.115 5.583,5.313 0.615,0.198 10 false DOWN 6,5.115 6.771,5.313 0.771,0.198 10 false RIGHT 2.917,5.75 3.229,5.948 0.313,0.198 10 false OK 3.958,5.74 4.573,5.938 0.615,0.198 10 false BACK 3.156,6.385 6.375,6.792 3.219,0.406 10 false Steering Pad Switch Assembly 0.083,7 2.385,7.74 2.302,0.74 10 false *1: w/ Stereo Jack Adapter Assembly (for Radio and Display Receiver Type) 2.635,7.01 4.938,7.75 2.302,0.74 10 false *2: w/ Stereo Jack Adapter Assembly (for Radio Receiver Type) 5.156,7 6.906,7.667 1.75,0.667 10 false *3: w/o Stereo Jack Adapter Assembly

CAUTION / NOTICE / HINT

NOTICE:

When replacing the combination meter assembly, always replace it with a new one. If a combination meter assembly which was installed to another vehicle is used, the information stored in it will not match the information from the vehicle and a DTC may be stored.


PROCEDURE

1.INSPECT STEERING PAD SWITCH ASSEMBLY
a.

Remove the steering pad switch assembly.

Click hereSteering>STEERING COLUMN>STEERING PAD SWITCH>REMOVAL


b.

Inspect the steering pad switch assembly.

Click hereSteering>STEERING COLUMN>STEERING PAD SWITCH>INSPECTION


Result:
Proceed to
OK
NG


OK

2.INSPECT SPIRAL CABLE SUB-ASSEMBLY

NG

REPLACE STEERING PAD SWITCH ASSEMBLY

2.INSPECT SPIRAL CABLE SUB-ASSEMBLY
a.

Remove the spiral cable sub-assembly.

Click hereVehicle Interior>SUPPLEMENTAL RESTRAINT SYSTEMS>SPIRAL CABLE>REMOVAL


b.

Inspect the spiral cable sub-assembly.

Click hereVehicle Interior>SUPPLEMENTAL RESTRAINT SYSTEMS>SPIRAL CABLE>INSPECTION


Result:
Proceed to
OK
NG


OK

3.CHECK HARNESS AND CONNECTOR (SPIRAL CABLE SUB-ASSEMBLY - COMBINATION METER ASSEMBLY)

NG

REPLACE SPIRAL CABLE SUB-ASSEMBLY

3.CHECK HARNESS AND CONNECTOR (SPIRAL CABLE SUB-ASSEMBLY - COMBINATION METER ASSEMBLY)
a.

Disconnect the K21 combination meter assembly connector.


b.

Measure the resistance according to the value(s) in the table below.

Standard Resistance:
Tester Connection Condition Specified Condition
K22-10 (+DP2) - K21-28 (MSM+) Always Below 1 Ω
K22-11 (+DP) - K21-29 (MSTI) Always Below 1 Ω
K22-10 (+DP2) or K21-28 (MSM+) - Body ground Always 10 kΩ or higher
K22-11 (+DP) or K21-29 (MSTI) - Body ground Always 10 kΩ or higher


Result:
Proceed to
OK
NG


OK

4.CONFIRM MODEL

NG

REPAIR OR REPLACE HARNESS OR CONNECTOR

4.CONFIRM MODEL
a.

Choose the model to be inspected.


Result:
Result Proceed to
w/ No. 1 Stereo Jack Adapter Assembly A
w/o No. 1 Stereo Jack Adapter Assembly B


A

5.CHECK COMBINATION METER ASSEMBLY (OUTPUT VOLTAGE)

B

11.CHECK HARNESS AND CONNECTOR (SPIRAL CABLE SUB-ASSEMBLY - BODY GROUND)
5.CHECK COMBINATION METER ASSEMBLY (OUTPUT VOLTAGE)
a.

Connect the K21 combination meter assembly connector.


b.

Measure the voltage according to the value(s) in the table below.

Standard Voltage:
Tester Connection Condition Specified Condition
K22-10 (+DP2) - Body ground Ignition switch ON 4.8 to 5.2 V
K22-11 (+DP) - Body ground Ignition switch ON 4.8 to 5.2 V


Result:
Proceed to
OK
NG


OK

6.CONFIRM MODEL

NG

REPLACE COMBINATION METER ASSEMBLY

6.CONFIRM MODEL
a.

Choose the model to be inspected.


Result:
Result Proceed to
for Radio and Display Receiver Type A
for Radio Receiver Type B


A

7.CHECK HARNESS AND CONNECTOR (SPIRAL CABLE SUB-ASSEMBLY - RADIO AND DISPLAY RECEIVER ASSEMBLY)

B

9.CHECK HARNESS AND CONNECTOR (SPIRAL CABLE SUB-ASSEMBLY - RADIO RECEIVER ASSEMBLY)
7.CHECK HARNESS AND CONNECTOR (SPIRAL CABLE SUB-ASSEMBLY - RADIO AND DISPLAY RECEIVER ASSEMBLY)
a.

Disconnect the K3 radio and display receiver assembly connector.


b.

Measure the resistance according to the value(s) in the table below.

Standard Resistance:
Tester Connection Condition Specified Condition
K22-4 (EAU) - K3-24 (SWG) Always Below 1 Ω


Result:
Proceed to
OK
NG


OK

8.CHECK HARNESS AND CONNECTOR (RADIO AND DISPLAY RECEIVER ASSEMBLY - BODY GROUND)

NG

REPAIR OR REPLACE HARNESS OR CONNECTOR

8.CHECK HARNESS AND CONNECTOR (RADIO AND DISPLAY RECEIVER ASSEMBLY - BODY GROUND)
a.

Measure the resistance according to the value(s) in the table below.

Standard Resistance:
Tester Connection Condition Specified Condition
K3-1 (GND1) - Body ground Always Below 1 Ω


Result:
Proceed to
OK
NG


OK

REPLACE RADIO AND DISPLAY RECEIVER ASSEMBLY

NG

REPAIR OR REPLACE HARNESS OR CONNECTOR

9.CHECK HARNESS AND CONNECTOR (SPIRAL CABLE SUB-ASSEMBLY - RADIO RECEIVER ASSEMBLY)
a.

Disconnect the K144 radio receiver assembly connector.


b.

Measure the resistance according to the value(s) in the table below.

Standard Resistance:
Tester Connection Condition Specified Condition
K22-4 (EAU) - K144-23 (SWG) Always Below 1 Ω


Result:
Proceed to
OK
NG


OK

10.CHECK HARNESS AND CONNECTOR (RADIO RECEIVER ASSEMBLY - BODY GROUND)

NG

REPAIR OR REPLACE HARNESS OR CONNECTOR

10.CHECK HARNESS AND CONNECTOR (RADIO RECEIVER ASSEMBLY - BODY GROUND)
a.

Disconnect the K152 radio receiver assembly connector.


b.

Measure the resistance according to the value(s) in the table below.

Standard Resistance:
Tester Connection Condition Specified Condition
K3-1 (GND1) - Body ground Always Below 1 Ω


Result:
Proceed to
OK
NG


OK

REPLACE RADIO RECEIVER ASSEMBLY

NG

REPAIR OR REPLACE HARNESS OR CONNECTOR

11.CHECK HARNESS AND CONNECTOR (SPIRAL CABLE SUB-ASSEMBLY - BODY GROUND)
a.

Measure the resistance according to the value(s) in the table below.

Standard Resistance:
Tester Connection Condition Specified Condition
K22-4 (EAU) - Body ground Always Below 1 Ω


Result:
Proceed to
OK
NG


OK

REPLACE COMBINATION METER ASSEMBLY

NG

REPAIR OR REPLACE HARNESS OR CONNECTOR