REAR SUSPENSION REAR COIL SPRING REMOVAL
CAUTION / NOTICE / HINT
The necessary procedures (adjustment, calibration, initialization, or registration) that must be performed after parts are removed and installed, or replaced during rear coil spring removal/installation are shown below.
| Replaced Part or Performed Procedure | Necessary Procedure | Effect/Inoperative Function when Necessary Procedure not Performed | Link |
|---|---|---|---|
| Rear wheel alignment adjustment | Perform system variant learning and acceleration sensor zero point calibration. | ·
VSC disabled or malfunctioning ·
DTCs are output ·
Slip indicator light illuminated ·
ABS warning light illuminated |
( ) |
| Suspension, tires
(The vehicle height changes because of suspension or tire replacement.) |
Rear television camera assembly optical axis (Back camera position setting) | Parking assist monitor system | ()for Initialization
( )for Calibration
|
·
Television camera controller initialization ·
Adjust steering angle ·
Rear television camera assembly optical axis (Back camera position setting) |
Panoramic view monitor system | ()for Initialization
( )for Calibration
|
|
| Perform headlight ECU sub-assembly LH initialization | Lighting System (EXT) (w/ Automatic Headlight Beam Level Control System) | ()
|
|
| Rear height control sensor sub-assembly LH | Perform headlight ECU sub-assembly LH initialization | Lighting System (EXT) (w/ Automatic Headlight Beam Level Control System) | ()
|
- HINT:
- ·
Use the same procedure for the RH side and LH side.
·The following procedure is for the LH side.
PROCEDURE

 1.REMOVE REAR WHEEL
58399D
2.REMOVE NO. 2 FLOOR UNDER COVER (w/ Cover)
for LH Side:
Click hereSuspension>REAR SUSPENSION>REAR STABILIZER BAR>REMOVAL
58398F
3.REMOVE NO. 1 FLOOR UNDER COVER (w/ Cover)
for RH Side:
Click hereSuspension>REAR SUSPENSION>REAR STABILIZER BAR>REMOVAL
89408C
4.REMOVE REAR HEIGHT CONTROL SENSOR SUB-ASSEMBLY LH (w/ Height Control Sensor)
for LH Side:
Click hereVehicle Exterior>LIGHTING (EXT)>HEIGHT CONTROL SENSOR>REMOVAL
48840A
5.REMOVE REAR STABILIZER LINK ASSEMBLY
48231B
6.REMOVE REAR COIL SPRING
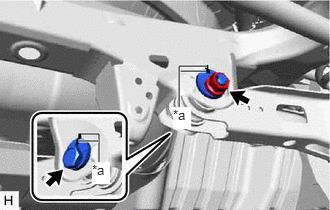
| *a | Matchmark |
Place matchmarks on the No. 2 camber adjust cam, rear suspension toe adjust cam sub-assembly and rear suspension member sub-assembly.
Loosen the nut (rear suspension member sub-assembly side) of the rear No. 2 suspension arm assembly.
- NOTICE:
-
Hold the rear suspension toe adjust cam sub-assembly while rotating the nut.
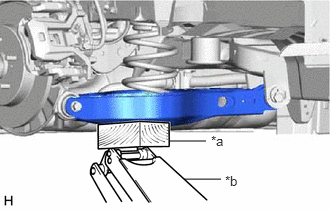
| *a | Wooden Block |
| *b | Jack |
Using a jack and a wooden block, support the rear No. 2 suspension arm assembly.
- NOTICE:
- ·
When jacking up the rear No. 2 suspension arm assembly, be sure to jack it up slowly.
·Make sure to perform this operation with the vehicle kept as low as possible.
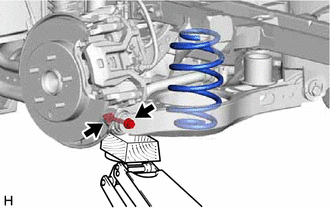
Remove the bolt and nut, and separate the rear No. 2 suspension arm assembly from the rear axle carrier sub-assembly.
- NOTICE:
-
Because the nut has its own stopper, do not turn the nut. Loosen the bolt with the nut secured.
Slowly lower the rear No. 2 suspension arm assembly, and then remove the rear coil spring.
48259A
7.REMOVE REAR UPPER COIL SPRING INSULATOR
Remove the rear upper coil spring insulator from the vehicle.
48258C
8.REMOVE REAR LOWER COIL SPRING INSULATOR
Remove the rear lower coil spring insulator from the rear No. 2 suspension arm assembly.