K120 CVT OIL PAN REMOVAL
CAUTION / NOTICE / HINT
The necessary procedures (adjustment, calibration, initialization or registration) that must be performed after parts are removed and installed, or replaced during transaxle side cover sub-assembly removal/installation are shown below.
| Replaced Part or Performed Procedure | Necessary Procedure | Effect/Inoperative Function when Necessary Procedure not Performed | Link |
|---|---|---|---|
| Battery terminal is disconnected/reconnected | Perform steering sensor zero point calibration | Lane Tracing Assist System | ( ) |
| Pre-collision System | |||
| Memorize steering angle neutral point | Parking Assist Monitor System | ()
|
|
| Panoramic View Monitor System | ()
|
||
| Replacement of CVT fluid | ATF thermal degradation estimate reset | The value of the Data List item "ATF Thermal Degradation Estimate" is not estimated correctly | ()
|
PROCEDURE

 53852K
1.REMOVE FRONT WHEEL OPENING EXTENSION PAD LH
53851M
2.REMOVE FRONT WHEEL OPENING EXTENSION PAD RH
51441
3.REMOVE NO. 1 ENGINE UNDER COVER ASSEMBLY
53737B
4.REMOVE FRONT FENDER APRON SEAL LH
5.DRAIN CONTINUOUSLY VARIABLE TRANSAXLE FLUID
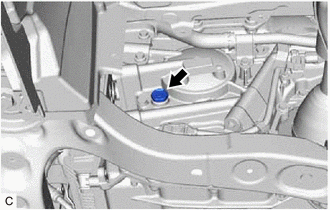
Remove the refill plug and gasket from the rear transaxle case sub-assembly.
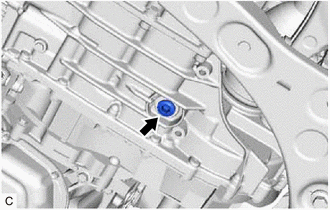
Using a 10 mm hexagon socket wrench, remove the overflow plug and gasket from the transaxle case sub-assembly, and drain the fluid.
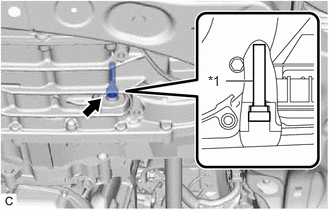
| *1 | Overflow (CVT) Tube |
Using a 6 mm hexagon socket wrench, remove the overflow (CVT) tube from the transaxle case sub-assembly.
- HINT:
-
Removing the overflow (CVT) tube will drain all fluid in the transaxle case sub-assembly.
Using a 6 mm hexagon socket wrench, install the overflow (CVT) tube to the transaxle case sub-assembly.
- Torque:
- 0.8 N*m (8 kgf*cm, 7 in.*lbf)
Using a 10 mm hexagon socket wrench, temporarily install the gasket and overflow plug to the transaxle case sub-assembly.
- HINT:
-
Reuse the old gasket as the overflow plug will be removed again to adjust the fluid level.
Temporarily install the gasket and refill plug to the rear transaxle case sub-assembly.
- HINT:
-
Reuse the old gasket as the refill plug will be removed again to adjust the fluid level.
12361A
6.REMOVE FRONT ENGINE MOUNTING INSULATOR
7.DISCONNECT OIL COOLER HOSE
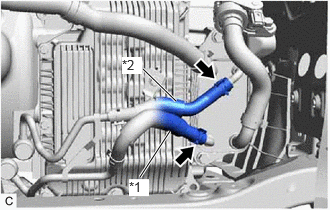
| *1 | Inlet Oil Cooler Hose |
| *2 | Outlet No. 1 Oil Cooler Hose |
Slide the clip and disconnect the inlet oil cooler hose from the transmission oil cooler.
Slide the clip and disconnect the outlet No. 1 oil cooler hose from the transmission oil cooler.
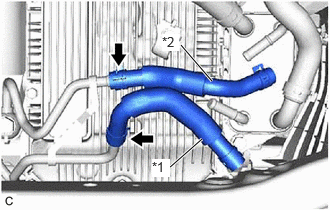
| *1 | Inlet Oil Cooler Hose |
| *2 | Outlet No. 1 Oil Cooler Hose |
Slide the clip and disconnect the inlet oil cooler hose from the oil cooler elbow sub-assembly.
- HINT:
-
Perform this procedure only when replacement of the inlet oil cooler hose is necessary.
Slide the clip and disconnect the outlet No. 1 oil cooler hose from the oil cooler elbow sub-assembly.
- HINT:
-
Perform this procedure only when replacement of the outlet No. 1 oil cooler hose is necessary.
32901L
8.REMOVE OIL COOLER ELBOW SUB-ASSEMBLY
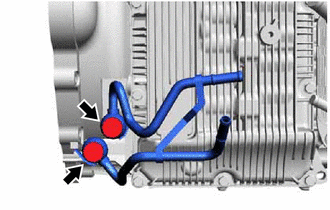
Remove the 2 union bolts, 2 gaskets and oil cooler elbow sub-assembly from the transaxle housing.
9.REMOVE WIRE HARNESS CLAMP BRACKET
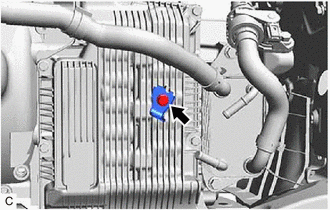
Remove the bolt and wire harness clamp bracket from the transaxle side cover sub-assembly.
35015Y
10.REMOVE TRANSAXLE SIDE COVER SUB-ASSEMBLY
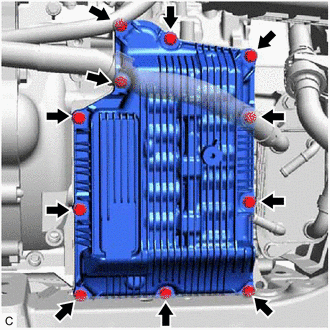
Remove the 11 bolts and transaxle side cover sub-assembly from the transaxle case sub-assembly.
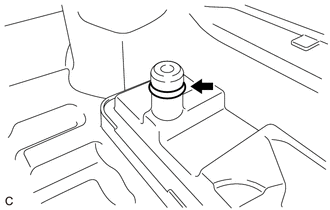
Remove the O-ring from the transaxle side cover sub-assembly.