BRAKE SYSTEM (OTHER) VACUUM WARNING SWITCH REMOVAL
CAUTION / NOTICE / HINT
The necessary procedures (adjustment, calibration, initialization or registration) that must be performed after parts are removed and installed, or replaced during vacuum warning switch assembly removal/installation are shown below.
| Replaced Part or Performed Procedure | Necessary Procedure | Effect/Inoperative Function when Necessary Procedure not Performed | Link |
|---|---|---|---|
|
*1: for LHD |
|||
| Disconnect cable from negative battery terminal*1 | Perform steering sensor zero point calibration | Lane Tracing Assist System | ( ) |
| Pre-collision system | |||
| Memorize steering angle neutral point | Parking assist monitor system | ()
|
|
| Panoramic View Monitor System | ()
|
||
PROCEDURE

 1. PRECAUTION (for LHD)
- NOTICE:
-
After turning the ignition switch off, waiting time may be required before disconnecting the cable from the negative (-) battery terminal. Therefore, make sure to read the disconnecting the cable from the negative (-) battery terminal notices before proceeding with work.
-
Click hereGeneral>INTRODUCTION>REPAIR INSTRUCTION>PRECAUTION
28800
2.REMOVE BATTERY (for LHD)
for A25A-FKS: Click hereGeneral>MAINTENANCE>A25A-FKS BATTERY>REMOVAL
for 2GR-FKS: Click hereGeneral>MAINTENANCE>2GR-FKS BATTERY>REMOVAL
for M20A-FKS: Click hereGeneral>MAINTENANCE>M20A-FKS BATTERY>REMOVAL
55708
3.REMOVE COWL TOP VENTILATOR LOUVER SUB-ASSEMBLY (for RHD)
53607A
4.REMOVE FRONT CENTER UPPER SUSPENSION BRACE SUB-ASSEMBLY (for RHD)
83390H
5.REMOVE VACUUM WARNING SWITCH ASSEMBLY
for LHD:
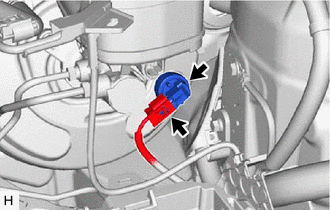
Disconnect the connector from the vacuum warning switch assembly.
Remove the vacuum warning switch assembly from the brake booster assembly.
for RHD:
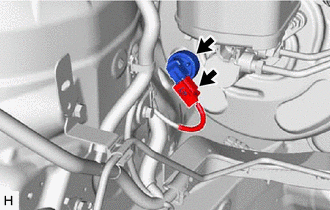
Disconnect the connector from the vacuum warning switch assembly.
Remove the vacuum warning switch assembly from the brake booster assembly.
44696
6.REMOVE CHECK VALVE GROMMET
Remove the check valve grommet from the brake booster assembly.