AUDIO / VIDEO RADIO ANTENNA CORD INSTALLATION
PROCEDURE

 86101Q
1.INSTALL NO. 4 ANTENNA CORD SUB-ASSEMBLY (w/ Digital Audio Broadcasting Antenna)
w/o Telematics Transceiver:
Engage the 9 clamps to install the No. 4 antenna cord sub-assembly.
Connect the connector.
86101R
2.INSTALL NO. 5 ANTENNA CORD SUB-ASSEMBLY (w/ Digital Audio Broadcasting Antenna)
w/ Telematics Transceiver:
Click hereAudio / Visual / Telematics>TELEMATICS>TELEPHONE ANTENNA CORD>INSTALLATION
86101J
3.INSTALL NO. 2 ANTENNA CORD SUB-ASSEMBLY
- HINT:
-
Butyl tape and adhesive tape are not available as supply parts. If these pieces of tape still have enough adhesion to secure the No. 2 antenna cord sub-assembly to the roof headlining assembly, reuse them. If the adhesive tape and/or the butyl tape is no longer sticky, apply new tape following the procedure below.
Apply new butyl tape.
for Normal Roof:
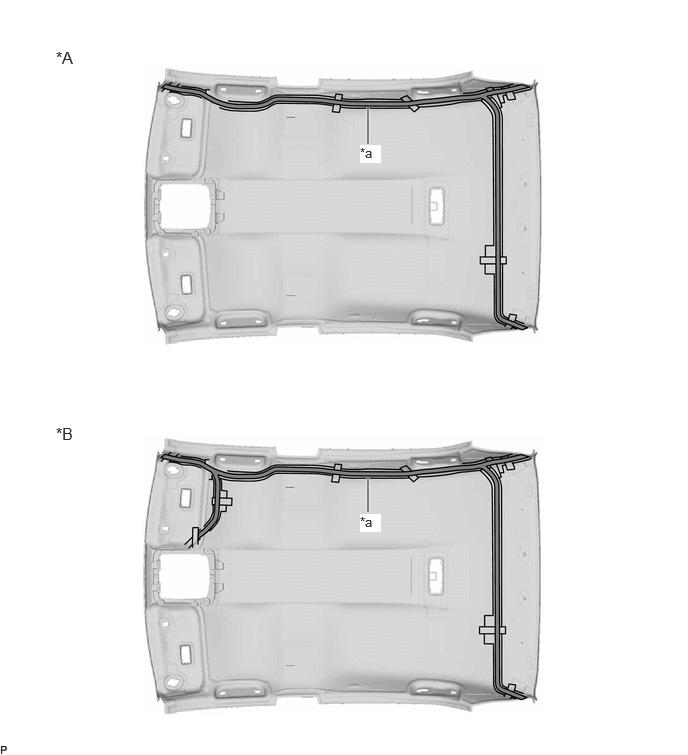
| *A | w/o Television Antenna | *B | w/ Television Antenna |
| *a | Marking | - | - |

|
Butyl tape | - | - |
for Moon Roof:
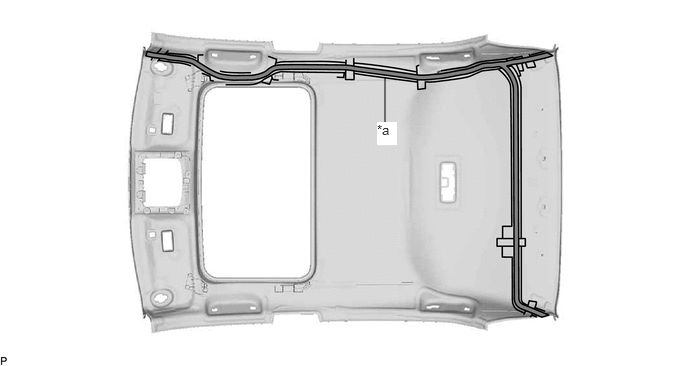
| *a | Marking | - | - |
|
|
Butyl tape | - | - |
for Panoramic Moon Roof:
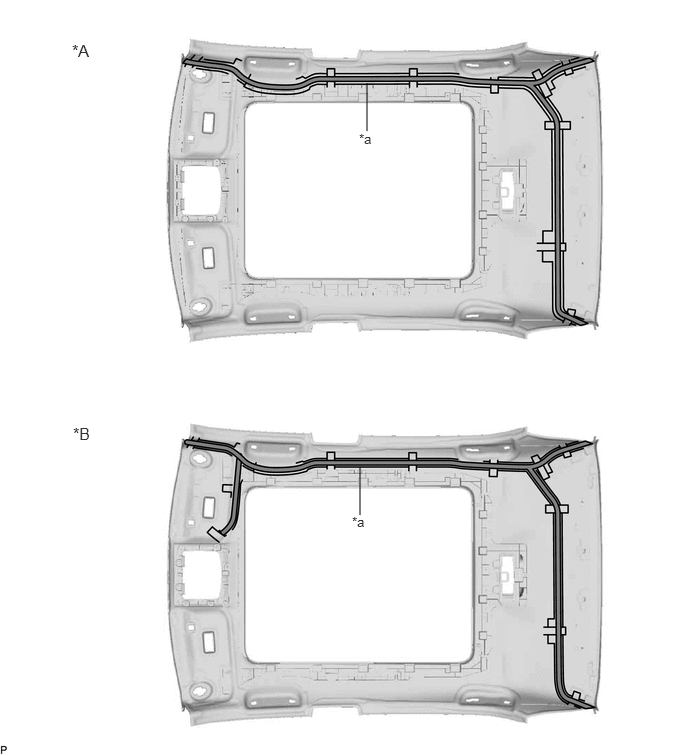
| *A | w/o Television Antenna | *B | w/ Television Antenna |
| *a | Marking | - | - |
|
|
Butyl tape | - | - |
Remove the old butyl tape from the roof headlining assembly.
Prepare an appropriate amount of new butyl tape.
- HINT:
-
Be careful not to touch the adhesive surface.
Apply the butyl tape to the roof headlining assembly while aligning the tape with the markings on the roof headlining assembly.
Peel off the release paper from the butyl tape.
w/o Television Antenna:
Align the marking tape (A) on the No. 2 antenna cord sub-assembly with the protrusion on the front of the roof headlining assembly and wrap tape around the No. 2 antenna cord sub-assembly and protrusion of the roof headlining assembly.
for Normal Roof:
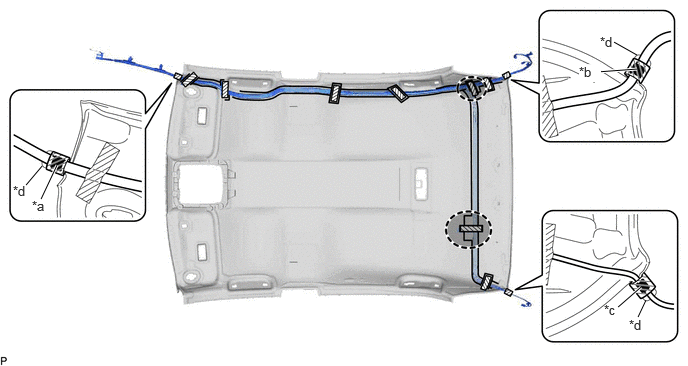
| *a | Marking Tape (A) | *b | Marking Tape (B) |
| *c | Marking Tape (C) | *d | Protrusion |

|
Adhesive Tape | 
|
Adjustment Area |
for Moon Roof:
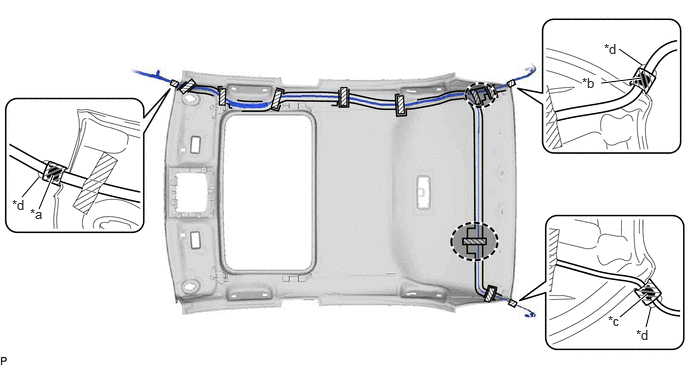
| *a | Marking Tape (A) | *b | Marking Tape (B) |
| *c | Marking Tape (C) | *d | Protrusion |
|
|
Adhesive Tape |
|
Adjustment Area |
for Panoramic Moon Roof:
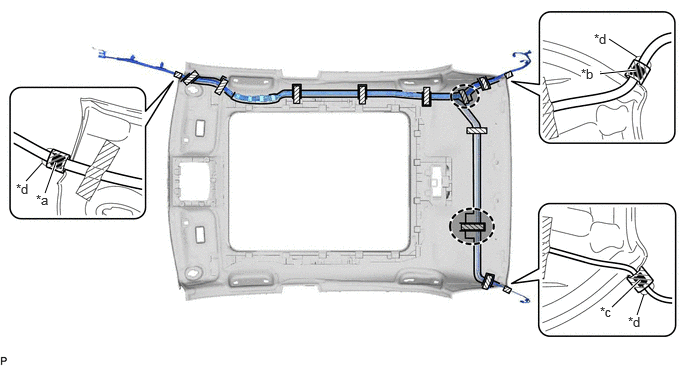
| *a | Marking Tape (A) | *b | Marking Tape (B) |
| *c | Marking Tape (C) | *d | Protrusion |
|
|
Adhesive Tape |
|
Adjustment Area |
Align the marking tape (B) on the No. 2 antenna cord sub-assembly with the protrusion on the rear of the roof headlining assembly and wrap tape around the No. 2 antenna cord sub-assembly and protrusion of the roof headlining assembly.
Align the marking tape (C) on the No. 2 antenna cord sub-assembly with the protrusion on the rear of the roof headlining assembly and wrap tape around the No. 2 antenna cord sub-assembly and protrusion of the roof headlining assembly.
Install the No. 2 antenna cord sub-assembly to the roof headlining assembly.
- NOTICE:
- ·
Make sure that there are no gaps between the roof headlining assembly and No. 2 antenna cord sub-assembly, and that the No. 2 antenna cord sub-assembly is not twisted.
·Make sure the No. 2 antenna cord sub-assembly is securely installed. If any part of the No. 2 antenna cord sub-assembly is loose, it will cause an abnormal noise.
- HINT:
-
Secure the extra length of the No. 2 antenna cord sub-assembly in the adjustment area.
Apply the adhesive tape as shown in the illustration to secure the No. 2 antenna cord sub-assembly.
w/ Television Antenna:
Align the marking tape (A) on the No. 2 antenna cord sub-assembly with the protrusion on the front of the roof headlining assembly and wrap tape around the No. 2 antenna cord sub-assembly and protrusion of the roof headlining assembly.
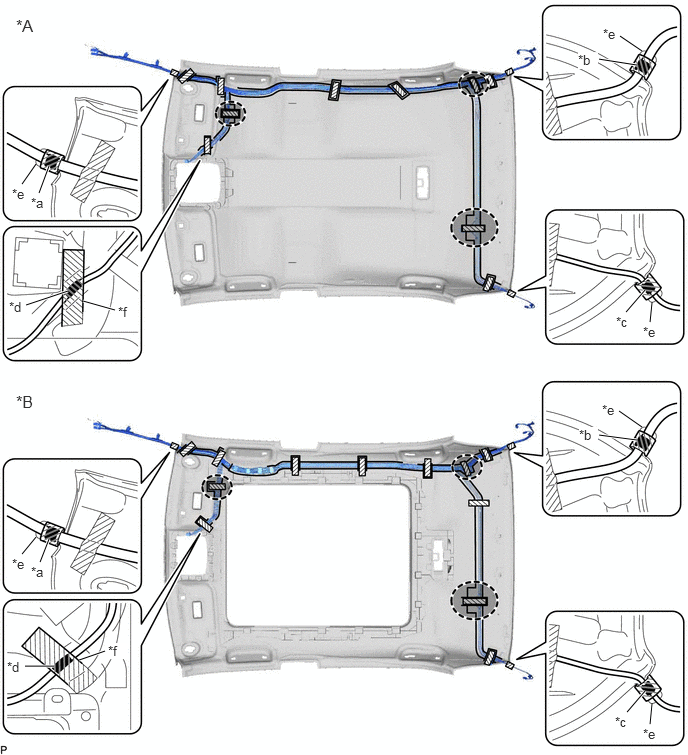
| *A | for Normal Roof | *B | for Panoramic Moon Roof |
| *a | Marking Tape (A) | *b | Marking Tape (B) |
| *c | Marking Tape (C) | *d | Marking Tape (D) |
| *e | Protrusion | *f | Marking |
|
|
Adhesive Tape |
|
Adjustment Area |
Align the marking tape (B) on the No. 2 antenna cord sub-assembly with the protrusion on the rear of the roof headlining assembly and wrap tape around the No. 2 antenna cord sub-assembly and protrusion of the roof headlining assembly.
Align the marking tape (C) on the No. 2 antenna cord sub-assembly with the protrusion on the rear of the roof headlining assembly and wrap tape around the No. 2 antenna cord sub-assembly and protrusion of the roof headlining assembly.
Align the marking tape (D) on the No. 2 antenna cord sub-assembly with the marking on the roof headlining assembly and secure the No. 2 antenna cord sub-assembly with the adhesive tape as shown in the illustration.
Install the No. 2 antenna cord sub-assembly to the roof headlining assembly.
- NOTICE:
- ·
Make sure that there are no gaps between the roof headlining assembly and No. 2 antenna cord sub-assembly, and that the No. 2 antenna cord sub-assembly is not twisted.
·Make sure the No. 2 antenna cord sub-assembly is securely installed. If any part of the No. 2 antenna cord sub-assembly is loose, it will cause an abnormal noise.
- HINT:
-
Secure the extra length of the No. 2 antenna cord sub-assembly in the adjustment area.
Apply the adhesive tape as shown in the illustration to secure the No. 2 antenna cord sub-assembly.
4.INSTALL ROOF HEADLINING ASSEMBLY
86101
5.INSTALL ANTENNA CORD SUB-ASSEMBLY (for LHD)
w/o Navigation Antenna:
Engage the 5 clamps to install the antenna cord sub-assembly.
w/ Navigation Antenna:
Engage each clamp to install the antenna cord sub-assembly.
Engage the 2 claws.
Connect the connector.
w/ Antenna Divider:
Connect the connector.
55086
6.INSTALL NO. 3 HEATER TO REGISTER DUCT SUB-ASSEMBLY (for LHD)
55972C
7.INSTALL NO. 2 SIDE DEFROSTER NOZZLE DUCT (for LHD)
86101
8.INSTALL ANTENNA CORD SUB-ASSEMBLY (for RHD)
Engage each clamp to install the antenna cord sub-assembly.
Engage the 2 claws.
Connect the connector.
55084E
9.INSTALL NO. 1 HEATER TO REGISTER DUCT SUB-ASSEMBLY (for RHD)
- HINT:
-
Use the same procedure as for LHD.
-
Click hereVehicle Interior>INTERIOR PANELS / TRIM>INSTRUMENT PANEL SAFETY PAD>REASSEMBLY
83108
10.INSTALL METER MIRROR SUB-ASSEMBLY (for RHD)
w/ Headup Display:
- HINT:
-
Use the same procedure as for LHD.
-
Click hereVehicle Interior>METER / GAUGE / DISPLAY>HEADUP DISPLAY>INSTALLATION
55950G
11.INSTALL DEFROSTER NOZZLE ASSEMBLY (for RHD)
w/ Headup Display:
- HINT:
-
Use the same procedure as for LHD.
-
Click hereVehicle Interior>INTERIOR PANELS / TRIM>INSTRUMENT PANEL SAFETY PAD>REASSEMBLY
55972C
12.INSTALL NO. 2 SIDE DEFROSTER NOZZLE DUCT (for RHD)
w/ Headup Display:
- HINT:
-
Use the same procedure as for LHD.
-
Click hereVehicle Interior>INTERIOR PANELS / TRIM>INSTRUMENT PANEL SAFETY PAD>REASSEMBLY
55086
13.INSTALL NO. 3 HEATER TO REGISTER DUCT SUB-ASSEMBLY (for RHD)
- HINT:
-
Use the same procedure as for LHD.
-
Click hereVehicle Interior>INTERIOR PANELS / TRIM>INSTRUMENT PANEL SAFETY PAD>REASSEMBLY
55971C
14.INSTALL NO. 1 SIDE DEFROSTER NOZZLE DUCT (for RHD)
- HINT:
-
Use the same procedure as for LHD.
-
Click hereVehicle Interior>INTERIOR PANELS / TRIM>INSTRUMENT PANEL SAFETY PAD>REASSEMBLY
15.INSTALL INSTRUMENT PANEL SAFETY PAD SUB-ASSEMBLY