DOOR LOCK REAR DOOR LOCK REMOVAL
CAUTION / NOTICE / HINT
The necessary procedures (adjustment, calibration, initialization, or registration) that must be performed after parts are removed and installed, or replaced during rear door lock with motor assembly removal/installation are shown below.
| Replaced Part or Performed Procedure | Necessary Procedure | Effect/Inoperative Function When Necessary Procedures are not Performed | Link |
|---|---|---|---|
| Disconnect cable from negative battery terminal | Perform steering sensor zero point calibration | Lane Tracing Assist System | ( ) |
| Pre-collision System | |||
| Memorize steering angle neutral point | Parking Assist Monitor System | ()
|
|
| Panoramic View Monitor System | ()
|
||
·
Rear door glass sub-assembly ·
Rear door glass run |
Initialize power window control system | ·
Auto up and down function ·
Jam protection function ·
Remote control function ·
Key-linked function ·
Wireless transmitter-linked function ·
Key-off operation function ·
Catch protection function ·
Window open warning function |
()
|
- HINT:
- ·
Use the same procedure for the RH side and LH side.
·The following procedure is for the LH side.
PROCEDURE

 1. PRECAUTION
- NOTICE:
-
After turning the ignition switch off, waiting time may be required before disconnecting the cable from the negative (-) battery terminal. Therefore, make sure to read the disconnecting the cable from the negative (-) battery terminal notices before proceeding with work.
-
Click hereGeneral>INTRODUCTION>REPAIR INSTRUCTION>PRECAUTION
2.DISCONNECT CABLE FROM NEGATIVE BATTERY TERMINAL
for A25A-FKS:
Click hereGeneral>MAINTENANCE>A25A-FKS BATTERY>REMOVAL
for 2GR-FKS:
Click hereGeneral>MAINTENANCE>2GR-FKS BATTERY>REMOVAL
for M20A-FKS:
74038B
3.REMOVE REAR DOOR ARMREST COVER SUB-ASSEMBLY
4.REMOVE REAR POWER WINDOW REGULATOR SWITCH ASSEMBLY WITH REAR DOOR UPPER ARMREST BASE PANEL
74260
5.REMOVE REAR ARMREST ASSEMBLY
67604
6.REMOVE REAR DOOR TRIM BOARD SUB-ASSEMBLY
68174A
7.REMOVE REAR DOOR INNER GLASS WEATHERSTRIP
67844A
8.REMOVE REAR DOOR NO. 2 SERVICE HOLE COVER
67842E
9.REMOVE REAR DOOR SERVICE HOLE COVER
67848A
10.REMOVE REAR DOOR NO. 1 VENT SEAL
67858B
11.REMOVE REAR DOOR PANEL PROTECTOR
68152C
12.REMOVE REAR DOOR GLASS RUN
67872
13.DISCONNECT REAR DOOR WEATHERSTRIP
Disconnect the rear door weatherstrip until the screw of the rear door rear lower window frame sub-assembly is visible.
67408F
14.REMOVE REAR DOOR REAR LOWER WINDOW FRAME SUB-ASSEMBLY
68124B
15.REMOVE REAR DOOR QUARTER WINDOW GLASS
68104
16.REMOVE REAR DOOR GLASS SUB-ASSEMBLY
69060A
17.REMOVE REAR DOOR LOCK WITH MOTOR ASSEMBLY
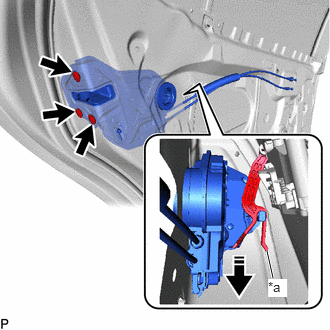
| *a | Release Plate |

|
Remove in this Direction |
Using a T30 "TORX" socket wrench, remove the 3 screws.
Move the rear door lock with motor assembly downward to disconnect it from the release plate of the rear door outside handle frame sub-assembly, and remove the rear door lock with motor assembly.
When reusing the rear door lock with motor assembly:
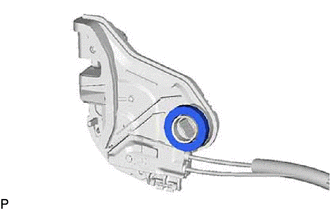
Remove the door lock wiring harness seal from the rear door lock with motor assembly.
69038A
18.REMOVE REAR DOOR LOCK COVER SUB-ASSEMBLY
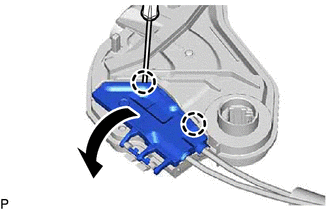
Using a screwdriver, disengage the 2 claws as shown in the illustration.
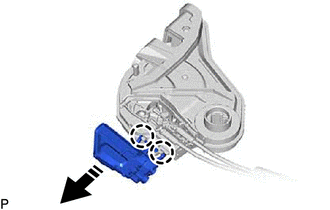
|
|
Remove in this Direction |
Disengage the 2 claws to remove the rear door lock cover sub-assembly as shown in the illustration.
69740D
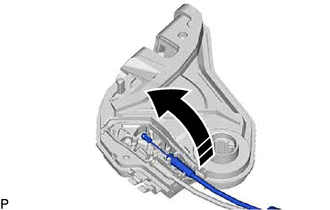
19.REMOVE REAR DOOR LOCK REMOTE CONTROL CABLE ASSEMBLY
|
|
Remove in this Direction |
Remove the rear door lock remote control cable assembly as shown in the illustration.
69780B
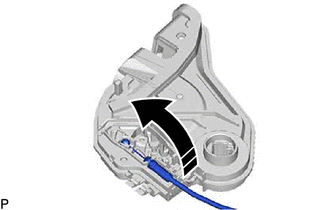
20.REMOVE REAR DOOR INSIDE LOCKING CABLE ASSEMBLY
|
|
Remove in this Direction |
Remove the rear door inside locking cable assembly as shown in the illustration.