MIRROR (EXT) OUTER REAR VIEW MIRROR COVER REMOVAL
CAUTION / NOTICE / HINT
The necessary procedures (adjustment, calibration, initialization, or registration) that must be performed after parts are removed and installed, or replaced during outer rear view mirror cover removal/installation are shown below.
| Replaced Part or Performed Procedure | Necessary Procedure | Effect/Inoperative Function when Necessary Procedure not Performed | Link |
|---|---|---|---|
|
*1: Applies only for when removing and installing or replacing the rear television camera assembly. |
|||
·
Side television camera assembly LH ·
Side television camera assembly RH |
Side television camera view adjustment | Panoramic View Monitor System | ( ) |
Replacement or removal and installation of 2 or more parts:
·
Front television camera assembly, front bumper assembly or radiator grille ·
Rear television camera assembly ·
Side television camera assembly LH or outer rear view mirror assembly LH ·
Side television camera assembly RH or outer rear view mirror assembly RH |
·
Television camera view adjustment ·
Rear television camera assembly optical axis (Back camera position setting)*1 |
||
- HINT:
- ·
Use the same procedure for the RH side and LH side.
·The following procedure is for the LH side.
PROCEDURE

 87961
1.REMOVE OUTER MIRROR
2.REMOVE OUTER MIRROR COVER WITH OUTER MIRROR HOLE COVER (w/o Panoramic View Monitor System)
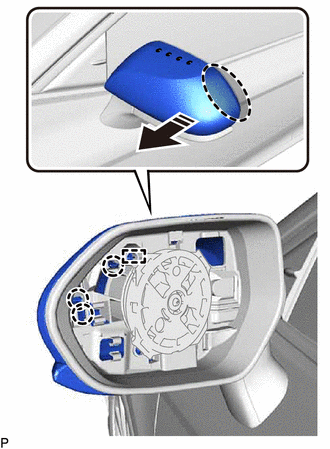

|
Place Hand Here |

|
Pull in this Direction |
Pull the outer mirror cover with outer mirror hole cover as shown in the illustration to disengage the 3 claws and guide.
- NOTICE:
-
As the claws and guide may be damaged, make sure not to apply force in any direction other than shown in the illustration.
- HINT:
-
If it is difficult to disengage the claws, disengage them using a screwdriver with its tip wrapped with protective tape.
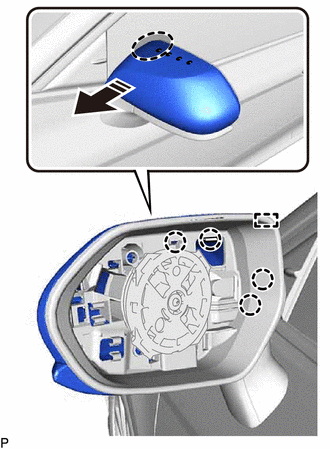
|
|
Place Hand Here |
|
|
Pull in this Direction |
Pull the outer mirror cover with outer mirror hole cover as shown in the illustration to disengage the 4 claws and guide.
- NOTICE:
-
As the claws and guide may be damaged, make sure not to apply force in any direction other than shown in the illustration.
- HINT:
-
If it is difficult to disengage the claws, disengage them using a screwdriver with its tip wrapped with protective tape.
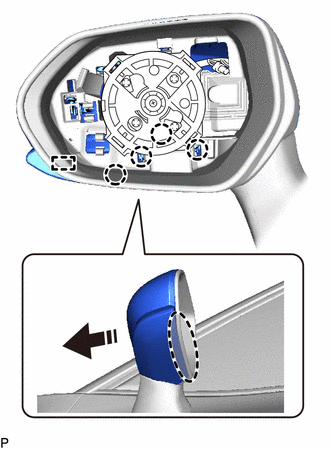
|
|
Place Hand Here |
|
|
Remove in this Direction |
Pull the outer mirror cover with outer mirror hole cover as shown in the illustration to disengage the 4 claws and guide and remove the outer mirror cover with outer mirror hole cover.
- NOTICE:
-
As the claws and guides may be damaged, make sure not to apply force in any direction other than shown in the illustration.
- HINT:
-
If it is difficult to disengage the claws, disengage them using a screwdriver with its tip wrapped with protective tape.
87945
3.REMOVE OUTER MIRROR COVER (w/o Panoramic View Monitor System)
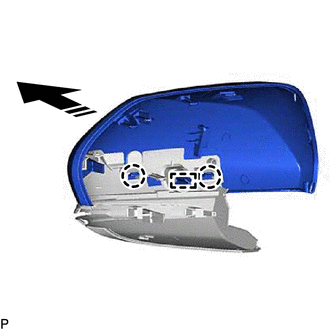
|
|
Remove in this Direction |
Disengage the 2 claws and guide to remove the outer mirror cover as shown in the illustration.
87945
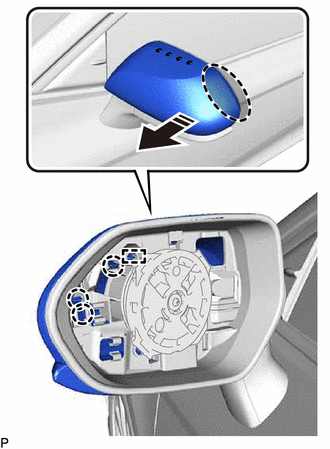
4.REMOVE OUTER MIRROR COVER (w/ Panoramic View Monitor System)
|
|
Place Hand Here |
|
|
Pull in this Direction |
Pull the outer mirror cover as shown in the illustration to disengage the 3 claws and guide.
- NOTICE:
-
As the claws and guide may be damaged, make sure not to apply force in any direction other than shown in the illustration.
- HINT:
-
If it is difficult to disengage the claws, disengage them using a screwdriver with its tip wrapped with protective tape.
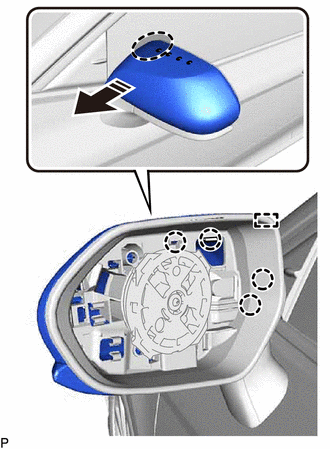
|
|
Place Hand Here |
|
|
Pull in this Direction |
Pull the outer mirror cover as shown in the illustration to disengage the 4 claws and guide.
- NOTICE:
-
As the claws and guide may be damaged, make sure not to apply force in any direction other than shown in the illustration.
- HINT:
-
If it is difficult to disengage the claws, disengage them using a screwdriver with its tip wrapped with protective tape.
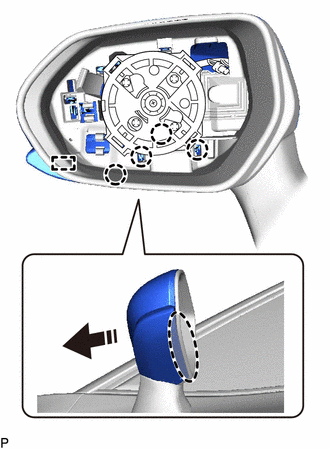
|
|
Place Hand Here |
|
|
Pull in this Direction |
Pull the outer mirror cover as shown in the illustration to disengage the 4 claws and guide.
- NOTICE:
-
As the claws and guides may be damaged, make sure not to apply force in any direction other than shown in the illustration.
- HINT:
-
If it is difficult to disengage the claws, disengage them using a screwdriver with its tip wrapped with protective tape.
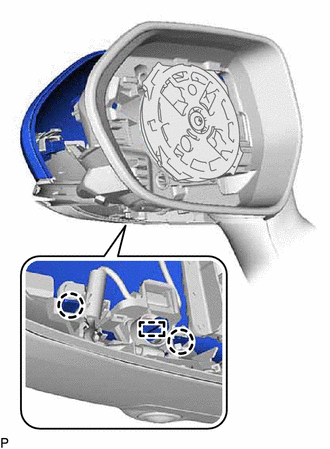
Disengage the 2 claws and guide to remove the outer mirror cover.
5.REMOVE OUTER MIRROR HOLE COVER WITH SIDE TELEVISION CAMERA ASSEMBLY (w/ Panoramic View Monitor System)
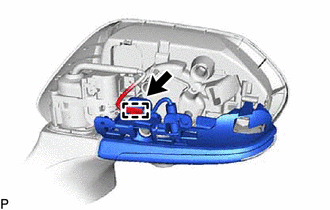
Disengage the clamp.
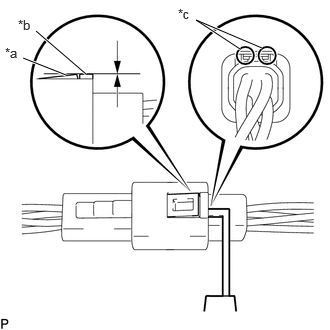
| *a | Claw |
| *b | Protrusion |
| *c | Insert Position |
Insert a 0.9 mm (0.0354 in.) spark plug gap gauge or similar tool into the connector as shown in the illustration.
- NOTICE:
- ·
Insert the spark plug gap gauge to the point that the claw becomes the same height as the protrusion of the connector housing. If the spark plug gap gauge is inserted too far, or if the claw is lifted directly using a screwdriver, the claw may be damaged.
·If the claw of the connector is damaged, replace the outer rear view mirror assembly.
Lift the claw and disconnect the connector to remove the outer mirror hole cover with side television camera assembly.
86790F
6.REMOVE SIDE TELEVISION CAMERA ASSEMBLY (w/ Panoramic View Monitor System)