A25A-FXS ENGINE MECHANICAL CAMSHAFT REMOVAL
CAUTION / NOTICE / HINT
The necessary procedures (adjustment, calibration, initialization, or registration) that must be performed after parts are removed and installed, or replaced during camshaft removal/installation are shown below.
| Replaced Part or Performed Procedure | Necessary Procedure | Effect/Inoperative Function when Necessary Procedure not Performed | Link |
|---|---|---|---|
| Auxiliary battery terminal is disconnected/reconnected | Perform steering sensor zero point calibration | Lane departure alert system (w/ Steering Control) | ( ) |
| Pre-collision system | |||
| Memorize steering angle neutral point | Parking assist monitor system | ()
|
|
| Replacement of ECM | Vehicle Identification Number (VIN) or frame number registration | MIL illuminates | ()(w/ Canister Pump Module)
( )(w/o Canister Pump Module)
|
·
Gas leak from exhaust system is repaired ·
Replacement of throttle body with motor assembly ·
Replacement of cam timing control motor with EDU assembly ·
Removal and installation of a cam timing control motor with EDU assembly ·
Replacement of camshaft timing gear assembly ·
Removal and installation of a camshaft timing gear assembly ·
Replacement of camshaft (for intake or exhaust camshaft) ·
Replacement of camshaft timing exhaust gear assembly ·
Replacement of fuel pump assembly (for high pressure side) ·
Replacement of ignition coil assembly |
Inspection After Repair | ·
Poor idle, etc. ·
Engine start function, etc. |
()(w/ Canister Pump Module)
( )(w/o Canister Pump Module)
|
- NOTICE:
-
This procedure includes the removal of small-head bolts. Refer to Small-Head Bolts of Basic Repair Hint to identify the small-head bolts.
-
Click hereGeneral>INTRODUCTION>REPAIR INSTRUCTION>PRECAUTION
PROCEDURE

 23100X
1.REMOVE FUEL PUMP ASSEMBLY (for High Pressure)
88710E
2.DISCONNECT AIR CONDITIONING TUBE AND ACCESSORY ASSEMBLY
for LHD:
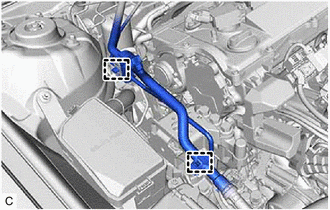
Disengage the 2 clamps and disconnect the air conditioning tube and accessory assembly.
for RHD:
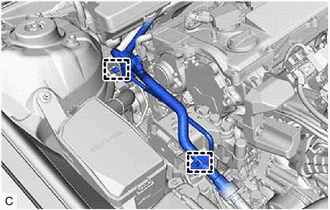
Disengage the 2 clamps and disconnect the air conditioning tube and accessory assembly.
82121
3.DISCONNECT ENGINE WIRE
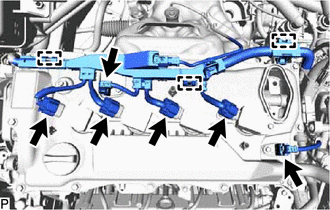
Disconnect the 6 connectors.
Disengage the 3 clamps and disconnect the engine wire.
19500
4.REMOVE IGNITION COIL ASSEMBLY
11102A
5.REMOVE CAMSHAFT POSITION SENSOR (for Intake Side)
11102A
6.REMOVE CAMSHAFT POSITION SENSOR (for Exhaust Side)
15370
7.REMOVE CAM TIMING OIL CONTROL SOLENOID ASSEMBLY
135A0A
8.REMOVE CAMSHAFT TIMING OIL CONTROL VALVE ASSEMBLY (EXHAUST CAMSHAFT TIMING GEAR BOLT ASSEMBLY)
13090D
9.REMOVE CAM TIMING CONTROL MOTOR WITH EDU ASSEMBLY
13090E
10.REMOVE CAM TIMING CONTROL MOTOR O-RING
11201
11.REMOVE CYLINDER HEAD COVER SUB-ASSEMBLY
11193
12.REMOVE SPARK PLUG TUBE GASKET
23477
13.REMOVE FUEL PUMP LIFTER GUIDE
14.SET NO. 1 CYLINDER TO TDC (COMPRESSION)
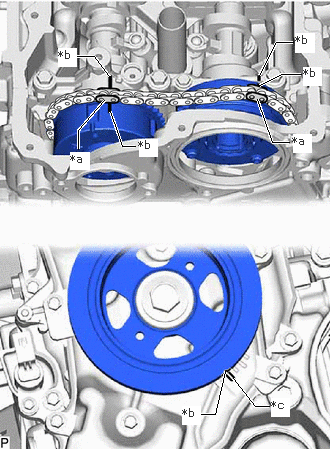
| *a | Paint Mark |
| *b | Timing Mark |
| *c | "0" Timing Mark |
Turn the crankshaft clockwise to align the timing mark (cutout) on the crankshaft pulley assembly with the "0" timing mark on the No. 2 timing gear cover assembly.
Check that the timing marks are positioned as shown in the illustration.
- HINT:
-
If the timing marks are not positioned as shown in the illustration, turn the crankshaft clockwise and then align them again.
Place paint marks on the chain sub-assembly at points aligned with the timing marks on the camshaft timing gear assembly and camshaft timing exhaust gear assembly.
15.REMOVE STRAIGHT SCREW PLUG
16.REMOVE CAMSHAFT
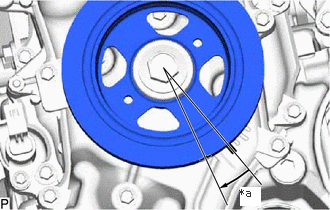
| *a | Approximately 15° |
Rotate the crankshaft approximately 15° clockwise.
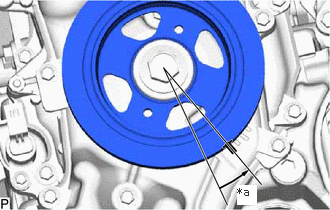
| *a | Approximately 15° |
Rotate the crankshaft approximately 15° counterclockwise.
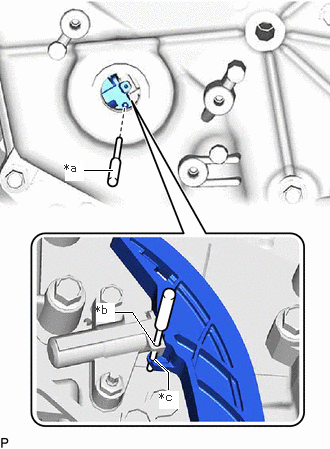
| *a | Pin |
| *b | Pin Hole (No. 1 Chain Tensioner Assembly Side) |
| *c | Pin Hole (Chain Tensioner Slipper Side) |
Align the pin hole of the No. 1 chain tensioner assembly with the pin hole of the chain tensioner slipper, and then insert the pin.
Type A:
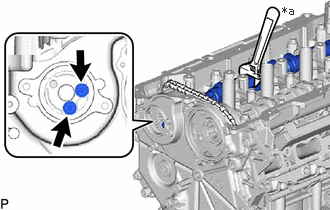
| *a | Hold |
Using the hexagonal portion of the No. 2 camshaft, secure the No. 2 camshaft.
- NOTICE:
-
Do not damage the camshaft housing sub-assembly, cylinder head sub-assembly and spark plug tube.
Using a 5 mm hexagon wrench, remove the 2 bolts from the camshaft timing exhaust gear assembly.
Type B:
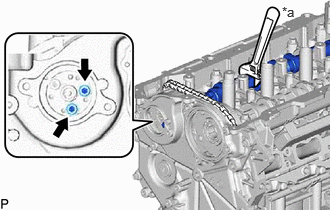
| *a | Hold |
Using the hexagonal portion of the No. 2 camshaft, secure the No. 2 camshaft.
- NOTICE:
-
Do not damage the camshaft housing sub-assembly, cylinder head sub-assembly and spark plug tube.
Using a 5 mm hexagon wrench, remove the 2 bolts from the camshaft timing exhaust gear assembly.
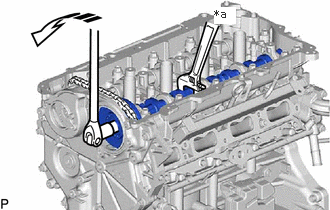
| *a | Hold |

|
Turn |
Using the hexagonal portion of the camshaft, secure the camshaft.
- NOTICE:
- ·
Do not damage the camshaft housing sub-assembly, cylinder head sub-assembly and spark plug tube.
·Do not disassemble the camshaft timing gear assembly.
Using a 10 mm bi-hexagon socket wrench, remove the bolt from the camshaft timing gear assembly.
Using the hexagonal portion of the No. 2 camshaft, loosen and hold the chain sub-assembly while moving the No. 2 camshaft in the direction shown in the illustration.
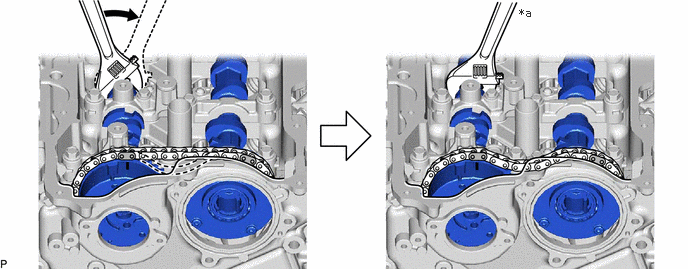
| *a | Hold | - | - |

|
Turn | - | - |
Move the camshaft timing gear assembly together with the camshaft timing exhaust gear assembly and chain sub-assembly toward the No. 2 timing gear cover assembly as shown in the illustration.
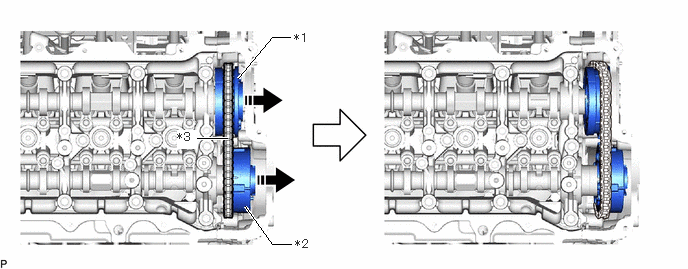
| *1 | Camshaft Timing Gear Assembly | *2 | Camshaft Timing Exhaust Gear Assembly |
| *3 | Chain Sub-assembly | - | - |
|
|
Remove in this Direction | - | - |
Remove the camshaft timing exhaust gear assembly from the chain sub-assembly.
Remove the camshaft timing gear assembly from the chain sub-assembly.
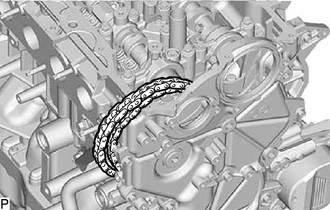
Secure the chain sub-assembly to the vehicle using rope, etc.
- NOTICE:
-
Do not drop the chain sub-assembly into the timing chain cover assembly.
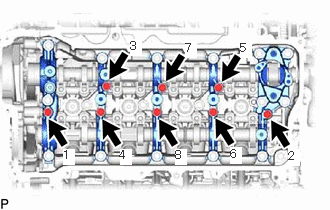
Uniformly loosen and remove the 8 bolts in the order shown in the illustration.
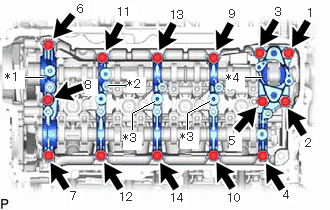
| *1 | No. 1 Camshaft Bearing Cap |
| *2 | No. 2 Camshaft Bearing Cap |
| *3 | No. 3 Camshaft Bearing Cap |
| *4 | No. 4 Camshaft Bearing Cap |
Uniformly loosen and remove the 14 bolts in the order shown in the illustration.
- NOTICE:
-
Uniformly loosen the bolts while holding the camshaft horizontally.
Remove the No. 1 camshaft bearing cap, No. 2 camshaft bearing cap, 2 No. 3 camshaft bearing caps and No. 4 camshaft bearing cap.
- HINT:
-
Arrange the removed parts so that they can be reinstalled in their original locations.
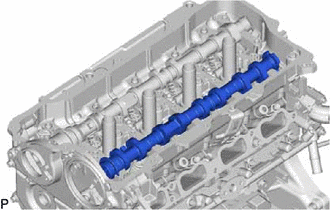
Remove the camshaft from the camshaft housing sub-assembly.
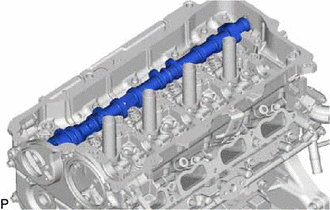
Remove the No. 2 camshaft from the camshaft housing sub-assembly.