BRAKE CONTROL / DYNAMIC CONTROL SYSTEMS ELECTRONICALLY CONTROLLED BRAKE SYSTEM C120F Open in Master Reservoir Level Switch Circuit
DESCRIPTION
If the skid control ECU (brake booster with master cylinder assembly) detects that the brake fluid level is low or there is an open in the brake fluid level warning switch signal circuit, DTC C120F is stored.
| DTC No. | Detection Item | INF Code | DTC Detection Condition | Trouble Area | Note |
|---|---|---|---|---|---|
| C120F | Open in Master Reservoir Level Switch Circuit | 371 | The brake fluid level warning switch (brake booster with master cylinder assembly) circuit is open for 2 seconds or more. | ·
Open in brake fluid level warning switch (brake booster with master cylinder assembly) ·
Open in wire harness ·
Skid control ECU (brake booster with master cylinder assembly) |
Electronically controlled brake system DTC |
WIRING DIAGRAM
Refer to DTC C1202.
Click hereBrake>BRAKE CONTROL / DYNAMIC CONTROL SYSTEMS>ELECTRONICALLY CONTROLLED BRAKE SYSTEM>C1202
CAUTION / NOTICE / HINT
- NOTICE:
-
After replacing the skid control ECU (brake booster with master cylinder assembly), perform linear solenoid valve offset learning, ABS holding solenoid valve learning, yaw rate and acceleration sensor zero point calibration and system information memorization after performing "Reset Memory".
-
Click hereBrake>BRAKE CONTROL / DYNAMIC CONTROL SYSTEMS>ELECTRONICALLY CONTROLLED BRAKE SYSTEM>INITIALIZATION
PROCEDURE
Check that the brake fluid level is sufficient.
- HINT:
-
If the fluid level is low, check for fluid leaks, and repair as necessary.
Check for brake fluid leaks (connection between the brake booster pump assembly, brake actuator assembly, brake booster with master cylinder assembly and wheel cylinders).
- HINT:
-
If no leaks exist, add and adjust fluid using the GTS.
-
Click hereBrake>BRAKE SYSTEM (OTHER)>BRAKE FLUID>ON-VEHICLE INSPECTION
Check that there are no leaks from the connections between the brake booster pump assembly, brake actuator assembly and brake booster with master cylinder assembly.
- HINT:
-
As a visual check is very difficult, perform the check with the following procedure.
Bleed the air from the brake system.
Turn the power switch off.
Disconnect the A39 brake pedal stroke sensor assembly connector.
Select the Data List on the GTS.
- Chassis > ABS/VSC/TRC > Data List
-
Tester Display Measurement Item Range Normal Condition Diagnostic Note MT Voltage Value MT voltage value Min.: 0.00 V, Max.: 20.00 V Pump motor off: 0.00 V
Pump motor on: 12.00 V- Accumulator Pressure Accumulator pressure output value Min.: 0.00 MPa, Max.: 24.48 MPa 15.00 to 21.00 MPa
(Pressure stable and pump motor stopped)When brake fluid is stored in the accumulator: Accumulator pressure changes in accordance with volume of fluid stored in the accumulator
- Chassis > ABS/VSC/TRC > Data List
-
Tester Display MT Voltage Value Accumulator Pressure - 50003 105 279,502
Depress the brake pedal several times to operate the pump motor, then wait until it stops.
After the pump motor stops, wait for 30 seconds, then check the drop in the accumulator pressure sensor output value and the state of the pump motor.
- Result:
Result Proceed to The drop in the accumulator pressure sensor output value is less than 2.50 MPa 30 seconds after the pump motor stops, and the pump motor does not operate within 30 seconds after the pump motor stops. A The drop in the accumulator pressure sensor output value is 2.50 MPa or more 30 seconds after the pump motor stops, or the pump motor operates within 30 seconds after the pump motor stops. B
A
B
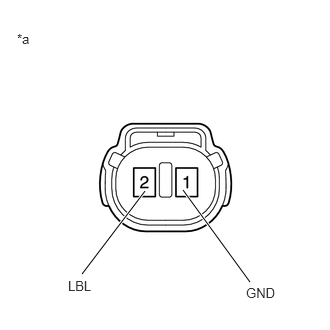
| *a | Component without harness connected
(Brake Fluid Level Warning Switch (Brake Booster with Master Cylinder Assembly)) |
Turn the power switch off.
Reconnect the A39 brake pedal stroke sensor assembly connector.
Remove the brake master cylinder reservoir filler cap assembly.
Make sure that there is no looseness at the locking part and the connecting part of the connector.
- OK:
The connector is securely connected.
Disconnect the A1 brake fluid level warning switch (brake booster with master cylinder assembly) connector.
Check both the connector case and the terminals for deformation and corrosion.
- OK:
No deformation or corrosion.
Measure the resistance according to the value(s) in the table below.
- HINT:
-
A float is located inside the brake master cylinder reservoir assembly (brake booster with master cylinder assembly). Its position changes according to the level of brake fluid.
- Standard Resistance:
Tester Connection Condition Specified Condition 2 (LBL) - 1 (GND) Brake fluid level warning switch (brake booster with master cylinder assembly) off (float up) 1.84 to 2.16 kΩ 2 (LBL) - 1 (GND) Brake fluid level warning switch (brake booster with master cylinder assembly) on (float down) Below 1 Ω
(Brake fluid level is low)
- HINT:
-
If there are no problems after completing the preceding inspection, adjust the brake fluid to the MAX level with the power switch on (IG).
- Result:
Proceed to OK NG
OK
NG
for LHD: Click hereBrake>BRAKE SYSTEM (OTHER)>BRAKE BOOSTER (for LHD)>REMOVAL
for RHD: Click hereBrake>BRAKE SYSTEM (OTHER)>BRAKE BOOSTER (for RHD)>REMOVAL
Turn the power switch off.
Make sure that there is no looseness at the locking part and the connecting part of the connector.
- OK:
The connector is securely connected.
Disconnect the A40 skid control ECU (brake booster with master cylinder assembly) connector.
Check both the connector case and the terminals for deformation and corrosion.
- OK:
No deformation or corrosion.
Measure the resistance according to the value(s) in the table below.
- Standard Resistance:
Tester Connection Condition Specified Condition A40-16 (LBL) - A1-2 (LBL) Always Below 1 Ω A40-16 (LBL) or A1-2 (LBL) - Body ground Always 10 kΩ or higher A1-1 (GND) - Body ground Always Below 1 Ω
- Result:
Proceed to OK NG
OK
NG
Reconnect the A40 skid control ECU (brake booster with master cylinder assembly) connector.
Reconnect the A1 brake fluid level warning switch (brake booster with master cylinder assembly) connector.
Disconnect the A39 brake pedal stroke sensor assembly connector.
Perform a road test according to Freeze Frame Data or customer problem analysis. While driving, check for abnormal brake pedal vibration caused by brake discs that are worn or have excess runout.
- OK:
Brake pedal does not vibrate during braking.
- HINT:
- ·
An unevenly worn disc may vibrate the caliper pistons and cause fluctuations in brake line pressure, triggering a malfunction detection condition.
·The brake pedal does not kick back due to caliper piston vibration during electronically controlled brake system control.
·If the brake pedal stroke sensor assembly connector is disconnected, the fail-safe function will prohibit electronically controlled brake system control.
·The Active Test does not prohibit electronically controlled brake system control when the vehicle is being driven, so disconnect the brake pedal stroke sensor assembly connector before continuing with inspection.
·Uneven disc wear can be checked by measuring the disc thickness variation.
for Front Brake: Click hereBrake>BRAKE (FRONT)>FRONT BRAKE>INSPECTION
for Rear Brake: Click hereBrake>BRAKE (REAR)>REAR BRAKE>INSPECTION
- Result:
Proceed to OK NG
OK
NG
Turn the power switch off.
Reconnect the A39 brake pedal stroke sensor assembly connector.
Clear the DTCs.
- Chassis > ABS/VSC/TRC > Clear DTCs
- 50002 105
Turn the power switch off.
Turn the power switch on (READY).
Perform a road test.
Check if the same DTC is output.
- Chassis > ABS/VSC/TRC > Trouble Codes
- 50001 105
- Result:
Result Proceed to DTC C120F is not output. A DTC C120F is output. B
A
Click hereGeneral>INTRODUCTION>HOW TO TROUBLESHOOT ECU CONTROLLED SYSTEMS>HOW TO PROCEED WITH TROUBLESHOOTING
B
for LHD: Click hereBrake>BRAKE SYSTEM (OTHER)>BRAKE BOOSTER (for LHD)>REMOVAL
for RHD: Click hereBrake>BRAKE SYSTEM (OTHER)>BRAKE BOOSTER (for RHD)>REMOVAL