WINDOW / GLASS BACK WINDOW GLASS REMOVAL
CAUTION / NOTICE / HINT
The necessary procedures (adjustment, calibration, initialization, or registration) that must be performed after parts are removed and installed, or replaced during back window glass sub-assembly removal/installation are shown below.
| Replaced Part or Performed Procedure | Necessary Procedure | Effect/Inoperative Function when Necessary Procedure not Performed | Link |
|---|---|---|---|
| Disconnect cable from negative auxiliary battery terminal | Perform steering sensor zero point calibration | Lane departure alert system (w/ Steering Control) | ( ) |
| Pre-collision system | |||
| Memorize steering angle neutral point | Parking assist monitor system | ()
|
PROCEDURE

 1.REMOVE ROOF HEADLINING ASSEMBLY
73370E
2.DISCONNECT REAR SEAT OUTER BELT ASSEMBLY LH
73360D
3.DISCONNECT REAR SEAT OUTER BELT ASSEMBLY RH
- HINT:
-
Use the same procedure as for the LH side.
81006
4.REMOVE CENTER STOP LIGHT SET
73373F
5.REMOVE REAR SEAT SHOULDER BELT HOLE COVER
64330
6.REMOVE PACKAGE TRAY TRIM PANEL ASSEMBLY (w/o Rear Sunshade)
64330
7.REMOVE PACKAGE TRAY TRIM PANEL ASSEMBLY (w/ Rear Sunshade)
64340B
8.REMOVE NO. 2 PACKAGE TRAY TRIM PANEL ASSEMBLY (w/ Rear Sunshade)
9.REMOVE BACK WINDOW GLASS SUB-ASSEMBLY
Disconnect each connector.

|
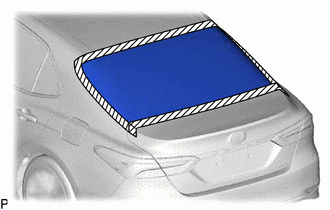
Protective Tape |
Apply protective tape to the area around the installation position of the back window glass sub-assembly on the vehicle body to prevent it from being scratched.
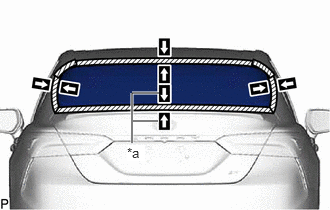
| *a | Matchmark |
Place matchmarks on the back window glass sub-assembly and vehicle body at the locations indicated in the illustration.
- HINT:
-
Matchmarks are not necessary if the back window glass sub-assembly is not going to be reused.
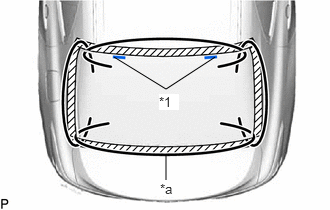
| *1 | Back Window Glass Stopper |
| *a | Piano Wire |
Pass a piano wire between the vehicle body and back window glass sub-assembly from the interior.
Tie both wire ends to wooden blocks or similar objects that can serve as handles.
Cut off the adhesive by pulling the piano wire around the back window glass sub-assembly.
- NOTICE:
- ·
When separating the back window glass sub-assembly, be careful not to damage the paint or interior and exterior ornaments.
·When cutting off the adhesive, take care not to damage the connectors on the back window glass sub-assembly.
Disengage the back window glass stoppers.
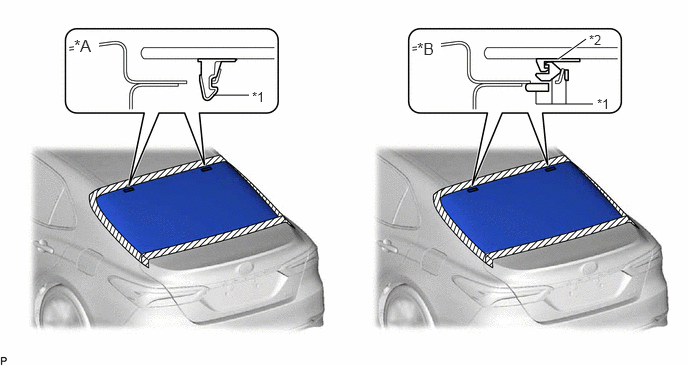
| *A | for 1-piece Type | *B | for 2-piece Type |
| *1 | No. 1 Back Window Glass Stopper | *2 | No. 2 Back Window Glass Stopper |
- NOTICE:
- ·
The No. 1 back window glass stoppers and No. 2 back window glass stoppers are installed to the back window glass sub-assembly as shown in the illustration. Be careful not to damage the back window glass sub-assembly when cutting the adhesive.
·To prevent the back window glass sub-assembly from falling when performing this operation, be sure to hold the back window glass sub-assembly using suction cups.
- HINT:
-
Depending on the vehicle, either 1-piece type or 2-piece type stoppers may be present.
Using suction cups, remove the back window glass sub-assembly.
- NOTICE:
- ·
Be careful not to drop the back window glass sub-assembly.
·Leave as much adhesive on the vehicle body as possible when removing the back window glass sub-assembly.
64813D
10.REMOVE BACK WINDOW GLASS ADHESIVE DAM
When reusing the back window glass:
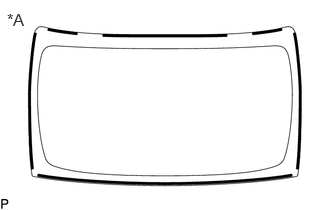
| *A | Back Side |
Using a scraper, remove the 6 back window glass adhesive dams.
- NOTICE:
- ·
Be careful not to damage the back window glass.
·Be sure to replace the back window glass adhesive dams with new ones.
11.REMOVE NO. 1 BACK WINDOW GLASS STOPPER (for 1-piece Type)
When reusing the back window glass:
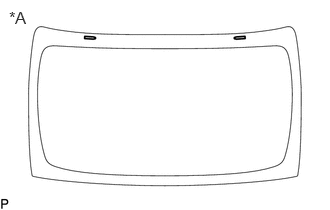
| *A | Back Side |
Using a scraper, remove the 2 No. 1 back window glass stoppers.
- NOTICE:
- ·
Be careful not to damage the back window glass.
·Be sure to replace the 1-piece type No. 1 back window glass stoppers with new 2-piece type No. 1 and No. 2 back window glass stoppers.
56116D
12.REMOVE NO. 2 BACK WINDOW GLASS STOPPER (for 2-piece Type)
When reusing the back window glass:
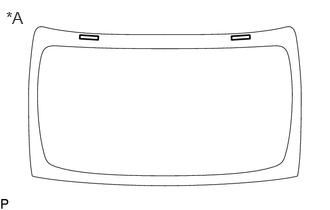
| *A | Back Side |
Using a scraper, remove the 2 No. 2 back window glass stoppers.
- NOTICE:
- ·
Be careful not to damage the back window glass.
·Be sure to replace the No. 2 back window glass stoppers with new ones.
56115B
13.REMOVE NO. 1 BACK WINDOW GLASS STOPPER (for 2-piece Type)
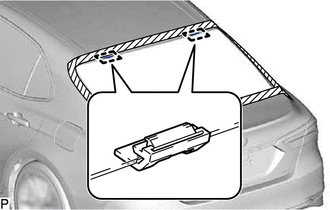
Remove the 2 No. 1 back window glass stoppers.
- NOTICE:
-
Be sure to replace the No. 1 back window glass stoppers with new ones.
14.CLEAN BACK WINDOW GLASS
When reusing the back window glass:
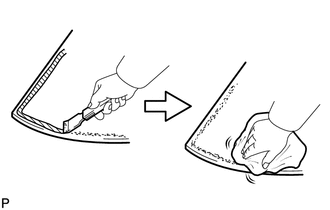
Using a scraper, remove any remaining adhesive dam and adhesive residue from the back window glass.
- NOTICE:
-
Be careful not to damage the back window glass.
Clean the outer circumference of the back window glass with a non-residue solvent.
- NOTICE:
- ·
Do not touch the back window glass surface after cleaning it.
·Even if using a new back window glass, clean it with a non-residue solvent.
15. CLEAN VEHICLE BODY
Clean and shape the contact surface of the vehicle body.
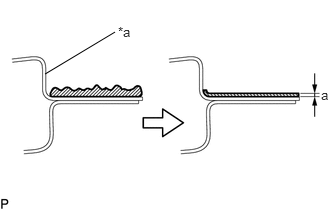
| *a | Vehicle Body |
|
|
Adhesive |
Using a knife, cut away excess adhesive on the contact surface of the vehicle body as shown in the illustration.
- Standard Dimension:
Area Dimension a 1.0 mm (0.0394 in.) or more
- NOTICE:
-
Be careful not to damage the vehicle body.
- HINT:
-
Leave approximately 1.0 mm (0.0394 in.) of adhesive on the vehicle body.
Clean the contact surface of the vehicle body with a piece of cloth saturated with non-residue solvent.
- HINT:
-
Even if all of the adhesive has been removed, clean the vehicle body.