EXTERIOR PANELS / TRIM FRONT DOOR BELT MOULDING INSTALLATION
CAUTION / NOTICE / HINT
- HINT:
- ·
Use the same procedure for the RH side and LH side.
·The following procedure is for the LH side.
PROCEDURE

 1. PRECAUTION
- NOTICE:
-
After turning the power switch off, waiting time may be required before disconnecting the cable from the negative (-) auxiliary battery terminal. Therefore, make sure to read the disconnecting the cable from the negative (-) auxiliary battery terminal notices before proceeding with work.
-
Click hereGeneral>INTRODUCTION>REPAIR INSTRUCTION>PRECAUTION
75720
2.INSTALL FRONT DOOR BELT MOULDING ASSEMBLY
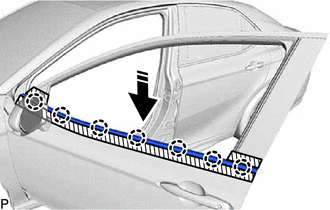

|
Install in this Direction |
Engage the 7 claws to install a new front door belt moulding assembly as shown in the illustration.
68102
3.INSTALL FRONT DOOR GLASS SUB-ASSEMBLY
67832
4.INSTALL FRONT DOOR SERVICE HOLE COVER
5.INSTALL FRONT DOOR INNER GLASS WEATHERSTRIP WITH FRONT DOOR VENT SEAL
67602
6.INSTALL FRONT DOOR TRIM BOARD SUB-ASSEMBLY
81230
7.INSTALL COURTESY LIGHT ASSEMBLY
74220
8.INSTALL FRONT ARMREST ASSEMBLY
9.INSTALL MULTIPLEX NETWORK MASTER SWITCH ASSEMBLY WITH FRONT DOOR UPPER ARMREST BASE PANEL (for Driver Side)
10.INSTALL POWER WINDOW REGULATOR SWITCH ASSEMBLY WITH FRONT DOOR UPPER ARMREST BASE PANEL (for Front Passenger Side)
74038A
11.INSTALL FRONT DOOR ARMREST COVER SUB-ASSEMBLY
67492A
12.INSTALL FRONT DOOR LOWER FRAME BRACKET GARNISH
13.CONNECT CABLE TO NEGATIVE AUXILIARY BATTERY TERMINAL
64718C
14.INSTALL LUGGAGE TRIM SERVICE HOLE COVER
15.INITIALIZE POWER WINDOW CONTROL SYSTEM
16.INSPECT POWER WINDOW OPERATION