REAR SUSPENSION REAR LOWER ARM REMOVAL
CAUTION / NOTICE / HINT
The necessary procedures (adjustment, calibration, initialization, or registration) that must be performed after parts are removed and installed, or replaced during rear suspension arm assembly removal/installation are shown below.
| Replaced Part or Performed Procedure | Necessary Procedure | Effect/Inoperative Function when Necessary Procedure not Performed | Link |
|---|---|---|---|
| Rear wheel alignment adjustment | 1.
Clear zero point calibration data. 2.
Perform yaw rate and acceleration sensor zero point calibration. |
·
DTCs are stored ·
ABS warning light illuminates ·
Brake warning light / yellow (minor malfunction) illuminates ·
Slip indicator light illuminates ·
VSC disabled or malfunctions |
( ) |
| Suspension, tires, etc.
(The vehicle height changes because of suspension or tire replacement.) |
·
Measure ultrasonic sensor detection angle ·
Ultrasonic sensor detection angle registration |
Parking Support Brake System | ()
|
| Rear television camera assembly optical axis (Back camera position setting) | Parking assist monitor system | ()
|
|
| Perform headlight ECU sub-assembly LH initialization | Lighting System (EXT) (w/ Automatic Headlight Beam Level Control System) | ()
|
|
| Rear height control sensor sub-assembly LH | Perform headlight ECU sub-assembly LH initialization | Lighting System (EXT) (w/ Automatic Headlight Beam Level Control System) | ()
|
- HINT:
- ·
Use the same procedure for the RH side and LH side.
·The following procedure is for the LH side.
PROCEDURE

 1.REMOVE REAR WHEEL
89408C
2.REMOVE REAR HEIGHT CONTROL SENSOR SUB-ASSEMBLY LH (w/ Height Control Sensor)
for LH Side:
Click hereVehicle Exterior>LIGHTING (EXT)>HEIGHT CONTROL SENSOR>REMOVAL
48840A
3.REMOVE REAR STABILIZER LINK ASSEMBLY
48231B
4.REMOVE REAR COIL SPRING
48258C
5.REMOVE REAR LOWER COIL SPRING INSULATOR
48740F
6.REMOVE REAR NO. 2 SUSPENSION ARM ASSEMBLY
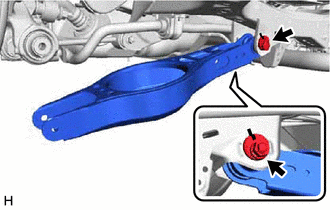
Remove the nut, No. 2 camber adjust cam, rear suspension toe adjust cam sub-assembly and rear No. 2 suspension arm assembly.
- NOTICE:
-
Hold the rear suspension toe adjust cam sub-assembly while rotating the nut.
48720A
7.REMOVE REAR NO. 1 SUSPENSION ARM ASSEMBLY
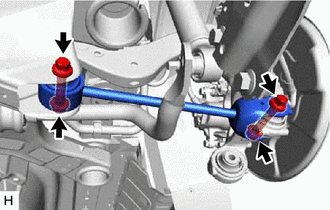
Remove the 2 bolts, 2 nuts and rear No. 1 suspension arm assembly from the rear axle carrier sub-assembly and rear suspension member sub-assembly.
- NOTICE:
-
Because the nut has its own stopper, do not turn the nut. Loosen the bolt with the nut secured.