BRAKE SYSTEM (OTHER) BRAKE BOOSTER(for RHD) REMOVAL
CAUTION / NOTICE / HINT
The necessary procedures (adjustment, calibration, initialization, or registration) that must be performed after parts are removed, installed, or replaced during brake booster with master cylinder assembly removal/installation are shown below.
| Replaced Part or Performed Procedure | Necessary Procedure | Effect/Inoperative Function when Necessary Procedure not Performed | Link |
|---|---|---|---|
| Auxiliary battery terminal is disconnected/reconnected | Perform steering sensor zero point calibration | Lane Tracing Assist System | ( ) |
| Pre-collision System | |||
| Memorize steering angle neutral point | Parking Assist Monitor System | ()
|
|
| Panoramic View Monitor System | ()
|
||
| Replacement of brake booster with master cylinder assembly | 1.
Bleed air 2.
Clear the data stored during previous linear solenoid valve offset learning, ABS holding solenoid valve learning, brake pedal stroke sensor assembly zero point calibration and system information memorization. 3.
Perform linear solenoid valve offset learning, ABS holding solenoid valve learning, brake pedal stroke sensor assembly zero point calibration and system information memorization. |
·
DTCs are stored ·
ABS warning light illuminates ·
Brake warning light / yellow (minor malfunction) illuminates ·
Slip indicator light illuminates ·
VSC disabled or malfunctions |
()for Initialization
( )for Calibration
|
1.
Clear zero point calibration data. 2.
Perform yaw rate and acceleration sensor zero point calibration. |
CAUTION / NOTICE / HINT
- NOTICE:
-
While the auxiliary battery is connected, even if the power switch is off, the brake control system activates when the brake pedal is depressed or any door courtesy switch turns on. Therefore, when servicing the brake system components, do not operate the brake pedal or open/close the doors while the auxiliary battery is connected.
PROCEDURE

 1. PRECAUTION
- NOTICE:
-
After turning the power switch off, waiting time may be required before disconnecting the cable from the negative (-) auxiliary battery terminal. Therefore, make sure to read the disconnecting the cable from the negative (-) auxiliary battery terminal notices before proceeding with work.
-
Click hereGeneral>INTRODUCTION>REPAIR INSTRUCTION>PRECAUTION
55708
2.REMOVE COWL TOP VENTILATOR LOUVER SUB-ASSEMBLY
53607A
3.REMOVE FRONT CENTER UPPER SUSPENSION BRACE SUB-ASSEMBLY
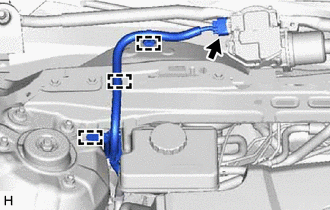
Disconnect the connector.
Disengage the 3 clamps and separate the wire harness.
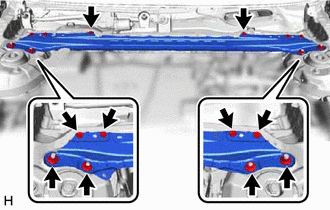
Remove the 6 bolts, 4 nuts and front center upper suspension brace sub-assembly.
12601B
4.REMOVE NO. 1 ENGINE COVER SUB-ASSEMBLY
5.PERFORM ACCUMULATOR PRESSURE ZERO DOWN
Using the GTS, perform the accumulator pressure zero down operation.
Connect the GTS to the DLC3 with the power switch off.
Turn the power switch on (IG).
Turn the GTS on and enter the following menus: Chassis / ABS/VSC/TRC / Utility / ECB (Electronically Controlled Brake system) Utility.
- Chassis > ABS/VSC/TRC > Utility
-
Tester Display ECB Utility - 50005 105 167
Select "Motor Invalid" on the "ECB (Electronically Controlled Brake system) Utility" screen.
Perform "Motor Invalid" according to the display on the GTS.
Enter the following menus: Chassis / ABS/VSC/TRC / Utility / ECB (Electronically Controlled Brake system) Utility.
- Chassis > ABS/VSC/TRC > Utility
-
Tester Display ECB Utility - 50005 105 167
Select "ECB (Electronically Controlled Brake system) Invalid" on the "ECB (Electronically Controlled Brake system) Utility" screen.
Perform "ECB (Electronically Controlled Brake system) Invalid" according to the display on the GTS.
Depress the brake pedal 40 times or more to return all the fluid in the accumulator back to the reservoir.
- HINT:
-
A buzzer may sound due to low accumulator pressure. As this is not a malfunction, continue the procedure.
Check that the brake pedal is firm.
- NOTICE:
-
If the brake pedal is not firm or the pump motor continues to operate even after depressing the brake pedal 40 times or more, the accumulator pressure zero down operation is not complete.
Turn the GTS off and turn the power switch off.
Disconnect the GTS from the DLC3.
Disconnect the cable from the negative (-) auxiliary battery terminal.
When the accumulator pressure zero down could not be performed using the GTS.
- NOTICE:
-
If DTCs are output, the accumulator pressure zero down operation may not be complete. In this case, perform the following procedure.
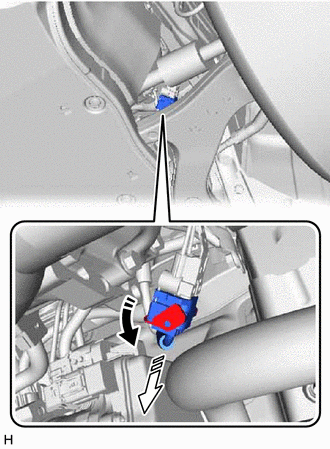

|
Release the lock lever |

|
Disconnect the connector |
With the power switch off, release the lock lever and disconnect the brake booster pump assembly connector as shown in the illustration.
- NOTICE:
-
Be careful not to allow any brake fluid to enter the connector.
Depress the brake pedal 40 times or more to return all the fluid in the accumulator back to the reservoir.
Check that the brake pedal is firm.
- NOTICE:
-
If the brake pedal is not firm or the pump motor continues to operate even after depressing the brake pedal 40 times or more, the accumulator pressure zero down operation is not complete.
Disconnect the cable from the negative (-) auxiliary battery terminal.
6.DRAIN BRAKE FLUID
- NOTICE:
-
If brake fluid leaks onto any painted surface, immediately wash it off.
82111
7.SEPARATE ENGINE ROOM MAIN WIRE
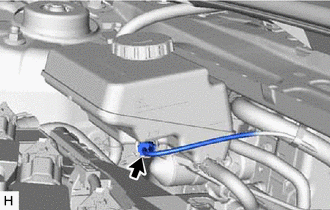
Disconnect the connector from the brake booster with master cylinder assembly.
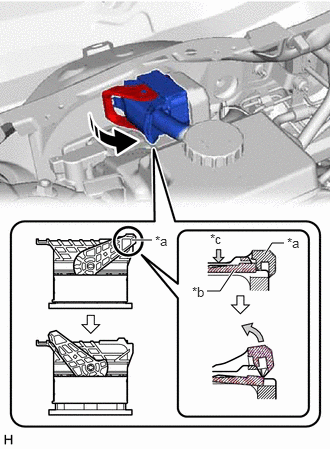
| *a | Lock Lever |
| *b | Lock Arm |
| *c | Push |
|
|
Release the lock lever |
Push the lock arm of the connector to disengage the lock and release the lock lever as shown in the illustration.
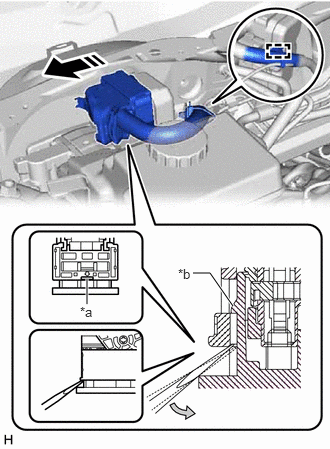
| *a | Screwdriver Insertion Point |
| *b | Pre-lock |
|
|
Disconnect the connector |
Using a screwdriver, release the pre-lock and disconnect the connector from the brake booster with master cylinder assembly as shown in the illustration.
- NOTICE:
-
Be careful not to allow any brake fluid to enter the connector.
Disengage the clamp to separate the engine room main wire.
44571A
8.DISCONNECT NO. 1 BRAKE ACTUATOR HOSE
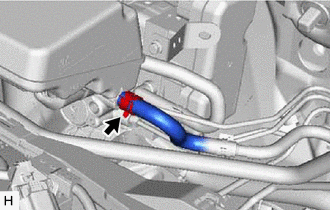
Slide the clip and disconnect the No. 1 brake actuator hose from the brake booster with master cylinder assembly.
44551C
9.SEPARATE NO. 1 BRAKE ACTUATOR TUBE
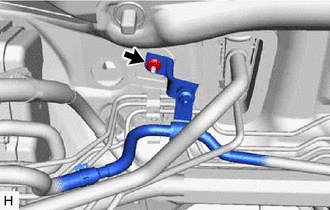
Remove the nut and separate the No. 1 brake actuator tube from the vehicle body.
10.DISCONNECT BRAKE LINE
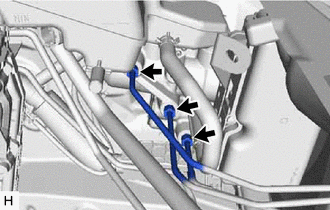
Using a union nut wrench, disconnect the 3 brake lines from the brake booster with master cylinder assembly.
- NOTICE:
- ·
Do not kink or damage the brake lines.
·Do not allow any foreign matter such as dirt or dust to enter the brake lines from the connecting parts.
78111
11.REMOVE ACCELERATOR PEDAL
47264A
12.REMOVE PUSH ROD PIN
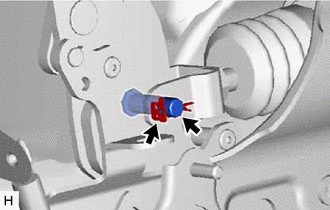
Remove the clip and push rod pin.
47210L
13.REMOVE BRAKE BOOSTER WITH MASTER CYLINDER ASSEMBLY
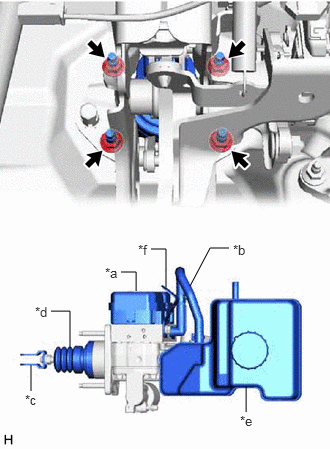
| *a | Skid Control ECU |
| *b | No. 1 Reservoir Hose |
| *c | Brake Master Cylinder Push Rod Clevis |
| *d | Boot |
| *e | Master Cylinder Reservoir Assembly |
| *f | Brake Actuator Bracket |
Remove the 4 nuts and brake booster with master cylinder assembly.
- NOTICE:
- ·
Do not kink or damage the brake lines.
·Do not carry the brake booster with master cylinder assembly by the parts shown in the illustration.
·Be careful not to allow any brake fluid to enter the connector.
44785D
14.REMOVE BRAKE MASTER CYLINDER GASKET